 TheWoWDB
I was able to two-pet this battle with two moth-type pets (in my case, Amber Moth and Ashwing Moth). Both had Alpha Strike / Cocoon Strike / Moth Dust.
1. Moth Dust on CD
2. Cocoon Strike on CD
3. Alpha Strike as fillerI won on my first try.
Quest

Fight Night: Amalia
A World of Warcraft quest in Dalaran. Facts and objectives from the current retail game data.
The highest voted Wowhead comments for this page. They are community notes, not TheWoWDB comments.
Fight Night: Amalia is randomly available in Dalaran (27.89, 23.20) and only visible if you've unlocked World Quests. Rewards will vary.
Amalia will have the following team (all level 25 rares):
1. [npc=107492]beast[pet-ability=578][pet-ability=668][pet-ability=362]2. [npc=107491]beast[pet-ability=905][pet-ability=1357][pet-ability=228]3. [npc=107493]elemental[pet-ability=1359][pet-ability=1687][pet-ability=1354]
- World Quest Team: I usually use a [npc=24968] (1,2,2) (alts), a shielded aquatic like [npc=63005] (2,2,1) (alts), and a second aquatic (2nd crab is good, water strider is also good).
- Foof: [pet-ability=634] > [pet-ability=777] > 2x[pet-ability=293] > if needed: [pet-ability=777]
- Stumpers: [pet-ability=634] hits, clean up with [pet-ability=777] or 2x[pet-ability=293]
- Lil' Sizzle: burn out mech, then bring in crab - maintain [pet-ability=310], [pet-ability=123] as needed (or for something to do while puppies are submerged), [pet-ability=509] to fill - use 2nd aquatic's attacks as needed if/when swapped
Amalia is part of Family Familiar
(Use the Spoiler tags to view the strats as they're developed/linked.)
Aquatic: Aquatic Acquiescence
- [npc=98116] (1,2,2) +2 Aquatic backups. There are alternate jellyfish, but Bleak has highest Power stat.
Strategy: here | Credit: TheCrosshare
Beast: Best of the Beasts
- Team: [npc=97531] (2,1,2) | [npc=61753] (2,1,2) | [npc=63304] (2,1,2)
Full list of larve/maggot/grub(bs): here
Strategy: here | Credit: fabianfreidberg
Critter: Mousing Around
I was going to make a "3 blind mice" joke ("joke") team - but really a snail works better in slot 3 since Lil' Sizzle is elemental.
- Team: [npc=111158] (1,1,2) (alt) | [npc=82715] (1,1,2) (alt) | [npc=98446] (2,2,1) (alts)
We're adding an element of RNG to this fight with [pet-ability=256], which might make Stumpers's [pet-ability=905] more annoying. The advantage it gives your Critters should still (mostly) outweigh misses/dodges. My Blind Rat was not rare quality and still made it halfway through the fight on 3 of 5 attempts, though.
vs. Foof[pet-ability=256] on CD, [pet-ability=1371] to fillvs. StumpersMaintain [pet-ability=165], [pet-ability=256], [pet-ability=1371] to fill
- If 1st rat dies, have 2nd rat avenge by repeating priorities.vs. Lil' SizzleWhen snail comes in: maintain [pet-ability=310], save [pet-ability=564] until final round of [pet-ability=1354], [pet-ability=449] to fill
Dragonkin: Dragons!
- Option 1: slow and steady with [npc=68662] (2,2,2) - Ledning's strat is here. Make sure you use two high health Dragonkin backups.
- Option 2: [npc=62395] (2,2,2) (alt) and [npc=68850] (2,2,2) (alts) - TNENoz's strat is here. Use a high health Dragonkin in slot 3.
Elemental: Ragnaros, Watch and Learn
- Soloed with [npc=66950] (2,1,1). Bring two elementals for back-up (make sure they have high HP to help mitigate [pet-ability=668]).
- Spam [pet-ability=419] until Lil' Sizzle dies in the back row, using [pet-ability=123] as needed (I used it round 4 and then on CD).
- After Sizzle has fizzled (sorrynotsorry), start peppering [pet-ability=513] into the rotation & using it on CD.
Flying: Flock Together
- Stack a team with moths that have [pet-ability=504], [pet-ability=506], [pet-ability=508]. Full list of these moths here.
Credit to op by donquixote235 (here).
Humanoid: Murlocs, Harpies, and Wolvar, Oh My!
- Team: [npc=15698] (2,1,2) | [npc=73741] (2,1,1) | [npc=15705] (2,1,2)
(Father Winter and Winter's Little Helpers are interchangeable.)
vs. Foof[pet-ability=206], 3x [pet-ability=413], finish with [pet-ability=586]vs. Stumpers2x [pet-ability=413], refresh [pet-ability=206], swap to Rotten Helper.
[pet-ability=1080] + [pet-ability=1076] (+ [pet-ability=413] w/bad RNG from [pet-ability=905])vs. Lil' Sizzle[pet-ability=413] until Rotten dies. Bring in 2nd Helper. Refresh [pet-ability=206] if needed, [pet-ability=586] on CD (unless Sizz is using [pet-ability=1354]), [pet-ability=413] to fill. Maintain priority if swapped with [pet-ability=1687].
Magic: Master of Magic
- Option 1: If you have [npc=98237] (2,1,2) and an ooze/slime/wasteling, use Rikade's strategy (link) with a 3rd Magic (lists reqs to use for leveling pets, as well).
- Option 2: [npc=88692] (2,2,2) +2 Magic pets (OP used [npc=33227] and [npc=98237]). Strategy: here | Credit: Cantralian.
Mechanical: Roboteer
- Team: [npc=55367] (1,1,2) | [npc=15699] (1,?,2)* | [npc=12419] (1,1,1)
*You can use [pet-ability=209] as a guide for substitutions, if you'd like. Of the Ion Cannon Mechs (with single breeds to make it easier), [npc=55356] (1,1,2) has the most health, [npc=84885] (1,?,2) has the highest power. Pets were suggested here by Zuckerguss - I added 3rd pet and moves/strategy.
vs. Foof[pet-ability=647] -> [pet-ability=334] -> [pet-ability=777] until Foof is deadvs. Stumpers[pet-ability=647] on CD & [pet-ability=777] to fill ([pet-ability=334] if it comes off CD)
Match will vary due to [pet-ability=905] procs.
If Zep dies, bring in Yeti & [pet-ability=384] until Stumpers is dead.vs. Lil' SizzleIf Zep: Continue [pet-ability=334] > [pet-ability=647] > [pet-ability=777] until death, bring in Yeti.
If Yeti: If active when Sizz comes out - [pet-ability=209], otherwise [pet-ability=384] until [pet-ability=1354] is over, then [pet-ability=209].
Lifelike Toad should be brought in with [pet-ability=1687]. Prioritize: [pet-ability=233] > [pet-ability=123] as needed > [pet-ability=118]
Undead: The Lil' Necromancer
- Soloed with [npc=61905] (2,2,2) (same moves as [npc=97952])
- brought 2 undead backups: [npc=83817] (2,2,2) | [npc=97324] (2,2,2)
[pet-ability=449] the round after you're debuffed ([pet-ability=362]), otherwise [pet-ability=299].
Terror Larva 2/1/2
Maggot 2/1/2
Jungle Grub 2/1/2Start with Burrow keep using as soon as it is of cool down
Consume on cool down and fill in with Acidic GooI was able to take Foof and Stumpers down with Terror Larva
When Terror Larva died to Lil' Sizzle I brought in the Maggot or Jungle Grub keep the last maggot type as a backup if necessary.
I tried it several times and was successful every time. Hope this helps
Quest facts
Quest ID42442
The Blizzard quest API has no row for this quest, so its quest text and rewards are not shown - only what the client game files carry.
Check whether you have already completed this quest
in-game: /run print(C_QuestLog.IsQuestFlaggedCompleted(42442))
Requirements
Quest typeBattle Pet World Quest
Read from the quest filters in the current retail client build.
Objectives
- Defeat Amalia
Where to go
Pins are the quest’s own POI points from the current retail client, projected onto the in-game zone map. The game marks one blob as the quest’s turn-in; the rest are objective areas. Points that fall outside a map’s window are dropped rather than guessed at.
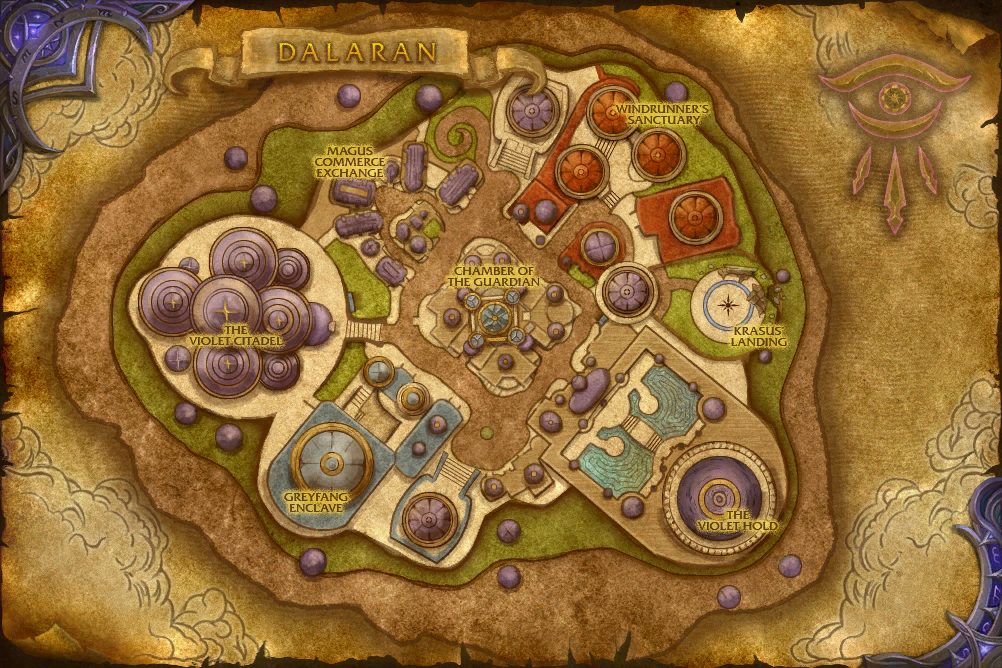 Objective area
In-game waypoint: /way #627 28.9 23.6
Coordinates
- Objective areaDalaran 28.9, 23.6
/way #627 28.9 23.6
Map coordinates of the pins above. An area the client draws as a shape is given by the centre of its points.
Nearby on the Dalaran map
- Mail Men about 50 yards
- Black Rook Bandit about 50 yards
- Too Good To Pass Up about 50 yards
- Leather Legwork about 50 yards
- Skin Deep about 60 yards
- From Head to Toe about 60 yards
- Over Your Head about 60 yards
- Adventuring Anxieties about 60 yards
- The Necessary Materials about 60 yards
- Battle Bonds about 60 yards
Quests whose map markers the client places closest to this one on Dalaran, nearest first. Distances are straight lines between the markers.
Getting there
Flight points closest to the quest’s first objective area marker on Dalaran:
- Dalaran
- Western Suramar
- Shackle's Den, Azsuna
Straight-line distances in yards between the quest’s own map markers (QuestPOI) and the client’s flight-point positions (TaxiNodes); flight paths and terrain are not modelled.
Objective targets
Amalia
KindCreature
Title<Grand Master Pet Tamer>
TypeHumanoid
RankNormal
Creature, object and item facts from the current retail client; “also asked for by” lists other quests whose objectives name the same target. Prices are the US commodity auction house’s lowest listed price.
Community notes from Wowhead · 128 comments
Top 3 shown aboveThe comments below were written by Wowhead users. They are community notes, not TheWoWDB comments. See them in context on Wowhead.
The top 3 are shown in Top Comments above. Read all 128 on Wowhead.
Where this quest fits
Other storylines on the Dalaran map
- Legion Alchemy
- Legion Tailoring
- Legion Leatherworking
- Legion Inscription
- Legion Blacksmithing
- Legion Engineering
Steps, storylines and map placement from the client’s QuestLine, prerequisite and QuestPOI data; neighbouring quest text is Blizzard’s own (quest API), shortened to its opening sentences.
Achievements
Completing this quest counts toward these achievements.
Battle on the Broken IslesComplete 30 Pet Battle World Quests on the Broken Isles.10Variety is the Spice of LifeComplete 100 different Legion World Quests.10


- Battle on the Broken Isles: its criteria name 37 quests, this one included.
- Variety is the Spice of Life: its criteria name 967 quests, this one included.