 TheWoWDB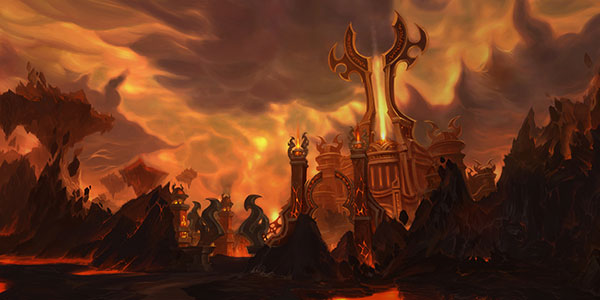
Raid - Cataclysm
Firelands
7 encounters, 1 boss abilities and 421 drops, with the Adventure Guide’s own ability and strategy notes for each fight. Every drop links to its item page; tradeable drops carry a live Auction House price.
The Firelands is the molten domain forged by the titans to house Ragnaros and his wayward minions. Following Deathwing's emergence into Azeroth, Ragnaros and his servants surged onto the slopes of Mount Hyjal before being driven back by the sacred mountain's valiant defenders. Now Ragnaros is rallying his loyalists to defend the Firelands from Azeroth's champions.
Quick Facts
| Type | Raid |
|---|---|
| Expansion | Cataclysm |
| Encounters | 7 |
| Boss abilities | 1 |
| Drops | 421 |
| Item level | 1 to 60 |
| Tradeable drops | 19 |
| Difficulties | Normal, Heroic, 10 Player, 25 Player, 10 Player (Heroic), 25 Player (Heroic), Timewalking |
Difficulties and Lockouts
Firelands has 3 difficulties in the game data: Normal, Heroic and Timewalking save you to a weekly lockout.
| Difficulty | Players | Level range | Lockout |
|---|---|---|---|
| Normal | 30 | 35 | Weekly |
| Heroic | 30 | 35 | Weekly |
| Timewalking | 30 | 35+ | Weekly |
Loot Table Value
19 of Firelands’s 421 drops are tradeable, and 12 of those are on the Auction House right now. The richest is Flickering Shoulderpads at 500,000g (median across 19 realms).
| Tradeable drop | Median price | Cheapest listing | Listed on |
|---|---|---|---|
| Flickering Shoulderpads | 500,000 gold | 40,000 gold | 19 realms |
| Ward of the Red Widow | 500,000 gold | 150,000 gold | 37 realms |
| Volcanospike | 350,000 gold | 99,997 gold | 53 realms |
| Goblet of Anger | 345,000 gold | 20,000 gold | 63 realms |
| Arachnaflame Treads | 315,000 gold | 10,000 gold | 53 realms |
| Wristwraps of Arrogant Doom | 307,500 gold | 10,000 gold | 50 realms |
| Glowing Wing Bracers | 250,000 gold | 10,000 gold | 53 realms |
| Treads of Implicit Obedience | 185,000 gold | 5,000 gold | 49 realms |
| Coalwalker Sandals | 150,000 gold | 10,000 gold | 53 realms |
| Volcanospike | 8,463 gold | 100 gold | 68 realms |
| Ward of the Red Widow | 4,237 gold | 100 gold | 55 realms |
| Flickering Shoulderpads | 3,047 gold | 100 gold | 54 realms |
Median is the middle price across every connected realm that currently lists the item, from our own Auction House scan, updated 2h ago.
Where It Is
The entrance to Firelands is in Sulfuron Spire, Mount Hyjal at 47.0, 78.2.
 NordrassilGrove of AessinaShrine of AvianaHyjal HotfootNordrassil SpiralEntrance 47.0, 78.2
Mount Hyjal, from the game’s own world map art. The framed marker is the Adventure Guide entrance; gold diamonds are the zone’s landmarks.
3D Model
First-party render from the game files. Model © Blizzard Entertainment.
Instance Map
The Adventure Guide places 7 bosses of Firelands on 2 maps. Numbers follow the encounter order; each links to that fight below.
Firelands
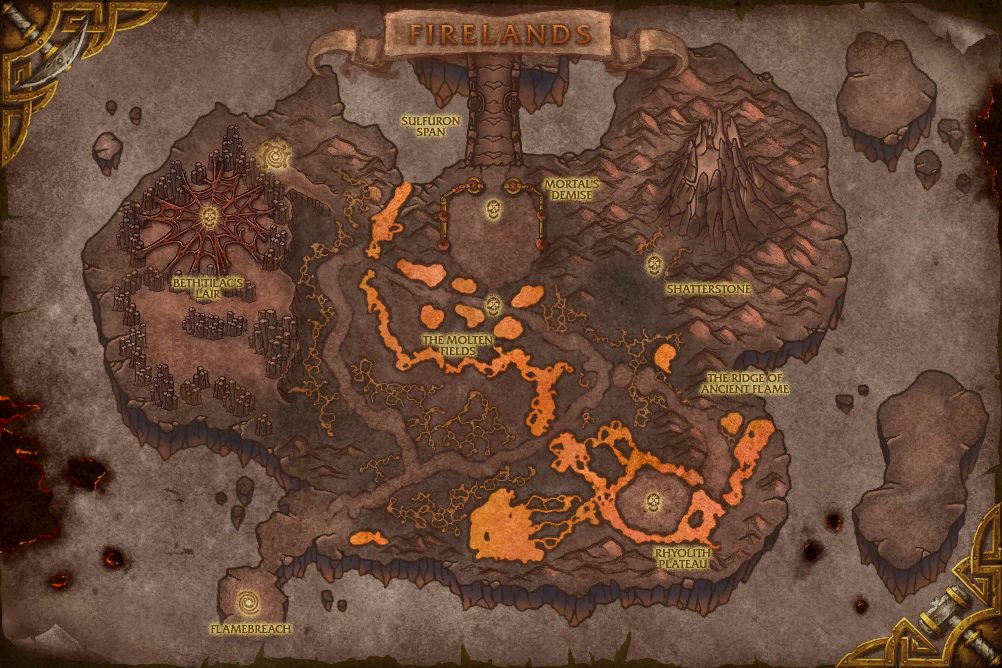 1Beth'tilac2Lord Rhyolith3Alysrazor4Shannox5Baleroc, the Gatekeeper
- 1 Beth'tilac 21.1, 32.8
- 2 Lord Rhyolith 65.4, 75.0
- 3 Alysrazor 64.4, 38.0
- 4 Shannox 49.3, 44.3
- 5 Baleroc, the Gatekeeper 49.5, 31.0
Firelands
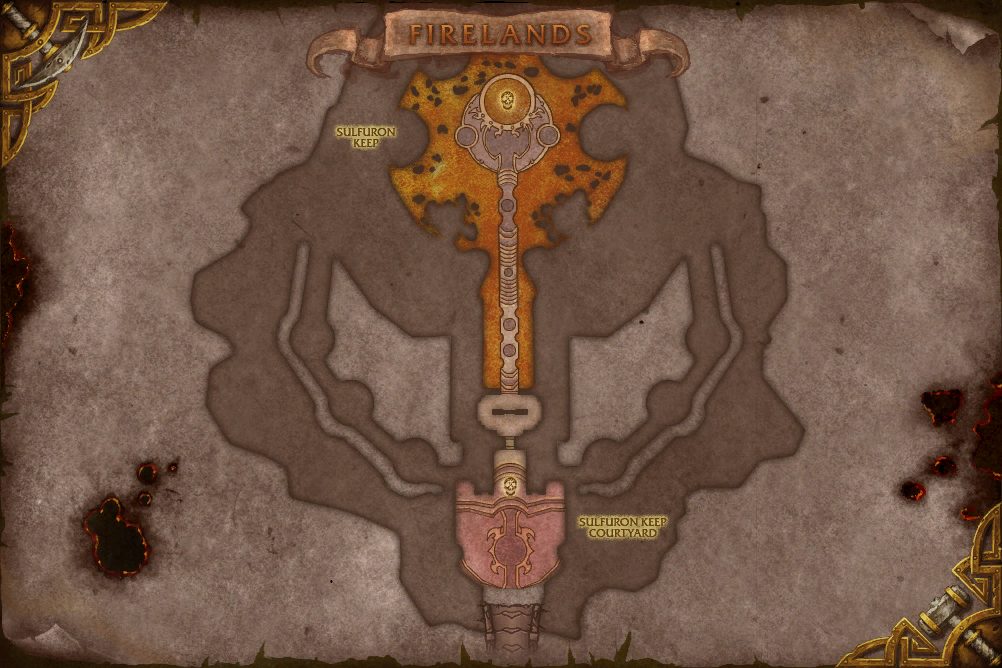 6Majordomo Staghelm7Ragnaros
- 6 Majordomo Staghelm 51.0, 72.5
- 7 Ragnaros 50.8, 15.4
Encounters
NNormalHHeroic10P10 Player25P25 Player10P H10 Player (Heroic)25P H25 Player (Heroic)TWTimewalking
Beth'tilac
Matriarch of the Cinderweb Brood, Beth'tilac and her merciless offspring sate their appetites by sucking the magma and fire from the corpses of elementals. To provide her broodlings with added sustenance, Beth'tilac has woven a network of incendiary webs throughout her lair to trap unsuspecting prey.
Abilities & Strategy
Overview
Beth'tilac begins the encounter above the playspace and will come down after she has cast Smoldering Devastation three times. Players can access this area by interacting with a Cinderweb Spinner's webstring and deal some damage Beth'tilac before she descends for Stage Two. Once Beth'tilac descends players must defeat Beth'tilac before her Frenzy level becomes too much to survive.
Tanks
- Cinderweb Spinners can be forced to drop off of their webstring by using a taunt effect on them.
- If no one is at Beth'tilac's level during Stage One, she will constantly cast Venom Rain.
- Point Cinderweb Drones' Boiling Spatter away from your allies.
- Once Beth'tilac descends, coordinate with your other tank to manage the decreased healing from Widow's Kiss.
- In Stage Two, keep Beth'tilac away from any Cinderweb Spiderlings or she will Consume them.
- If up above in Stage One, jump down before Beth'tilac casts Smoldering Devastation.
Healers
- If no one is at Beth'tilac's level during Stage One, she will constantly cast Venom Rain.
- Anyone at the same level as Beth'tilac will take damage from her Ember Flare.
- When Beth'tilac's energy is depleted she will cast Smoldering Devastation.
- If up above in Stage One, jump down before Beth'tilac casts Smoldering Devastation.
Damage Dealers
- Cinderweb Drones are not defeated before their energy reaches zero they will ascend to drain Beth'tilac of her energy, hastening the next cast of Smoldering Devastation.
- Beth'tilac constantly damages players at the same level she is with Ember Flare, make sure you have a healer and tank up above before you take one of Cinderweb Spinners' web strings.
- If up above in Stage One, jump down before Beth'tilac casts Smoldering Devastation.
Stage One: The Cinderweb
Beth'tilac retreats to the top of her web at the beginning of the encounter.
Fire Energy
Beth'tilac slowly loses Fire Energy over time. Cinderweb Drones also siphon some of her energy when their own energy is depleted. Whenever Beth'tilac runs out of Fire Energy, she will set herself ablaze, causing Smoldering Devastation.
Ember Flare
Intense heat burns enemies near Beth'tilac, inflicting Fire damage to players at the same level as Beth'tilac.
Meteor Burn
The meteor also burns a hole in the web through which players may fall.
Consume
Beth'tilac consumes Cinderweb Spiderlings, healing Beth'tilac for 10% of her maximum health.
Smoldering Devastation
When Beth'tilac's Fire Energy fully depletes, she will set herself ablaze and inflict Fire damage on all players located at her same level.
 Venom Rain
Cinderweb Spinner
Cinderweb Spinners dangle from the web above on a filament strand. Using Taunt or a similar ability on a Spinner will cause them to drop to the ground. Once killed, their web filament remains. Players may then interact with the filament and move to the top of the web.
Burning Acid
The Cinderweb Spinner spits burning venom at a random player, inflicting Fire damage.
Fiery Web Spin
The Cinderweb Spinner channels a fiery web onto a random player, stunning them for 25 sec.
Cinderweb Drone
These large spiders climb out of caves below the Cinderweb. When their Fire Energy fully depletes, the Cinderweb Drone climbs up to Beth'tilac and siphons Fire Energy from her.
Consume
Cinderweb Drones consume a Cinderweb Spiderling, healing itself for% of its maximum life, increasing damage dealt by%, and increasing movement speed by%.
Boiling Splatter
The Cinderwb Drone spits burning venom in a 20 yard long 60 degree forward cone, inflicting Fire damage on any enemy within the area.
Burning Acid
The Cinderweb Drone spits Burning Acid at a random player, inflicting Fire damage.
Fixate
The Cinderweb Drone fixates on a random player, ignoring all other targets but decreasing its damage dealt by 75% for 10 sec.
Cinderweb Spiderling
These tiny spiders climb out of caves below the Cinderweb. They instinctively move towards Cinderweb Drones.
Seeping Venom
The Cinderweb Spiderling leaps onto a random player within 5 yards, injecting them with venom and inflicting Fire damage every 2 seconds for 10 sec.
Engorged Broodling
These unstable spiders fixate on a random player and cast Volatile Burst when they reach their target.
Volatile Burst
Stage Two: The Frenzy!
After she has performed Smoldering Devastation three times, Beth'tilac enters a frenzy. She lowers herself from the safety of the top of her Cinderweb and no longer calls for aid from her brood.
Frenzy
Beth'tilac periodically casts Frenzy, increasing her damage dealt by 5% until the end of the encounter. This effect stacks.
The Widow's Kiss
Beth'tilac's deadly kiss boils the blood of her current target, reducing the healing dealt to the target by% every 2 seconds for 20 sec.
Ember Flare
Beth'tilac emits a blazing heat, inflicting Fire damage to enemies on the same level as Beth'tilac.
Consume
Beth'tilac consumes Cinderweb Spiderlings, healing Beth'tilac for 10% of her maximum health.
Loot
66 drops · item level 1 to 60 · 11 slots (Chest, Feet, Finger, Hands, Head, Legs +5 more) · 5 tradeable
 Arachnaflame TreadsArachnaflame TreadsArachnaflame Treads
 Avool's Incendiary ShankerAvool's Incendiary ShankerAvool's Incendiary Shanker
 Carapace of Imbibed FlameCarapace of Imbibed FlameCarapace of Imbibed Flame
 Cindersilk GlovesCindersilk GlovesCindersilk Gloves
 Cinderweb LeggingsCinderweb LeggingsCinderweb Leggings
 Cowl of the Clicking MenaceCowl of the Clicking MenaceCowl of the Clicking Menace
 Crystallized Firestone
 Entrail DisgorgerEntrail DisgorgerEntrail Disgorger
 Eye of PurificationEye of PurificationEye of Purification
 Firethorn MindslicerFirethorn MindslicerFirethorn Mindslicer
 Flickering ShouldersFlickering ShouldersFlickering Shoulders
 Funeral PyreFuneral PyreFuneral Pyre
 Mandible of Beth'tilacMandible of Beth'tilacMandible of Beth'tilac
 Robes of Smoldering DevastationRobes of Smoldering DevastationRobes of Smoldering Devastation
 Shatterskull BonecrusherShatterskull BonecrusherShatterskull BonecrusherSmoldering Censer of PuritySmoldering Censer of PuritySmoldering Censer of Purity
 Spaulders of Manifold EyesSpaulders of Manifold EyesSpaulders of Manifold Eyes
 Spidersilk SpindleSpidersilk SpindleSpidersilk Spindle
 Thoracic Flame KiltThoracic Flame KiltThoracic Flame Kilt
 Ward of the Red WidowWard of the Red WidowWard of the Red Widow
 Widow's KissWidow's KissWidow's Kiss
 Zoid's Firelit GreatswordZoid's Firelit GreatswordZoid's Firelit Greatsword
 Cinderweb Egg
 Living Ember
Lord Rhyolith
Rhyolith is one of the most ancient elementals in existence, born from the primordial fires that forged Azeroth itself. He is responsible for the creation of new elementals in the Firelands and still possesses a searing hatred of the titans for what he considers monumental arrogance in relocating him.
Abilities & Strategy
Overview
The encounter consists of two stages. In Stage One, players must force Rhyolith to step on randomly spawned volcanoes by hitting either of his feet. Damaging one foot more than the other causes Rhyolith to walk in that direction. Evenly damaging the two feet will force Rhyolith to walk in a straight line. Stage Two is a race to defeat Rhyolith before his Immolation ability burns the raid down.
Tanks
- During Stage One, you will tank adds that spawn throughout the playspace. In Stage Two, you will need to tank Rhyolith.
- Sparks of Rhyolith inflict Fire damage to all nearby players.
Healers
- As the number of Volcanoes increases, the frequency of Eruption increases.
- In Phase Two, Immolation will continually burn your raid.
Damage Dealers
- Rhyolith's movements are controlled by the ratio of damage being done to his two feet. More damage on the right foot will make him turn right; and more damage on the left foot will make him turn left. Damaging both equally will cause him to move in a straight line.
- Damaging Rhyolith's body in Stage One will equally distribute the damage between both of Rhyolith's feet.
- Don't let Rhyolith reach the lava around hit platform or else he will Drink the Magma.
- If Rhyolith steps on an active volcano, he will lose armor. If he steps on a dormant volcano, he will gain armor.
Stage One: Nuisances, Nuisances!
Lord Rhyolith ignores players while his armor is intact, but they can attack his feet to control his movement.
Obsidian Armor
Lord Rhyolith awakens encrusted in a thick coat of Obsidian Armor, which reduces all damage he takes by 80%. Lord Rhyolith's Obsidian Armor is reduced by 10% every time he steps on an active volcano. In Heroic Difficulty when Lord Rhyolith steps on an Active Volcano, 5 Liquid Obsidian creatures spawn around him.
Liquid Obsidian
The Liquid Obsidian moves towards Lord Rhyolith, and casts Fuse when it reaches him.
Concussive Stomp
Lord Rhyolith smashes the ground, inflicting Fire damage to all players. Each stomp creates two to three volcanoes.
Volcano
Lord Rhyolith ignites a Volcano, causing it to inflict Fire damage to random players every 2 sec. When struck, the player takes 5% additional Fire damage for 15 sec. This effect stacks up to 20 times.
Crater
Lord Rhyolith creates a crater when he steps on an active volcano. Occasionally, Lord Rhyolith causes streams of lava to flow from a crater. The moving stream of lava inflicts Fire damage to any player in its path. After 10 sec. the stream of lava erupts, inflicting Fire damage to any player standing within a lava stream.
Thermal Ignition
Lord Rhyolith releases a jet of cinders, inflicting Fire damage to players within 7 yards and creates either 5 Fragments of Rhyolith or 1 Spark of Rhyolith.
Fragment of Rhyolith
Fragments of Rhyolith have low health. If not slain within 30 sec, they inflict damage equal to their current health to a random player.
Spark of Rhyolith
Drink Magma
Stage Two: Now you will BURN!
When Lord Rhyolith reaches 25% remaining health, his Obsidian armor shatters. He becomes attackable and no longer ignores players.
Immolation
Unleashed Flame
Loot
62 drops · item level 25 to 60 · 10 slots (Back, Chest, Feet, Hands, Head, Neck +4 more) · 3 tradeable
 Arbalest of Erupting FuryArbalest of Erupting FuryArbalest of Erupting FuryAvool's Incendiary ShankerAvool's Incendiary ShankerAvool's Incendiary Shanker
 Cracked Obsidian StompersCracked Obsidian StompersCracked Obsidian StompersCrystallized Firestone
 Dreadfire DrapeDreadfire DrapeDreadfire Drape
 Earthcrack BracersEarthcrack BracersEarthcrack BracersEntrail DisgorgerEntrail DisgorgerEntrail DisgorgerEye of PurificationEye of PurificationEye of Purification
 Fireskin GauntletsFireskin GauntletsFireskin GauntletsFirethorn MindslicerFirethorn MindslicerFirethorn Mindslicer
 Flaming Core ChestguardFlaming Core ChestguardFlaming Core Chestguard
 Flickering CowlFlickering CowlFlickering Cowl
 Grips of the Raging GiantGrips of the Raging GiantGrips of the Raging Giant
 Heartstone of RhyolithHeartstone of RhyolithHeartstone of Rhyolith
 Hood of Rampant DisdainHood of Rampant DisdainHood of Rampant Disdain
 Incendic ChestguardIncendic ChestguardIncendic Chestguard
 Lava Line WristbandsLava Line WristbandsLava Line WristbandsShatterskull BonecrusherShatterskull BonecrusherShatterskull BonecrusherSmoldering Censer of PuritySmoldering Censer of PuritySmoldering Censer of Purity
 VolcanospikeVolcanospikeVolcanospikeZoid's Firelit GreatswordZoid's Firelit GreatswordZoid's Firelit GreatswordLiving Ember
Alysrazor
When Ragnaros's forces surged into Mount Hyjal, the green dragon Alysra betrayed her allies and helped liberate the traitorous archdruid Fandral Staghelm. As a reward, she was purified with fire and reborn as a fearsome fire hawk.
Abilities & Strategy
Overview
The fight begins with some members of your raid collecting Molten Feathers to fly after Alysrazor while the rest of the raid stays below to handle several adds. Once this stage ends, players must regroup down on the ground and avoid Alysrazor's attacks before she spends all of her energy, making her vulnerable for a short time. Once she has regained half of her energy she becomes active again, fighting from the ground. When she finally reaches full energy she will return to her Stage One activities. This cycle repeats until Alysrazor is defeated.
Tanks
- Voracious Hatchlings will Imprint on the nearest player they see when they spawn.
- Move Voracious Hatchlings near a Plump Lava Worm to keep them Satiated or else they will start throwing Tantrums.
- Blazing Talon Initiates do not need to be tanked.
- Work with the other tank to manage your stacks of Blazing Claw in Stage Four.
Healers
- Tanks will take significantly more damage in Stage One if their Voracious Hatchling throws a Tantrum.
- During Stage Two you will need to move constantly.
- In Stage Three, no damage should go out on the raid.
- In Stage Four, Alysrazor will constantly pulse Fire damage to the raid. When Stage Four ends she emits one final, large burst of Fire damage.
Damage Dealers
- Blazing Talon Initiates will gain stacks of Fire it Up! if they successfully cast Fieroblast.
- Most abilities in Stage One are avoidable.
- Blazing Talon Clawshapers that spawn in Stage Three will give Molten Power to Alysrazor if they are not controlled with stuns and interrupts.
Fliers
- Picking up a Molten Feather after Alysrazor takes to the air in Stage One will give you Wings of Flame.
- While you have Wings of Flame, you can cast while moving.
- Pass through the Rings of Fire while flying to gain Blazing Power and refresh the duration of Wings of Flame.
Firestorm
At the beginning of the battle Alysrazor ascends into the sky, inflicting Fire damage to players and knocking them back. Alysrazor continues to inflict Fire damage to players every 1 sec. for 10 sec.
Volcanic Fire
A massive eruption creates patches of Fire which block escape from Alysrazor's domain.
Stage One: I Will Burn You From the Sky!
Alysrazor flies around the arena, allowing her minions to corner her foes far below. She periodically flies through the center of the arena to claw at foes.
Blazing Claw
Alysrazor claws her way through the center of the arena, inflicting Physical damage to enemies in a 25 yard long 90 degree cone every 1.5 seconds. Each swipe also increases the Fire and Physical damage dealt to the target by 10% for 15 sec.
Firestorm
Alysrazor faces the center of the arena and kicks up a powerful, fiery wind.
Molting
Alysrazor molts, creating Molten Feathers nearby.
Molten Feather
Players can pick up to three Molten Feathers. While holding a Molten Feather, all spells can be cast while moving and movement speed increases by 30% per feather. Once a player obtains three Molten Feathers, they gain Wings of Flame.
Flying
Players with Wings of Flame contend with additional elements of the battle.
Blazing Power
Alysrazor periodically creates rings of fire which last for 3 seconds. Players passing through the ring gain Blazing Power, increasing haste by 8%. Each stack of Blazing Power restores mana, rage, energy, runic power, and holy power, and refreshes the duration of Wings of Flame.
Alysra's Razor
If a player gains 25 stacks of Blazing Power, they gain Alysra's Razor. This increases the player's critical strike chance by 75% for 40 sec.
Incendiary Cloud
Alysrazor periodically creates an increasing number of Incendiary Clouds lasting for 3 seconds. Players that pass through the cloud suffer Fire damage every 1.5 sec. In Heroic Difficulty, Alysrazor always creates three Incendiary Clouds.
Blazing Talon Initiate
Blazing Talon Initiates periodically fly in to assist Alysrazor in defeating enemy forces on the ground.
Brushfire
Blazing Shield
The Blazing Talon Initiate calls upon a familiar flame for protection from Alysrazor's Firestorm.
Fieroblast
Fire it Up!
When a Blazing Talon Initiate casts Fieroblast, they gain a stack of Fire it Up! This effect increases the Initiate's damage dealt by 10% and casting speed by 10%.
Voracious Hatchling
Early in Stage 1, two Blazing Broodmothers drop off two Molten Eggs. After several seconds the eggs hatch into Voracious Hatchlings. Voracious Hatchlings throw a Tantrum if not fed Plump Lava Worms.
Imprinted
Upon hatching, Voracious Hatchlings imprint on the nearest player. The hatchling only attacks that player, but they gain 1000% additional damage against the hatchling.
Satiated
The Voracious Hatchling will not throw a Tantrum when Satiated, which lasts for 15 sec. Voracious Hatchlings hatch Satiated, and can become Satiated again if a player feeds them Plump Lava Worms.
Hungry
A Voracious Hatchling that is no longer Satiated becomes Hungry.
Tantrum
The Voracious Hatchling throws a Tantrum, increasing damage dealt by 50% and haste by 50%.
Gushing Wound
The Voracious Hatchling strikes all targets within a 10 yard 60 degree cone, causing them to bleed for Physical damage every 0.2 seconds for 1 min. or until the target's health falls below 50% of their maximum health.
Plump Lava Worm
During Stage 1, two sets of four Plump Lava Worms erupt from the molten ground. Players cannot attack Plump Lava Worms. Voracious Hatchlings near a Plump Lava Worm rush to devour it, becoming Satiated.
Lava Spew
Plump Lava Worms spew a molten cone of fire, dealing damage every 1 sec to all enemies within a 18 yard 35 degree cone.
Herald of the Burning End
During Stage 1, a Herald of the Burning End periodically appears and begins casting Cataclysm. The Herald is immune to all damage, but dies when he casts Cataclysm.
Cataclysm
Stage Two: The Skies are Mine!
Alysrazor flies in a tight circle, removes Wings of Flame from all players after 5 seconds, and then begins her ultimate attack.
Fiery Vortex
Harsh Winds
for 5 sec to players farther than 60 yards from the Fiery Vortex. This effect stacks.
Fiery Tornado
Blazing Power
Alysrazor continues to create rings of fire that appear on the ground of the arena and last for 3 seconds. Players passing through the ring gain Blazing Power, increasing their haste by 8%. Each stack of Blazing Power also restores mana, rage, energy, runic power, and holy power.
Stage Three: Burnout!
Alysrazor crashes to the ground with 0 Molten Power and becomes vulnerable. This stage lasts until Alyrazor's energy bar reaches 50 Molten Power.
Burnout
Alysrazor's fire burns out, immobilizing her and increasing her damage taken by 50%. When struck with a harmful spell Alysrazor emits Essence of the Green.
Essence of the Green
If Alysrazor is struck by a harmful spell she emits Essence of the Green, restoring 10% of the caster's maximum mana.
Spark
A bright spark burns within the heart of Alysrazor, restoring Molten Power every 2 seconds.
Blazing Talon Clawshaper
At the start of stage 2, two Blazing Talon Clawshapers fly in and re-energize Alysrazor.
Ignition
Blazing Talon Clawshapers channel molten energy into Alysrazor, restoring Molten Power every 1 sec.
Stage Four: Reborn in Flame!
Alysrazor's fire reignites at 50 Molten Power. This stage lasts until Alysrazor reaches 100 Molten Power.
Ignited
Alysrazor's fiery core combusts once again, rapidly restoring her Molten Power. The core restores Molten Power every 1 sec.
Blazing Buffet
Alysrazor's fiery core emits powerful bursts of flame, inflicting Fire damage to all players every 1 sec. while Alysrazor remains Ignited.
Blazing Claw
Alysrazor claws at her current target, inflicing Physical damage to enemies in a 25 yard long 90 degree cone every 1.5 seconds. Each swipe also increases the Fire and Physical damage dealt to the target by 10% for 15 sec.
Full Power
When Alysrazor reaches 100 Molten Power, she is at Full Power. This deals Fire damage to all players and knocks them back. Alysrazor then begins her Stage 1 activities again.
Loot
88 drops · item level 10 to 60 · 12 slots (Back, Chest, Feet, Finger, Hands, Head +6 more) · 1 tradeable
Alysra's RazorAlysra's RazorAlysra's Razor Alysrazor's BandAlysrazor's BandAlysrazor's BandAvool's Incendiary ShankerAvool's Incendiary ShankerAvool's Incendiary ShankerBalespider's RobesBattleplate of the Molten GiantChestguard of the Molten Giant
 Chest of the Fiery ConquerorChest of the Fiery ProtectorChest of the Fiery Vanquisher
 Clawshaper GauntletsClawshaper GauntletsClawshaper Gauntlets
 Clutch of the FiremotherClutch of the FiremotherClutch of the Firemother
 Craterflame SpauldersCraterflame SpauldersCraterflame SpauldersCrystallized Firestone
 Dark Phoenix Tunic
 Elementium Deathplate BreastplateElementium Deathplate ChestguardEntrail DisgorgerEntrail DisgorgerEntrail Disgorger
 Erupting Volcanic CuirassErupting Volcanic HauberkErupting Volcanic Tunic
 Eye of Blazing PowerEye of Blazing PowerEye of Blazing PowerEye of PurificationEye of PurificationEye of Purification
 Firehawk RobesFirethorn MindslicerFirethorn MindslicerFirethorn Mindslicer
 Flametalon of AlysrazorFlamewaker's Tunic
 Flickering WristbandsFlickering WristbandsFlickering Wristbands
 Greathelm of the Voracious MawGreathelm of the Voracious MawGreathelm of the Voracious MawImmolation BattleplateImmolation BreastplateImmolation Chestguard
 Lavaworm LegplatesLavaworm LegplatesLavaworm Legplates
 Leggings of Billowing FireLeggings of Billowing FireLeggings of Billowing Fire
 Moltenfeather LeggingsMoltenfeather LeggingsMoltenfeather LeggingsObsidian Arborweave RaimentObsidian Arborweave TunicObsidian Arborweave Vestment
 Phoenix-Down TreadsPhoenix-Down TreadsPhoenix-Down Treads
 Robes of the Cleansing FlameShatterskull BonecrusherShatterskull BonecrusherShatterskull BonecrusherSmoldering Censer of PuritySmoldering Censer of PuritySmoldering Censer of Purity
 Spaulders of Recurring FlameSpaulders of Recurring FlameSpaulders of Recurring Flame
Shannox
The flamewakers are among the most feared elemental guardians in the Firelands. Shannox is no exception. Serving as the chief hunter and kennel master of Ragnaros's hell hounds, Shannox patrols the elemental realm with his two most ferocious beasts: Riplimb and Rageface.
Abilities & Strategy
Overview
Shannox will not appear until you have slain a large number of the enemies in the zone. Once engaged, Shannox will attack you with his two companions: Rageface and Riplimb. Shannox will throw his spear and lay down Crystal Prison Traps periodically while Rageface attacks players at random and Riplimb must be tanked. When either Rageface or Riplimb are defeated, Shannox will Frenzy. When Shannox is defeated, both Rageface and Riplimb will gain Frenzied Devotion.
Tanks
- Shannox and Riplimb are immune to Taunt mechanics.
- Rageface fixates on targets at random.
- Use the time when Riplimb retrieves Shannox's spear to reset your applications of Jagged Tear.
Healers
- Rageface fixates on targets at random.
- Victims of Face Rage will need significant healing.
Damage Dealers
- Rageface can be imprisoned by the Crtystal Prison Traps Shannox drops on the ground.
- Rageface will fixate on random members of your raid.
- Bring down all three targets at nearly the same time to avoid the extra damage from Frenzy and Frenzied Devotion.
Immolation Trap
Shannox launches a fiery trap at a random player's location. The trap arms after 2 seconds, then detonates when either a player or one of Shannox's pets steps over the trap. Immolation Trap inflicts Fire damage, Fire damage every 3 sec., and increases the target's damage taken by 40% for 9 sec.
Crystal Prison Trap
Shannox launches a prison trap at a random player's location. The trap arms after 2 seconds, then detonates when either a player or one of Shannox's pets steps over the trap. The Crystal Prison trap encases the target in a block of magma crystal, preventing all movement and any other action. Destroying the crystal prison frees a trapped player.
Arcing Slash
Shannox inflicts 56.25% of normal melee damage in a 120 degree cone up to 10 yards in front of him, and inflicts Jagged Tear on his current target.
Jagged Tear
Shannox's Arcing Slash leaves a Jagged Tear that inflicts Physical damage every 3 sec. for 24 sec. This effect stacks.
Hurl Spear
Shannox hurls his spear at a location near Riplimb. The spear strike also triggers a cascade of molten eruptions around the impact location, inflicting Fire damage to enemies caught in an eruption. Riplimb will then break off from combat, fetch the spear, and return it to Shannox.
Frenzy
When the players defeat Riplimb or Rageface, Shannox enters a frenzy. This increases his Physical damage by 30% and attack speed by 30%. This effect stacks twice.
Magma Rupture
Once Riplimb has been slain, Shannox drives his spear into the ground instead of hurling it. This attack inflicts Fire damage and increases the Fire damage taken for all players by 40% for 1 min. The spear strike also triggers a cascade of molten eruptions around the impact location, inflicting Fire damage to enemies caught in an eruption.
Riplimb
Riplimb will attack the target with the most threat. In Heroic Difficulty Riplimb cannot be permanently slain while his master lives. When his health reaches zero, he will collapse for 30 seconds, and then reanimate at full health to resume fighting.
Limb Rip
Riplimb savagely bites his current target, inflicting 39% of normal melee damage and inflicting Jagged Tear.
Jagged Tear
Riplimb's Limb Rip leaves a Jagged Tear that inflicts Physical damage every 3 sec. for 24 sec. This effect stacks.
Frenzied Devotion
Riplimb enters an unstoppable rage if he witnesses Shannox's health reach 30%. This effect increases Riplimb's damage dealt by 100%, attack speed by 50% and movement speed by 100%.
Feeding Frenzy
Riplimb's successful melee attacks increase his physical damage dealt by% for 20 sec. This effect stacks.
Rageface
Rageface cannot be controlled, and darts about from enemy to enemy, changing targets periodically.
Face Rage
Rageface leaps at a random player, stunning and knocking them to the ground. Rageface begins to viciously maul the player, inflicting Physical damage every 0.5 sec. and the damage dealt increases over time. While Rageface mauls the player, all attacks against the beast will be critical strikes. Rageface will continue the mauling until his target is dead, or until he has taken.1% of total health.
Frenzied Devotion
Rageface enters an unstoppable rage if he witnesses Shannox's health reach 30%. This effect increases Riplimb's damage dealt by 100%, attack speed by 50% and movement speed by 100%.
Feeding Frenzy
Rageface's successful melee attacks increase his physical damage dealt by% for 20 sec. This effect stacks.
Loot
88 drops · item level 1 to 60 · 12 slots (Feet, Finger, Hands, Head, Held In Off-hand, Legs +6 more) · 9 tradeable
Avool's Incendiary ShankerAvool's Incendiary ShankerAvool's Incendiary Shanker Balespider's Leggings
 Bracers of the Dread HunterBracers of the Dread HunterBracers of the Dread Hunter
 Coalwalker SandalsCoalwalker SandalsCoalwalker SandalsCrystallized Firestone
 Crystal Prison BandCrystal Prison BandCrystal Prison BandDark Phoenix LegguardsElementium Deathplate GreavesElementium Deathplate LegguardsEntrail DisgorgerEntrail DisgorgerEntrail DisgorgerErupting Volcanic KiltErupting Volcanic LegguardsErupting Volcanic LegwrapsEye of PurificationEye of PurificationEye of PurificationFeeding FrenzyFeeding FrenzyFeeding FrenzyFirehawk LeggingsFirethorn MindslicerFirethorn MindslicerFirethorn MindslicerFlamewaker's Legguards
 Flickering ShoulderpadsFlickering ShoulderpadsFlickering Shoulderpads
 Gloves of Dissolving SmokeGloves of Dissolving SmokeGloves of Dissolving Smoke
 Goblet of AngerGoblet of AngerGoblet of Anger
 Immolation GreavesImmolation LegguardsImmolation Legplates
 Leggings of the Cleansing Flame
 Leggings of the Fiery ConquerorLeggings of the Fiery ProtectorLeggings of the Fiery Vanquisher
 Legguards of the Molten GiantLegplates of Absolute ControlLegplates of Absolute ControlLegplates of Absolute ControlLegplates of Frenzied DevotionLegplates of Frenzied DevotionLegplates of Frenzied DevotionLegplates of the Molten GiantLegwraps of the Cleansing Flame
 Necklace of FetishesNecklace of FetishesNecklace of Fetishes
 Obsidian Arborweave LeggingsObsidian Arborweave LegguardsObsidian Arborweave Legwraps
 Scalp of the Bandit PrinceScalp of the Bandit PrinceScalp of the Bandit PrinceShatterskull BonecrusherShatterskull BonecrusherShatterskull Bonecrusher
 Skullstealer GreataxeSkullstealer GreataxeSkullstealer GreataxeSmoldering Censer of PuritySmoldering Censer of PuritySmoldering Censer of Purity
 Treads of Implicit ObedienceTreads of Implicit ObedienceTreads of Implicit Obedience
Baleroc, the Gatekeeper
Baleroc earned a reputation as a merciless combatant during the elemental wars of ancient Azeroth. Now that he is confined to the Firelands, Baleroc's sanity has dwindled. Few elementals dare disturb him, fearful that they will become victim to his battle lust.
Abilities & Strategy
Overview
The raid will need to take advantage of Blaze of Glory on tanks and Vital Spark on healers in order to keep the tanks alive as Baleroc alternates between using his Inferno Blade and Decimation Blade abilities. To give healers more stacks of Vital Spark, the damage dealers will need to coordinate standing near Shards of Torment in turn.
Tanks
- Blaze of Glory increases your maximum health; but it also increases your Physical damage taken.
- With each cast of Blaze of Glory, Baleroc gains a stack of Incendiary Soul.
- Decimating Strike will inflict 20% of your maximum health in Shadow damage. This attack ignores defenses and armor.
Healers
- Healing victims of a Shard of Torment's Torment will grant you a stack of Vital Spark.
- Once you heal a target of Blaze of Glory, your Vital Sparks become a Vital Flame.
- If a Shard of Torment ever causes you to become Tormented your healing done will be greatly reduced.
Damage Dealers
- By getting heals while Tormented by a Shard of Torment, the healer will gain stacks of Vital Spark.
- The longer you stand near a Shard of Torment, the more damage Torment will do to you. Walking away changes the Torment to Tormented.
- Avoid Shards of Torment while you are Tormented.
- If a Shard of Torment ever has no players nearby, it will unleash a Wave of Torment.
Blaze of Glory
Baleroc's assault periodically awakens a burning spark within his current target, increasing the target's physical damage taken by 20%, but also raising their maximum health by 20%. Every time Baleroc applies Blaze of Glory, he gains an application of Incendiary Soul.
Incendiary Soul
Every time Baleroc applies Blaze of Glory, he gains an application of Incendiary Soul, increasing his Fire damage dealt by 20%.
Shards of Torment
Baleroc summons crystals amongst his foes, which continually channels a shadowy beam on the nearest player.
Torment
The Shard of Torment inflicts Shadow damage per application to the nearest player, stacking once per second.
Tormented
When Torment fades from a player, they are afflicted by the Tormented effect, which increases their magical damage taken by 250% and reduces the player's healing done by 50% for 20 sec. In Heroic Difficulty direct melee contact with any other player will apply a fresh copy of the Tormented effect to that player.
Wave of Torment
If no player stands within 15 yards of a Shard of Torment, the Shard pulses this effect, inflicting Shadow damage each second to all players.
Vital Spark
If a player casts a direct heal on someone being damaged by Torment, the healer gains an application of Vital Spark for every three stacks of Torment on the target. Casting a single-target direct heal on a target affected by Blaze of Glory will trigger Vital Flame. In Heroic Difficulty the healer gains an application of Vital Spark for every five stacks of Torment.
Vital Flame
Vital Flame increases healing done to targets affected by Blaze of Glory by 5% per stack of Vital Spark consumed, lasting for 15 sec. When Vital Flame expires, it restores the Vital Spark stacks consumed to create the effect.
Blades of Baleroc
Baleroc periodically empowers one of his blades with Shadow or Fire energy, and wields it alone for 15 sec.
Decimation Blade
Baleroc's melee strikes do no Physical damage but instead inflict Shadow damage equal to 90% of the target's maximum health, but always at least damage. This damage cannot be resisted or mitigated. Baleroc's time between attacks increases by 150% while this effect is active.
Inferno Blade
Baleroc's melee strikes do no Physical damage but instead inflict Fire damage.
Countdown
Baleroc links two players to each other for 8 sec.
Loot
85 drops · item level 1 to 60 · 11 slots (Chest, Feet, Hands, Head, Held In Off-hand, One-Hand +5 more) · 3 tradeable
Avool's Incendiary ShankerAvool's Incendiary ShankerAvool's Incendiary Shanker Balespider's HandwrapsBreastplate of the Incendiary SoulBreastplate of the Incendiary SoulBreastplate of the Incendiary Soul
 Casque of FlameCasque of FlameCasque of FlameCrystallized FirestoneDark Phoenix Gloves
 Decimation TreadsDecimation TreadsDecimation TreadsElementium Deathplate GauntletsElementium Deathplate HandguardsEntrail DisgorgerEntrail DisgorgerEntrail DisgorgerErupting Volcanic GlovesErupting Volcanic GripsErupting Volcanic HandwrapsEye of PurificationEye of PurificationEye of Purification
 Firehawk GlovesFirethorn MindslicerFirethorn MindslicerFirethorn Mindslicer
 Flamewaker's Gloves
 Flickering HandguardsFlickering HandguardsFlickering Handguards
 GatecrasherGatecrasherGatecrasherGatekeeper's EmbraceGatekeeper's EmbraceGatekeeper's Embrace
 Gauntlets of the Fiery ConquerorGauntlets of the Fiery ProtectorGauntlets of the Fiery VanquisherGauntlets of the Molten Giant
 Gloves of the Cleansing Flame
 Glowing Wing BracersGlowing Wing BracersGlowing Wing BracersHandguards of the Molten GiantHandwraps of the Cleansing Flame
 Helm of Blazing GloryHelm of Blazing GloryHelm of Blazing GloryImmolation GauntletsImmolation GlovesImmolation Handguards
 Mantle of Closed DoorsMantle of Closed DoorsMantle of Closed Doors
 Molten ScreamMolten ScreamMolten Scream
 Necromantic FocusNecromantic FocusNecromantic FocusObsidian Arborweave GlovesObsidian Arborweave GripsObsidian Arborweave Handwraps
 Shard of TormentShard of TormentShard of TormentShatterskull BonecrusherShatterskull BonecrusherShatterskull Bonecrusher
 Shoulderpads of the Forgotten GateShoulderpads of the Forgotten GateShoulderpads of the Forgotten GateSmoldering Censer of PuritySmoldering Censer of PuritySmoldering Censer of Purity
Majordomo Staghelm
The loss of his son, Valstann, in the War of the Shifting Sands utterly shattered Fandral Staghelm's spirit. Now empowered by Ragnaros as the new Majordomo of the Firelands (replacing the deceased Majordomo Executus) and the leader of the treacherous Druids of the Flame, Fandral seeks to bring ruin to Azeroth rather than live in a world without his beloved child.
Abilities & Strategy
Overview
Majordomo Staghelm will change form based on how many players are standing together or separated. Each form has its own abilities that will be used more frequently the longer he is in any given form. Each time Majordomo Staghelm changes forms he will gain Fury. He will change into a scorpion if the raid is standing together or into a cat when the raid is spread out. After every third shift he will change into his human form briefly, use Fiery Cyclone, and then cast either Searing Seeds or Burning Orbs.
Tanks
- Each time Majordomo's Cat Form casts Leaping Flames, a Spirit of Flame is summoned.
- Flame Scythe's damage is split evenly amongst all target caught in its area of effect.
- Majordomo Staghelm's damage increases with each shapeshift.
Healers
- Majordomo Staghelm's damage increases with each shapeshift.
- Flame Scythe will be cast more frequently the longer Majordomo Staghelm remains in his Scorpion Form.
- Burning Orbs damage the nearest player with constant Fire damage that ramps up the longer the victim stands closest to the orb.
- Searing Seeds duration is different per player.
- It is possible to dodge Leaping Flames.
Damage Dealers
- Burning Orbs damage the nearest player with constant Fire damage that ramps up the longer the victim stands closest to the orb.
- Searing Seeds duration is different per player.
- It is possible to dodge Leaping Flames.
Concentration
Each player who engages Fandral on Heroic Difficulty gains a Concentration power bar. This bar fills over time, increasing damage and healing done by 25% for every 25 Concentration up to 100. Players hit by a damaging attack or spell lose all Concentration.
Shapeshifting
Fandral transforms into a Cat when his enemies are not clustered together or into a Scorpion when many of his enemies are clustered together. On every third transform, Fandral briefly pauses in Night Elf form.
Cat Form
Fandral transforms into a Cat when many of his enemies are not clustered together.
Leaping Flames
Fandral leaps at an enemy, leaving behind a Spirit of the Flame. He lands in a blaze of glory, igniting the ground at his destination and causing it to burn enemy units for Fire damage every 0.5 sec. for 1 min. This attack costs 100 energy.
Spirit of the Flame
These images of Fandral attack enemies until defeated.
Adrenaline
Fandral gains a stack of Adrenaline each time he performs Leaping Flames. Adrenaline increases his energy regeneration rate by 6% per application. Fandral loses all stacks of Adrenaline when he switches forms.
Fury
Fandral gains a stack of Fury each time he transforms into a Cat or Scorpion, increasing the damage of Leaping Flames and Flame Scythe by 8% per application. This effect stacks.
Scorpion Form
Fandral transforms into a Scorpion when many of his enemies are clustered together. In 25 player raids, Fandral transforms when 18 or more of his enemies are clustered together.
Flame Scythe
Fandral inflicts Fire damage to enemies in front of him. Damage is split equally among targets hit. This attack costs 100 energy.
Adrenaline
Fandral gains a stack of Adrenaline each time he performs Flame Scythe. Adrenaline increases his energy regeneration rate by 6% per application. Fandral loses all stacks of Adrenaline when he switches forms.
Fury
Fandral gains a stack of Fury each time he transforms into a Cat or Scorpion, increasing the damage of Leaping Flames and Flame Scythe by 8% per application. This effect stacks.
Night Elf Form
When Fandral enters Night Elf form, he briefly envelops his enemies in a Fiery Cyclone and casts an additional spell. When switching from Cat form to Scorpion form, Fandral unleashes Searing Seeds. When switching from Scorpion form to Cat form, Fandral unleashes Burning Orbs.
Fiery Cyclone
Fiery Cyclone tosses all enemy targets into the air, preventing all action but making them invulnerable for 3 sec.
Searing Seeds
Searing Seeds implants fiery seeds in Fandral's enemies. Each seed grows at a different rate.
Burning Orbs
Fandral summons several orbs around the room. Each orb attacks the nearest player, burning them for Fire damage every 2 sec. This effect stacks.
Loot
85 drops · item level 1 to 60 · 11 slots (Chest, Feet, Hands, Legs, Neck, One-Hand +5 more) · 3 tradeable
Avool's Incendiary ShankerAvool's Incendiary ShankerAvool's Incendiary Shanker Balespider's Mantle
 Bracers of the Fiery PathBracers of the Fiery PathBracers of the Fiery PathBreastplate of Shifting VisionsBreastplate of Shifting VisionsBreastplate of Shifting VisionsCrystallized FirestoneDark Phoenix Spaulders
 Elementium Deathplate PauldronsElementium Deathplate ShoulderguardsEntrail DisgorgerEntrail DisgorgerEntrail DisgorgerErupting Volcanic MantleErupting Volcanic ShoulderwrapsErupting Volcanic SpauldersEye of PurificationEye of PurificationEye of Purification
 Fandral's FlamescytheFandral's FlamescytheFandral's FlamescytheFirecat LeggingsFirecat LeggingsFirecat LeggingsFirehawk MantleFirethorn MindslicerFirethorn MindslicerFirethorn MindslicerFlamewaker's Spaulders
 Flowform ChokerFlowform ChokerFlowform ChokerGrips of Unerring PrecisionGrips of Unerring PrecisionGrips of Unerring PrecisionImmolation MantleImmolation PauldronsImmolation Shoulderguards
 Jaws of DefeatJaws of DefeatJaws of Defeat
 Mantle of the Cleansing Flame
 Mantle of the Fiery ConquerorMantle of the Fiery ProtectorMantle of the Fiery VanquisherObsidian Arborweave MantleObsidian Arborweave ShoulderwrapsObsidian Arborweave SpauldersPauldrons of the Molten Giant
 Sandals of Leaping CoalsSandals of Leaping CoalsSandals of Leaping CoalsShatterskull BonecrusherShatterskull BonecrusherShatterskull BonecrusherShoulderguards of the Molten GiantShoulders of the Fiery ConquerorShoulders of the Fiery ProtectorShoulders of the Fiery VanquisherShoulderwraps of the Cleansing FlameSmoldering Censer of PuritySmoldering Censer of PuritySmoldering Censer of Purity
 Stinger of the Flaming ScorpionStinger of the Flaming ScorpionStinger of the Flaming Scorpion
 The HungererThe HungererThe Hungerer
 Treads of the Penitent ManTreads of the Penitent ManTreads of the Penitent Man
 Wristwraps of Arrogant DoomWristwraps of Arrogant DoomWristwraps of Arrogant Doom
Ragnaros
Ragnaros, lord of the Firelands, embodies the fury and destruction of the primordial infernos that forged Azeroth itself. Promised the chance to set Azeroth aflame without interference from Neptulon and Therazane, Ragnaros seeks to appease the Old Gods by incinerating the World Tree of Nordrassil.
Abilities & Strategy
Overview
This encounter spans three stages, separated by two intermissions. Ragnaros will attack players from his lava pool during each stage, and will submerge below during the intermissions.
Tanks
- Ragnaros will use Magma Blast if his tank target isn't in melee range.
- Manage your applications of Burning Wound so that Burning Blast doesn't become lethal.
- Lava Scions that spawn during intermission two need to be tanked.
- When targeted for Molten Seed place the seed away from the raid to minimize the damage of the resultant Molten Inferno.
- Molten Elementals fixate on random raid members and cannot be tanked.
Healers
- Tanks will take high amounts of damage from Burning Wound and Burning Blast.
- Magma Trap is the largest source of raid damage.
- Any players who fail to avoid Lava Waves will need immediate attention to survive.
- Hand of Ragnaros will damage all melee damage dealers. The knockback will cancel your casting if you are too close to Ragnaros.
- Stand apart from your raid members to minimize Wrath of Ragnaros knocking you back.
- When targeted for Molten Seed place the seed away from the raid to minimize the damage of the resultant Molten Inferno.
Damage Dealers
- Avoid triggering Magma Trap due to the knockback of Hand of Ragnaros.
- Spread out to avoid hitting multiple players with Wrath of Ragnaros.
- Kill Sons of Flame before they reach Sulfuras or they will Supernova.
- Magma Trap will launch you high enough to make the fall fatal.
- When targeted for Molten Seed place the seed away from the raid to minimize the damage of the resultant Molten Inferno.
- Stand apart from your raid members to minimize Wrath of Ragnaros knocking you back.
- Living Meteors can be forced to change target by damaging them while they are Combustible.
Stage One: By Fire Be Purged!
Sulfuras Smash
Ragnaros faces the location of a random player and prepares to smash Sulfuras on the platform.
Lava Wave
If a player touches a moving Lava Wave, the lava inflicts Fire damage, Fire damage every 1 sec. for 5 sec., and knocks the player back.
Wrath of Ragnaros
Hand of Ragnaros
Magma Trap
Ragnaros launches a Magma Trap at a random player's location. The active Magma Trap persists for the duration of the encounter and triggers when stepped on, causing a Magma Trap Eruption.
Magma Trap Eruption
A triggered Magma Trap erupts for Fire damage to all players, and violently knocks the triggering player into the air. The Magma Trap causes the triggering player to take 50% more damage from other Magma Traps. This effect lasts for 45 sec and stacks.
Magma Blast
Ragnaros blasts magma at his current target if he cannot reach and melee them, inflicting Fire damage and increasing Fire damage taken by 50% for 6 sec.
Intermission: Minions of Fire!
At 70% health Ragnaros casts Splitting Blow, burying Sulfuras into the platform and creating Sons of Flame across the platform. Ragnaros submerges for 45 seconds or until the players destroy all the Sons of Flame, whichever comes first.
Splitting Blow
Son of Flame
Sons of Flame cross the platform and attempt to reform with Sulfuras. A Son of Flame that reaches Sulfuras causes a Supernova.
Burning Speed
For every 5% of their remaining health above 50%, Sons of Flame move 75% faster. When players reduce a Son of Flame to below 50% remaining health, the Son of Flame loses the Burning Speed effect.
Supernova
When a Son of Flame reaches Sulfuras it explodes in a Supernova, inflicting Fire damage to all players.
Lava Bolt
While Ragnaros lies submerged underneath the lava, bolts of hot magma fall on several random players every 4 seconds. A Lava Bolt inflicts Fire Damage.
Stage Two: Sulfuras Will Be Your End!
Sulfuras Smash
Ragnaros faces the location of a random player and prepares to smash Sulfuras on the platform.
Lava Wave
If a player touches a moving Lava Wave, the lava inflicts Fire damage, Fire damage every 1 sec. for 5 sec., and knocks the player back.
Engulfing Flame
Ragnaros periodically engulfs a random third of the platform in flames, immediately inflicting Fire damage to players caught in the conflagration then again inflicting Fire damage one second later.
World in Flames
Ragnaros periodically casts Engulfing Flames on a random section of the platform every 3 sec for 9 sec.
Molten Seed
After 10 sec the Molten Seed bursts into a Molten Inferno.
Molten Inferno
When Molten Seeds burst they create a Molten Inferno, inflicting Fire damage to all players and creating a Molten Elemental. The damage inflicted decreases the farther away the player stands from the seed.
Molten Elemental
A Molten Inferno creates a Molten Elemental, which attacks and fixates on a random player.
Magma Blast
Ragnaros blasts magma at his current target if he cannot reach and melee them, inflicting Fire damage and increasing Fire damage taken by 50% for 6 sec.
Intermission: Denizens of Flame!
At 40% health Ragnaros casts Splitting Blow, burying Sulfuras into the platform and creating Sons of Flame across the platform. Ragnaros submerges for 45 seconds or until the players destroy all the Sons of Flame, whichever comes first. Ragnaros also creates two Lava Scions that attack the players.
Splitting Blow
Son of Flame
Sons of Flame cross the platform and attempt to reform with Sulfuras. A Son of Flame that reaches Sulfuras causes a Supernova.
Burning Speed
For every 5% of their remaining health above 50%, Sons of Flame move 75% faster. When players reduce a Son of Flame to below 50% remaining health, the Son of Flame loses the Burning Speed effect.
Supernova
When a Son of Flame reaches Sulfuras it explodes in a Supernova, inflicting Fire damage to all players.
Lava Scion
One Lava Scion forms on each side of the platform.
Blazing Heat
A Lava Scion inflicts a random player with Blazing Heat, causing the player to create a trail of Blazing Heat in their wake. Blazing Heat inflicts Fire damage every 1 sec on players standing within the trail, and heals Sons of Flame within the trail for 10% every 1 sec.
Stage Three: Begone From My Realm!
Sulfuras Smash
Ragnaros faces the location of a random player and prepares to smash Sulfuras on the platform.
Lava Wave
If a player touches a moving Lava Wave, the lava inflicts Fire damage, Fire damage every 1 sec. for 5 sec., and knocks the player back.
Engulfing Flame
Ragnaros periodically engulfs a random third of the platform in flames, immediately inflicting Fire damage to players caught in the conflagration then again inflicting Fire damage one second later.
World in Flames
Ragnaros periodically casts Engulfing Flames on a random section of the platform every 3 sec for 9 sec.
Summon Living Meteor
Ragnaros calls down an increasing number of Living Meteors.
Living Meteor
The Living Meteor fixates on a random player and chases them.
Magma Blast
Ragnaros blasts magma at his current target if he cannot reach and melee them, inflicting Fire damage and increasing Fire damage taken by 50% for 6 sec.
Stage Four: The True Power of the Firelord!
The Firelord unleashes his full power and is able to move freely around the platform. Players have the aid of powerful heroes of Azeroth to support them.
Superheated
Ragnaros unleashes his full power and becomes Superheated, inflicting Fire damage every 1 sec. on all players and increasing the damage dealt by Superheated by%. This effect stacks.
Empower Sulfuras
Ragnaros channels his flames upon Sulfuras. After 5 sec. of channeling, Sulfuras becomes Empowered and Ragnaros' melee attacks unleash the Flames of Sulfuras, inflicting Fire damage to all players.
Flames of Sulfuras
With Sulfuras empowered, Ragnaros' melee attacks unleash the Flames of Sulfuras, inflicting Fire damage to all players.
Dreadflame
Ragnaros stomps and creates a Dreadflame at nearby locations. The Dreadflame multiplies rapidly and spreads across the platform.
Cenarius
Although the son of Malorne and Elune, the mighty demigod and druid patron Cenarius was cared for in his youth by the Dragon Aspect Ysera. Cenarius supports the raid by using his powers over nature to freeze Living Meteors and reduce the damage caused when Ragnaros is Superheated.
Breadth of Frost
Cenarius forms a Breadth of Frost at a nearby random location. Any Living Meteors that enter the Breadth of Frost freeze and take 50% additional damage from players. Breadth of Frost grants immunity to Superheated damage and removes the Superheated debuff from players standing within the area.
Arch Druid Hamuul Runetotem
Apart from being revered by his fellow tauren, the greathearted archdruid Hamuul Runetotem is also a celebrated leader of the Cenarion Circle. The wise tauren assists the raid by harnessing nature's fury and causes roots to erupt from the ground to entrap Ragnaros.
Entrapping Roots
Arch Druid Hamuul Runetotem forms Entrapping Roots at a nearby random location. If Ragnaros enters the area of the Entrapping Roots, he becomes stunned for 10 sec and takes% additional damage while stunned.
Malfurion Stormrage
One of the most powerful druids ever, Archdruid Malfurion Stormrage has been instrumental in protecting Mount Hyjal from Ragnaros's fiery elemental forces. The legendary archdruid helps the raid by protecting heroes from the all-consuming Dreadflame attacks.
Cloudburst
Malfurion forms a Cloudburst. The player who interacts with a Cloudburst becomes surrounded with a Deluge. Deluge grants the player immunity to Dreadflame damage, and allows the player to extinguish any nearby Dreadflame.
Loot
64 drops · item level 25 to 60 · 9 slots (Hands, Head, Neck, One-Hand, Ranged, Shoulder +3 more) · 1 tradeable
 Arathar, the Eye of FlameArathar, the Eye of FlameArathar, the Eye of FlameBalespider's Hood
 Choker of the Vanquished LordChoker of the Vanquished LordChoker of the Vanquished Lord
 Cowl of the Cleansing Flame
 Crown of FlameCrown of FlameCrown of Flame
 Crown of the Fiery ConquerorCrown of the Fiery ProtectorCrown of the Fiery VanquisherCrystallized FirestoneDark Phoenix HelmetElementium Deathplate FaceguardElementium Deathplate Helmet
 Erupting Volcanic FaceguardErupting Volcanic HeadpieceErupting Volcanic HelmetFaceguard of the Molten GiantFingers of IncinerationFingers of IncinerationFingers of Incineration
 Firehawk HoodFlamewaker's HeadguardHelmet of the Molten GiantHelm of the Fiery ConquerorHelm of the Fiery ProtectorHelm of the Fiery VanquisherHood of the Cleansing FlameImmolation FaceguardImmolation HeadguardImmolation Helmet
 Ko'gun, Hammer of the FirelordKo'gun, Hammer of the FirelordKo'gun, Hammer of the Firelord
 Majordomo's Chain of OfficeMajordomo's Chain of OfficeMajordomo's Chain of Office
 Matrix RestabilizerMatrix RestabilizerMatrix RestabilizerObsidian Arborweave CoverObsidian Arborweave HeadpieceObsidian Arborweave Helm
 Pauldrons of Roaring FlamePauldrons of Roaring FlamePauldrons of Roaring Flame
 Sho'ravon, Greatstaff of AnnihilationSho'ravon, Greatstaff of AnnihilationSho'ravon, Greatstaff of Annihilation
 Smoldering Egg of Millagazor
 Sulfuras, the Extinguished HandSulfuras, the Extinguished HandSulfuras, the Extinguished Hand
 Variable Pulse Lightning CapacitorVariable Pulse Lightning CapacitorVariable Pulse Lightning Capacitor
 Vessel of AccelerationVessel of AccelerationVessel of AccelerationLiving Ember
Quests
1 quest Blizzard’s quest data files under Firelands:
- Reward:28 gold9 silver
Achievements
13 achievements tied to Firelands, worth 120 achievement points in total.
 Firelands Guild RunDefeat the bosses in Firelands while in a guild group.10
 Heroic: Ragnaros Guild RunDefeat Ragnaros in Firelands on Heroic difficulty while in a guild group.10
- Realm First! RagnarosFirst guild on the realm to defeat Ragnaros in Firelands on Heroic Difficulty while in a guild group.
- FirelandsDefeat the bosses in Firelands.10
 Heroic: Beth'tilacDefeat Beth'tilac in Firelands on Heroic Difficulty.10
 Heroic: Lord RhyolithDefeat Lord Rhyolith in Firelands on Heroic Difficulty.10
 Heroic: ShannoxDefeat Shannox in Firelands on Heroic Difficulty.10
 Heroic: AlysrazorDefeat Alysrazor in Firelands on Heroic Difficulty.10
 Heroic: BalerocDefeat Baleroc in Firelands on Heroic Difficulty.10
 Heroic: Majordomo Fandral StaghelmDefeat Majordomo Fandral Staghelm in Firelands on Heroic Difficulty.10
- Heroic: RagnarosDefeat Ragnaros in Firelands on Heroic Difficulty.Title: Firelord10
 Death from AboveOnly kill Cinderweb Drones while they are atop the web canopy during the Beth'tilac encounter in Firelands.10
- Only the Penitent...Activate both of Fandral's Flames at once in Firelands without any raid member getting hit by Kneel to the Flame!10
More Cataclysm Raids
Other raids from the same expansion.