 TheWoWDB
Use Spectral Sight at stage 5 to see demons through the rocks and find the trail.
Quest

Vengeance Will Be Ours
Quest facts and objectives from the current retail game data.
The highest voted Wowhead comments for this page. They are community notes, not TheWoWDB comments.
Video Guide: https://www.youtube.com/watch?v=s9KEF68x5II
1. Vengeance Will Be Ours (Scenario)
• Accept the quest, Vengeance Will Be Ours, from [npc=99254] at coords 74.6, 48.6 (Krasus' Landing in [zone=7502]).
• Click on the [npc=99250], to be brought to the [zone=7796].Stage 1 - Picking Up the Pieces
• Travel south to coords 15.1, 51.7, and click on [npc=98882] to free her.Stage 2 - Their Blood Will Flow
• Continue south to 16.2, 56.0, and destroy the nearby [object=248517].
• Defeat [npc=98975], who lands near the portal you destroyed.
• When it casts [spell=215701], run out of the area to avoid its damage. Interrupt [spell=215709].
• Proceed southeast to 17.6, 57.3, and destroy the second [object=248573].
• [npc=105000] mobs will come out of the two [object=248573]. After you destroy the last portal, they will stop coming.Stage 3 - A River of Souls
• Travel southeast to coords 20.1, 61.4.
• Defeat [npc=105094] and [npc=105095], who both share a health pool with [spell=215837].
• Interrupt [spell=215852] cast by [npc=105094].
• AoE the [npc=108686] that Taraar summons.
• Interrupt [spell=215885] cast by [npc=105095].Stage 4 - In the Darkness of the Pit
• After the Eredar twins are defeated, [npc=99046] will crawl up from the fel pools.
• When fighting [npc=99046], continue to move to minimize damage from [spell=215978]. When it is casting [spell=215925], avoid staying in front of [npc=99046].Stage 5 - Nowhere to Hide
• Travel east to coords 21.9, 61.1, and activate your [spell=185501] to discover the trail of [npc=99184], into the Lost Temple.
• Click on the collapsed rocks, in front of you.Stage 6 - Vengeance for the Illidari (Final Stage)
• Enter the tunnel of the Lost Temple, proceeding to coords 26.8, 61.4, and defeating any demons you come across.
• Defeat [npc=99184]
• When [npc=99184] casts [spell=216164] - Move out of the area to avoid knockback.
• After the defeat of [npc=99184], go back to 26.8, 61.3, and click the [object=248785] to pick up your artifact weapon.
• After picking up your artifact weapon, [npc=98882] will bring an [npc=99227] for you.
• Click on the [npc=99227] to ride it back to [zone=7502].
• After landing, turn in the quest to [npc=102799].
Go to the Demon Hunter class hall to turn in the quest to Kor'vas Bloodthorn.
Quest facts
Quest ID41863
Check whether you have already completed this quest
in-game: /run print(C_QuestLog.IsQuestFlaggedCompleted(41863))
Requirements
ClassDemon Hunter
Read from the Blizzard quest API.
What to do
WhereMardum, the Shattered Abyss, Dalaran, Broken Shore
StorylineThe Aldrachi Warblades, step 6 of 7
Rewards20g 22s, 27,650 XP
Description
Caria lies in the very heart of Legion territory - they'll see our forces immediately if we try to launch an all-out attack. Failure is not an option. However, if you go alone you might be able to slip by unnoticed long enough to avoid the brunt of the Legion army. Remember, {name} - this is not a rescue mission. The power of the Aldrachi Warblades could tip the scales of this war in our favor; Allari and her men are expendable if need be.
Where to go
Pins are the quest’s own POI points from the current retail client, projected onto the in-game zone map. The game marks one blob as the quest’s turn-in; the rest are objective areas. Points that fall outside a map’s window are dropped rather than guessed at.
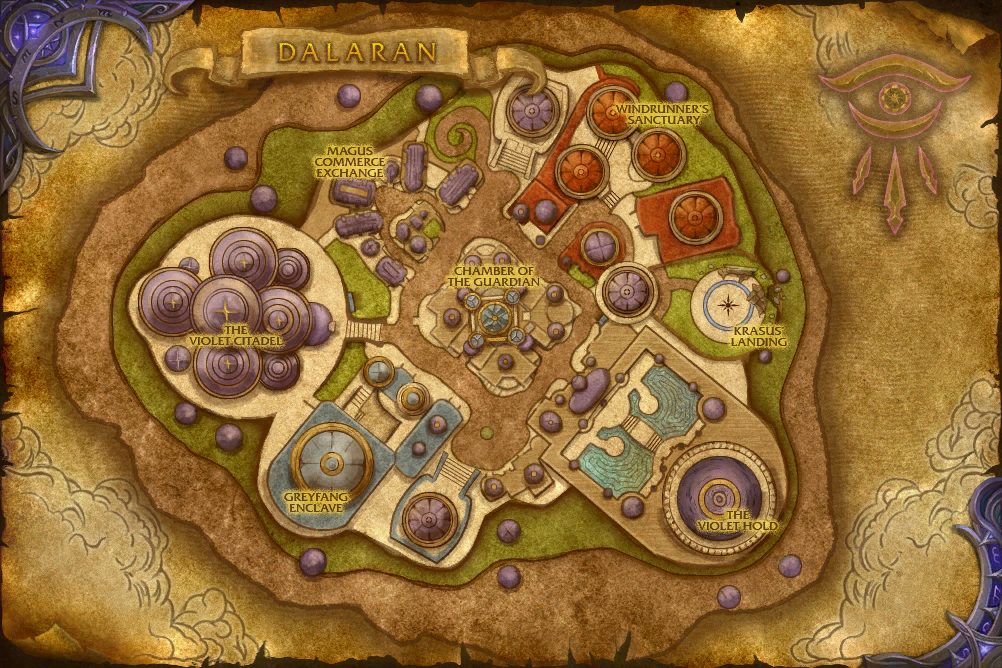 Turn-inTurn-inObjective areaObjective area
In-game waypoint: /way #627 98.1 69.4
Coordinates
- Turn-inDalaran 98.1, 69.4
/way #627 98.1 69.4 - Turn-inDalaran 73.9, 46.1
/way #627 73.9 46.1 - Objective areaDalaran 75.2, 47.7
/way #627 75.2 47.7
Map coordinates of the pins above. An area the client draws as a shape is given by the centre of its points.
Nearby on the Mardum, the Shattered Abyss map
- Unexpected Visitors
- Last, But Not Least
- Return to Mardum
- Move Like No Other
- Direct Our Wrath
- Time is of the Essence
- Confrontation at the Black Temple
- Champion: Akama
- Champion: Shade of Akama
- Into Our Ranks
Other quests whose map markers the client places on Mardum, the Shattered Abyss.
Community notes from Wowhead · 5 comments
Top 3 shown aboveThe comments below were written by Wowhead users. They are community notes, not TheWoWDB comments. See them in context on Wowhead.
The top 3 are shown in Top Comments above. Read all 5 on Wowhead.
Money20 gold22 silver
Experience27,650 XP
Other quests on the Mardum, the Shattered Abyss map
Storyline
The Aldrachi Warblades
Part 6 of 7.
Previous: Establishing a Connection · Next: Vengeance Will Be Ours
- 1Asking a Favor
- 2Asking a Favor
- 3Ask and You Shall Receive
- 4Return to Jace
- 5Establishing a Connection
- 6Vengeance Will Be Ours
- 7Vengeance Will Be Ours
Storyline order is the client’s own QuestLine data from the current retail build.
Where this quest fits
Before this quest
Taken from the storyline's own step order.
- Establishing a Connection
<Jace glances at the crystallized soul.> Yes, that will do nicely. Release its energy to activate the communicator - it should already be configured to contact Allari and her forces. If Caria is out there, we will find her, and we will make her suffer for her transgressions.
The storyline at a glance
The Aldrachi Warblades has 7 steps, from Asking a Favor to Vengeance Will Be Ours.
Maps its steps are placed on (steps per map): Dalaran (7).
Other storylines on the Dalaran map
- Legion Alchemy
- Legion Tailoring
- Legion Leatherworking
- Legion Inscription
- Legion Blacksmithing
- Legion Engineering
Steps, storylines and map placement from the client’s QuestLine, prerequisite and QuestPOI data; neighbouring quest text is Blizzard’s own (quest API), shortened to its opening sentences.