 TheWoWDB
Dungeon - Legion
Eye of Azshara
5 encounters, 45 boss abilities and 57 drops, with the Adventure Guide’s own ability and strategy notes for each fight. Every drop links to its item page; tradeable drops carry a live Auction House price.
Amidst outlying shoals off the coast of Azsuna, an ancient source of power lies beneath the waves. Long ago, the power of Queen Azshara extended throughout these lands, and the naga seeking the Tidestone of Golganneth still act at her behest. As clouds roll in and the air crackles with the energy of an approaching storm, Azshara's followers prepare to summon an incarnation of her Wrath to lay waste to the land.
Quick Facts
| Type | Dungeon |
|---|---|
| Expansion | Legion |
| Encounters | 5 |
| Boss abilities | 45 |
| Drops | 57 |
| Item level | 50 |
| Tradeable drops | 0 |
| Difficulties | Normal, Heroic, Mythic |
Difficulties and Lockouts
Eye of Azshara has 5 difficulties in the game data: Mythic saves you to a weekly lockout; Heroic resets daily; Normal, Mythic Keystone and Timewalking can be run again at any time.
| Difficulty | Players | Level range | Lockout |
|---|---|---|---|
| Normal | 5 | 10 to 45 | None |
| Heroic | 5 | 45 | Daily |
| Mythic | 5 | 45 | Weekly |
| Mythic Keystone | 5 | None | |
| Timewalking | 5 | 10+ | None |
Mythic+ timer, Eye of Azshara: 35:00 (+2 at 28:00, +3 at 21:00).
Loot Table Value
Every one of Eye of Azshara’s 57 drops is Bind on Pickup, so none of this loot can ever reach the Auction House. The table below the bosses is the complete reward list; its value is item level, not gold.
Where It Is
The entrance to Eye of Azshara is in Azsuna at 61.0, 41.1.
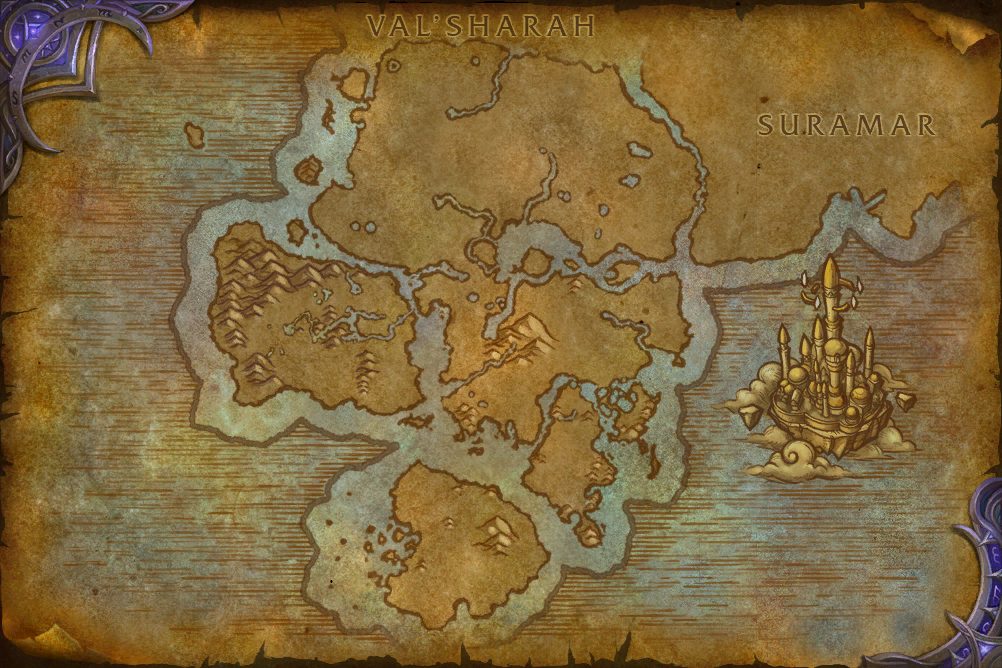 Entrance 61.0, 41.1
Azsuna, from the game’s own world map art. The framed marker is the Adventure Guide entrance.
3D Model
First-party render from the game files. Model © Blizzard Entertainment.
Instance Map
The Adventure Guide places 5 bosses of Eye of Azshara on 1 map. Numbers follow the encounter order; each links to that fight below.
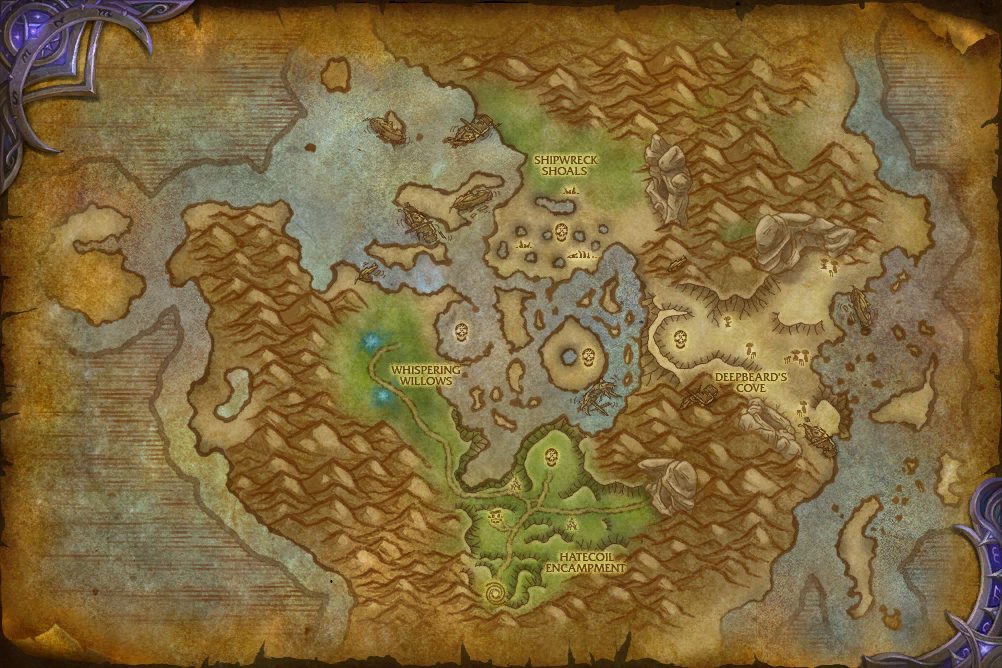 1Warlord Parjesh2Lady Hatecoil3King Deepbeard4Serpentrix5Wrath of Azshara
- 1 Warlord Parjesh 54.6, 68.4
- 2 Lady Hatecoil 46.0, 50.0
- 3 King Deepbeard 68.3, 51.3
- 4 Serpentrix 56.3, 35.1
- 5 Wrath of Azshara 57.8, 53.7
Encounters
NNormalHHeroicMMythic
Serpentrix
The naga camped at the Eye of Azshara keep a healthy distance from its northern reaches. An ancient scaled beast makes its home in the shallows there, occasionally bursting forth with one if its many snake-like necks to devour nearby prey.
Abilities & Strategy
Overview
Players initially face Serpentrix alone. However when the beast reaches 66% and 33% health it will Submerge and re-emerge at a distant location, summoning two Hydra Spawns nearby.
Damage Dealer
- When Serpentrix uses Toxic Wound, keep moving to avoid taking damage from the Toxic Puddle.
- Avoid damage from Poison Spit by staying downwind of Serpentrix during Violent Winds.
- When Serpentrix uses Submerge at 33% and 66% health, interrupt it to prevent damage from Rampage.
Healers
- When Serpentrix uses Toxic Wound, keep moving to avoid taking damage from the Toxic Puddle.
- Avoid damage from Poison Spit by staying downwind of Serpentrix during Violent Winds.
Tanks
- Avoid damage from Poison Spit by staying downwind of Serpentrix during Violent Winds.
- When Serpentrix uses Submerge at 33% and 66% health, interrupt it to prevent damage from Rampage.


 Submerge
Blazing Hydra Spawn
Summoned nearby Serpentrix after Emerging.

Arcane Hydra Spawn
Summoned nearby Serpentrix after Emerging.

Loot
11 drops · item level 50 · 8 slots (Chest, Feet, Hands, Head, Legs, Shoulder +2 more) · all Bind on Pickup


Warlord Parjesh
This fierce commander oversees the military might of the naga that have overrun Azsuna in search of the Tidestone of Golgonnath. He is second only to Athissa among the Hatecoil, and commands obedience with an equal measure of fear and respect.
Abilities & Strategy
Overview
Warlord Parjesh calls in reinforcements to assist him in combat and hurls an Impaling Spear, striking the first target in a line and inflicting massive damage.
Damage Dealers
- Position yourself behind naga reinforcements when Impaling Spear is being thrown to avoid being pinned.
- Kill enemy naga summoned by Call Reinforcements.
Healers
- Position yourself behind naga reinforcements when Impaling Spear is being thrown to avoid being pinned.
- If an ally is struck by Impaling Spear, that player will require increased healing.
Tanks
- Position yourself behind naga reinforcements when Impaling Spear is being thrown to avoid being pinned.
- Gain threat on Hatecoil Shellbreakers when Call Reinforcements is cast.


 Call Reinforcements
Hatecoil Shellbreaker
Assaults players with heavy melee damage.

Hatecoil Crestrider
Hurls lightning bolts at random targets.


Loot
11 drops · item level 50 · 9 slots (Chest, Feet, Hands, Head, Neck, Shoulder +3 more) · all Bind on Pickup


Lady Hatecoil
This naga sea witch hails from a long line of Hatecoil nobility, favored by Queen Azshara herself. The waves and the skies heed her call, as she harnesses their power to crush any who would oppose the Hatecoil.
Abilities & Strategy
Overview
Lady Hatecoil assaults her enemies with raging storms and lightning strikes, using conductivity to her advantage. Static Nova strikes all players touching the water and Focused Lightning can blow away sand dunes.
Damage Dealers
- Move on top of a sand dune to avoid damage from Static Nova.
- Move away from sand dunes when Focused Lightning strikes to prevent it from destroying them.
Healers
- Move on top of a sand dune to avoid damage from Static Nova.
- Move away from sand dunes when Focused Lightning strikes to prevent it from destroying them.
Tanks
- Move on top of a sand dune to avoid damage from Static Nova.
- Move away from sand dunes when Focused Lightning strikes to prevent it from destroying them.
- Gain threat on loose Saltsea Globules when Lady Hatecoil casts Beckon Storm.


 Beckon Storm
Saltsea Globule


Loot
12 drops · item level 50 · 10 slots (Chest, Feet, Finger, Hands, Head, Legs +4 more) · all Bind on Pickup


King Deepbeard
Sailors tell of a behemoth that strides the ocean floor, surging from the depths to tear vessels apart with his bare hands. They say he wears the intact prow of a ship as a pauldron--as a trophy. Most listeners dismiss these reports as fools' tales, the product of too much grog.
Abilities & Strategy
Overview
King Deepbeard attacks with an array of avoidable abilities. Normally, evade the damage, but if you are afflicted with Gaseous Bubbles, seek out damaging effects to avoid triggering a Gaseous Explosion.
Damage Dealers
- Avoid taking damage from Call the Seas.
- Move to avoid damage from Aftershock after King Deepbeard casts Quake.
Healers
- Avoid damage when King Deepbeard casts Call the Seas.
- Move to avoid damage from Aftershock after King Deepbeard casts Quake.
Tanks
- Avoid damage when King Deepbeard casts Call the Seas.
- Move to avoid damage from Aftershock after King Deepbeard casts Quake.
- When King Deepbeard casts Ground Slam move to avoid damage!
 Gaseous Bubbles
Gaseous Explosion
The erupting Gaseous Bubble inflicts Frost damage to all enemies equal to the absorb shield amount remaining on Gaseous Bubbles.


Loot
9 drops · item level 50 · 6 slots (Back, Chest, Finger, Legs, Trinket, Waist) · all Bind on Pickup


Wrath of Azshara
One of Azshara's most loyal handmaidens offered herself willingly to her Queen to serve as the instrument of her vengeance. Summoned by Hatecoil channelers as a last resort after Parjesh's failure, the terrifying Wrath of Azshara exists to wash away all landwalkers who would stand against her.
Abilities & Strategy
Overview
The Wrath of Azshara crushes Queen Azshara's enemies with fierce storms and arcane energy, seeking to wash away her foes. Avoid the dangerous weather hazards and watch out when the storm intensifies!
Damage Dealers
- Avoid being sucked into the air by moving away from Mystic Tornado when it spawns.
- Move out of the detonation area of Arcane Bomb once it has been dispelled.
Healers
- Avoid being sucked into the air by moving away from Mystic Tornado when it spawns.
- Dispel Arcane Bomb from players so they can avoid its detonation.
Tanks
- Remain within melee range of the Wrath of Azshara to prevent it from using Raging Storms.
- Avoid being sucked into the air by moving away from Mystic Tornado when it spawns.
- Move out of the area while Massive Deluge is being cast.


Elemental Resonance
The Wrath of Azshara is a being of immense magical energy. Upon striking foes with magic, a lingering effect remains behind.


Loot
14 drops · item level 50 · 8 slots (Feet, Finger, Head, Neck, Shoulder, Trinket +2 more) · all Bind on Pickup


Quests
3 quests Blizzard’s quest data files under Eye of Azshara, most for level 10 to 45:
- Reward:20 gold22 silver
- Reward:121 gold32 silver

Achievements
10 achievements tied to Eye of Azshara, worth 70 achievement points in total.
 Eye of AzsharaDefeat the Wrath of Azshara in Eye of Azshara.10
- Mythic: Eye of Azshara Guild RunDefeat the Wrath of Azshara in Eye of Azshara on Mythic difficulty while in a guild group.10
- Heroic: Eye of AzsharaDefeat the Wrath of Azshara in Eye of Azshara on Heroic difficulty or higher.10
- Mythic: Eye of AzsharaDefeat the Wrath of Azshara in Eye of Azshara on Mythic difficulty.10
- Eye of AzsharaDefeat the Wrath of Azshara in Eye of Azshara.Lesser Bronze Cache
- Heroic: Eye of AzsharaDefeat the Wrath of Azshara in Eye of Azshara on Heroic difficulty or higher.Bronze Cache
- Mythic: Eye of AzsharaDefeat the Wrath of Azshara in Eye of Azshara on Mythic difficulty.Greater Bronze Cache
 But You Say He's Just a FriendDefeat Warlord Parjesh without allowing any Hatecoil Shellbreakers to die in Eye of Azshara on Mythic difficulty.10
 Stay SaltyDefeat Lady Hatecoil after destroying 11 or more Saltsea Globules with a single Curse of the Witch in Eye of Azshara on Mythic difficulty.10
 Ready for Raiding VDefeat the Wrath of Azshara without being struck by Magic or Frost Resonance in Eye of Azshara on Mythic difficulty.10
More Legion Dungeons
Other dungeons from the same expansion.