Skip to content
Advertisement
Quest Log

Harnessing Power

Harnessing Power is a quest for level 45. It is step 2 of 11 in The Four Horsemen IV storyline. It rewards 6,150 experience and money.

Description

These fools are using the power of Rimefang's harness to subjugate the frost wyrms. Their leader, Andjor, sits inside on the back of the broodmother and mocks us.

He should breathe no longer.

Rewards

Money20 gold22 silver
Experience6,150 XP

Stuck on this quest?

Known issues

Top Comments

The highest voted Wowhead comments for this page. They are community notes, not TheWoWDB comments.

1
SnOoPz+28via Wowhead (opens the original comment in a new tab)

As usual, this quest was not well thought through. Alliance & Horde both camping the NPC. Horde keeps one shotting it when it spawns, which does not give adequate time for the second NPC to appear for the quest. And yet, they cannot figure it out and just keep doing it over and over. The whole realm is sitting here watching a few horde do this continuously. Cannot progress past the quest :(

2
bossfight1+13via Wowhead (opens the original comment in a new tab)

Why would they not make this an individual instance rather than letting every Death Knight and their mother join and leaving it so open to abuse? They made Icecrown Citadel a solo instance for the Frost Artifact quest, but this? NOPE.

EDIT: It's been fixed so Andjor Dragontamer actually spawns with the Broodmother, making this quest actually beatable. Really, don't know how it got through testing in that state...

1 more comment below ↓

Check whether you have already completed it in-game: /run print(C_QuestLog.IsQuestFlaggedCompleted(45398))

Top Comments

The highest voted Wowhead comments for this page. They are community notes, not TheWoWDB comments.

1
SnOoPz+28via Wowhead (opens the original comment in a new tab)

As usual, this quest was not well thought through. Alliance & Horde both camping the NPC. Horde keeps one shotting it when it spawns, which does not give adequate time for the second NPC to appear for the quest. And yet, they cannot figure it out and just keep doing it over and over. The whole realm is sitting here watching a few horde do this continuously. Cannot progress past the quest :(

2
bossfight1+13via Wowhead (opens the original comment in a new tab)

Why would they not make this an individual instance rather than letting every Death Knight and their mother join and leaving it so open to abuse? They made Icecrown Citadel a solo instance for the Frost Artifact quest, but this? NOPE.

EDIT: It's been fixed so Andjor Dragontamer actually spawns with the Broodmother, making this quest actually beatable. Really, don't know how it got through testing in that state...

Read all 35 on Wowhead ↗

Advertisement
Rewards in detail
TypeRewardAmount
ExperienceXP6,150
MoneyGold20g 22s
Where it comes from
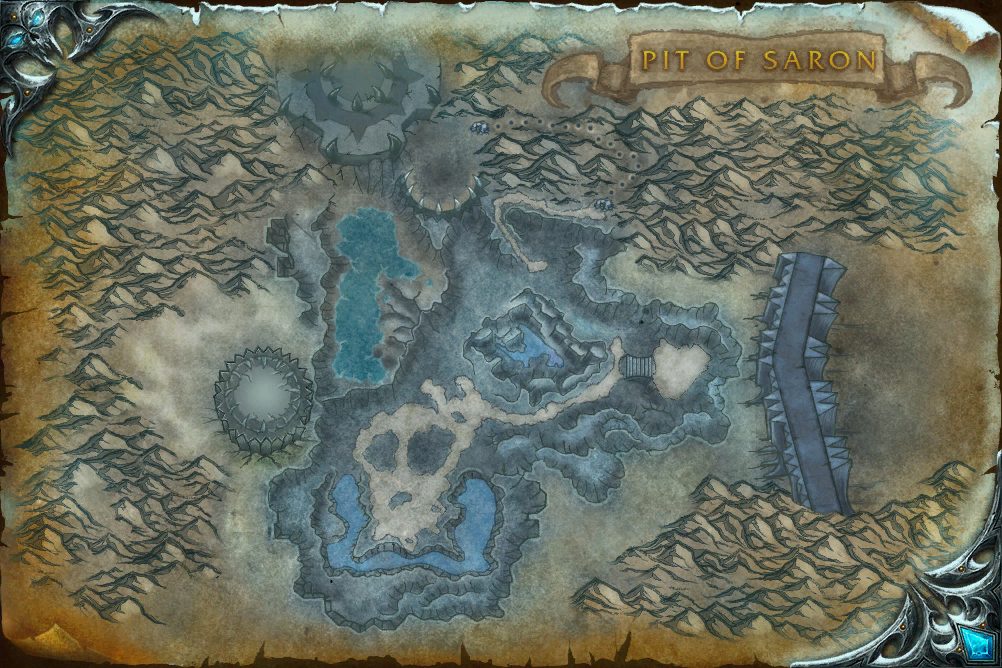
Objective areaPit of Saron4 mapped points
World Map

Where to go

Pins are the quest’s own POI points from the current retail client, projected onto the in-game zone map. The game marks one blob as the quest’s turn-in; the rest are objective areas. Points that fall outside a map’s window are dropped rather than guessed at.

Pit of Saron Objective area 4 mapped points
Pit of Saron map showing where to go for Harnessing PowerObjective areaObjective areaObjective areaObjective area

In-game waypoint: /way #823 38.9 15.7

Coordinates

  • Objective areaPit of Saron 38.9, 15.7/way #823 38.9 15.7
  • Objective areaPit of Saron 34.1, 9.3/way #823 34.1 9.3
  • Objective areaPit of Saron 47.8, 19.3/way #823 47.8 19.3

Map coordinates of the pins above. An area the client draws as a shape is given by the centre of its points.

Quest Line

Storyline

The Four Horsemen IV

Part 2 of 11.

Previous: Making Preparations · Next: Severing the Sveldrek

  1. 1Making Preparations
  2. 2Harnessing Power
  3. 3Severing the Sveldrek
  4. 4Return to Acherus
  5. 5The Peak of Bones
  6. 6From Bones They Rise
  7. 7Thorim's Flame
  8. 8The Bonemother
  9. 9On Daumyr's Wings
  10. 10We Ride!
  11. 11Champion: Minerva Ravensorrow

Storyline order is the client’s own QuestLine data from the current retail build.

Where this quest fits

Before this quest

Taken from the storyline's own step order.

  • Making PreparationsLevel 45

    Deathlord, we have uncovered an heirloom of great significance and power. Rimefang's harness has appeared in Icecrown Citadel. We must obtain it, rather than let it fall into the hands of others. I assume you'd like to retrieve the harness personally?

After this quest

Taken from the storyline's own step order.

  • Severing the SveldrekLevel 45

    So here's the order of things, as far as I've been told. Mortal walks into Icecrown. Mortal is brutally defeated. Mortal gets raised as Scourge. These fools can't expect to trounce in here, do whatever they want, and leave without any consequence. Time to make them truly as mindless as they act.

The storyline at a glance

The Four Horsemen IV has 11 steps, from Making Preparations to Champion: Minerva Ravensorrow.

Maps its steps are placed on (steps per map): Acherus: The Ebon Hold (3), Stormheim (3), Pit of Saron (2), Broken Shore (2).

Other storylines on the Acherus: The Ebon Hold map

Steps, storylines and map placement from the client’s QuestLine, prerequisite and QuestPOI data; neighbouring quest text is Blizzard’s own (quest API), shortened to its opening sentences.

Related
Database
Downloads