 TheWoWDB
Raid - Classic
Blackrock Depths
8 encounters, 123 boss abilities and 77 drops, with the Adventure Guide’s own ability and strategy notes for each fight. Every drop links to its item page; tradeable drops carry a live Auction House price.
The smoldering Blackrock Depths are home to the Dark Iron dwarves and their emperor, Dagran Thaurissan. Like his predecessors, he serves under the iron rule of Ragnaros the Firelord, a merciless being summoned into the world centuries ago. The presence of chaotic elementals has attracted Twilight's Hammer cultists to the mountain domain. Along with Ragnaros' servants, they have pushed the dwarves toward increasingly destructive ends that could soon spell doom for all of Azeroth.
Quick Facts
| Type | Raid |
|---|---|
| Expansion | Classic |
| Encounters | 8 |
| Boss abilities | 123 |
| Drops | 77 |
| Item level | 1 to 584 |
| Tradeable drops | 0 |
Difficulties and Lockouts
Blackrock Depths has 3 difficulties in the game data: Normal, Heroic and Looking For Raid save you to a weekly lockout.
| Difficulty | Players | Level range | Lockout |
|---|---|---|---|
| Normal | 15 | 80 | Weekly |
| Heroic | 15 | 80 | Weekly |
| Looking For Raid | 15 | 30 to 80 | Weekly |
Raid Finder splits Blackrock Depths into 3 wings:
- The Elemental Overlords
- Shadowforge City
- The Imperial Seat
Loot Table Value
Every one of Blackrock Depths’s 77 drops is Bind on Pickup, so none of this loot can ever reach the Auction House. The table below the bosses is the complete reward list; its value is item level, not gold.
3D Model
First-party render from the game files. Model © Blizzard Entertainment.
Instance Map
The Adventure Guide places 8 bosses of Blackrock Depths on 2 maps. Numbers follow the encounter order; each links to that fight below.
Blackrock Depths
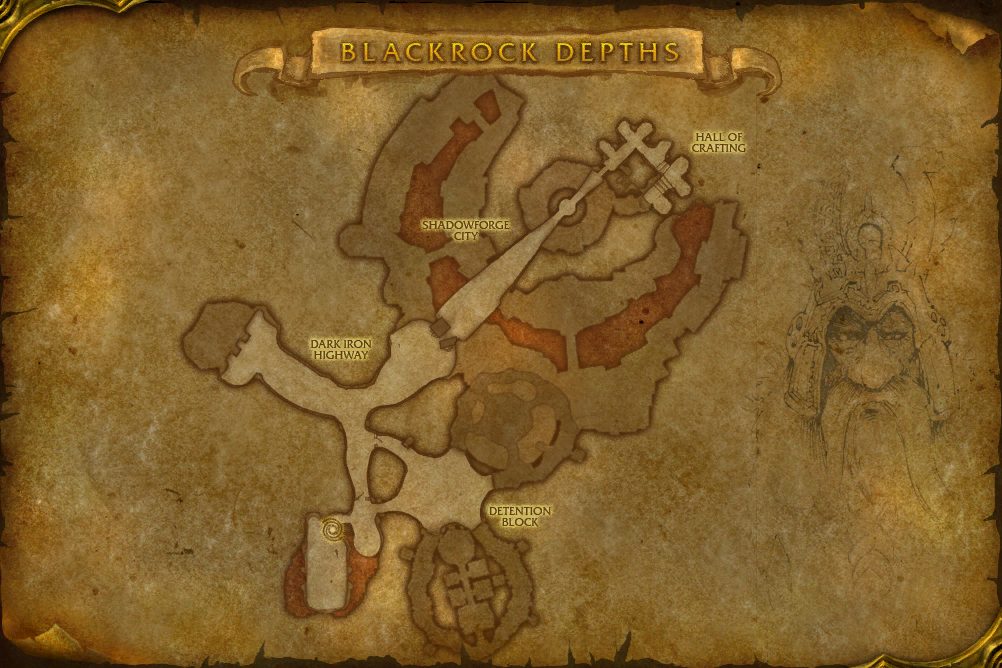 1Lord Roccor2Bael'Gar3Lord Incendius
- 1 Lord Roccor 44.5, 73.4
- 2 Bael'Gar 25.1, 53.5
- 3 Lord Incendius 46.3, 46.4
Blackrock Depths
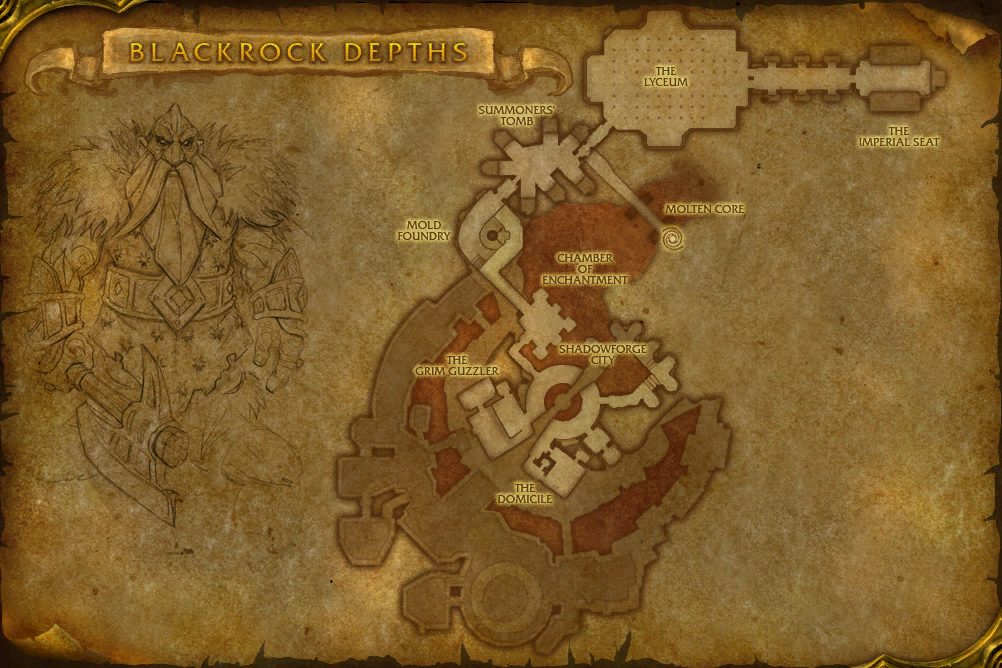 4Golem Lord Argelmach5The Seven6General Angerforge7Ambassador Flamelash8Emperor Dagran Thaurissan
- 4 Golem Lord Argelmach 48.6, 35.0
- 5 The Seven 53.8, 24.8
- 6 General Angerforge 66.7, 17.3
- 7 Ambassador Flamelash 81.2, 11.9
- 8 Emperor Dagran Thaurissan 91.0, 11.9
Encounters
Lord Roccor
Lord Roccor loathes the scheming and backstabbing of his fellow fire elementals. To avoid serving alongside his kind in the Molten Core, the mighty being purposefully angered the Firelord. Roccor's risky gambit paid off: he was expelled from the core and forced to guard Blackrock Depths in isolation.
Abilities & Strategy
Overview
Lord Roccor casts Roiling Magma on his target, inflicting damage and providing the raw material to Crystallize his obsidian progeny. When Lord Roccor reaches 95% health and every 20% damage suffered thereafter, he will cast Eruption, filling the room with Roiling Magma. Each Living Magma that reaches its destination will increase the power of the elemental created by Igneous Crystallization. Upon reaching 100 energy, Roccor casts Volcanic Upheaval, inflicting huge damage to all players.
Tanks
- Roiling Magma is cast on Lord Roccor's primary target and inflicts Fire damage to enemies in the area.
- Stepping on a Living Magma will destroy it and inflict damage over time to the player.
- When crystallized, Obsidian Elementals attack nearby players.
- Volcanic Upheaval inflicts significant damage to all players.
Damage Dealers
- Stepping on a Living Magma will destroy it and inflict damage over time to the player.
- When crystallized, Obsidian Elementals attack nearby players.
- Volcanic Upheaval inflicts significant damage to all players.
Healers
- Roiling Magma is cast on Lord Roccor's primary target and inflicts Fire damage to enemies in the area.
- Stepping on a Living Magma will destroy it and inflict damage over time to the player.
- Volcanic Upheaval inflicts significant damage to all players.

 Crystallize
Son of Roccor

 Eruption
 Living Magma
Igneous Crystallization
Son of Roccor
Greater Obsidian Elemental
Obsidian Elemental
Lesser Obsidian Elemental

Loot
10 drops · item level 584 · 8 slots (Legs, Neck, One-Hand, Ranged, Shield, Shoulder +2 more) · all Bind on Pickup


Bael'Gar
The monstrous molten giant Bael'Gar lumbers across the Dark Iron Highway, a stunning feat of dwarven engineering carved into Blackrock Depths. Ragnaros pulled the giant from the heart of the Firelands to guard a massive sealed door at one end of the highway. According to legend, only the Firelord and the Dark Iron clan's highest-ranking members know what lies beyond the mysterious gate.
Abilities & Strategy
Overview
Bael'Gar's Giant Strike inflicts enormous damage in a cone in front of him with every swing. Damage is split between players struck. Rockfall causes large boulders and small rocks to fall from the ceiling that players must avoid. Players will need to seek cover when Bael'Gar casts Molten Furnace. Any boulders that remain when Bael'Gar casts Shatter will inflict significant additional damage to the entire raid. Whenever a boulder is destroyed, several Spawns of Bael'Gar are created. When a Spawn of Bael'Gar is killed, its Molten Heart inflicts damage over time to a random player.
Tanks
- Tanks will need to split the damage of Giant Strike in order to survive.
- The large boulders created by Rockfall inflict higher damage the nearer players are to the point of impact.
- Any boulders that remain when Bael'Gar casts Shatter have the potential to make its damage lethal.
- When a boulder is destroyed several Spawns of Bael'Gar will be created and attack nearby players.
Damage Dealers
- The large boulders created by Rockfall inflict higher damage the nearer players are to the point of impact.
- Molten Furnace inflicts lethal damage to players that are not behind cover.
- Any boulders that remain when Bael'Gar casts Shatter have the potential to make its damage lethal.
- When a boulder is destroyed several Spawns of Bael'Gar will be created and attack nearby players.
Healers
- Tanks will need to split the damage of Giant Strike in order to survive.
- The large boulders created by Rockfall inflict higher damage the nearer players are to the point of impact.
- Molten Furnace inflicts lethal damage to players that are not behind cover.
- Any boulders that remain when Bael'Gar casts Shatter have the potential to make its damage lethal.
- When Spawns of Bael'Gar are killed they will deal damage over time to a random player with Molten Heart.

 Rockfall
Boulder
Boulders can be used to hide from Molten Furnace and release Spawns of Bael'Gar when destroyed.
Spawn of Bael'Gar
 Crumbling Ceiling


Loot
9 drops · item level 584 · 8 slots (Chest, Finger, Head, Legs, One-Hand, Trinket +2 more) · all Bind on Pickup


Lord Incendius
Baron Geddon taught Incendius to harness his destructive powers, but the baron never expected his protege to grow so lethally efficient. Increasingly wary that Incendius might usurp him, Geddon sent the blazing elemental out of the Molten Core to guard the Dark Iron dwarves' fabled Black Anvil.
Abilities & Strategy
Overview
Lord Incendius summons powerful Flame Geysers that will inflict deadly damage until they are brought under control. Even in defeat, a Flame Geyser casts Dying Flare which can hurl players off the bridge and inflict high damage. Lord Incendius will attempt to force players off the bridge with Scorching Wind. Tanks will need to work together to prevent Blowback from throwing them off the bridge. Flame Geysers that remain when Lord Incendius casts Scorching Wind may become extremely deadly.
Tanks
- Flame Geysers become more deadly the longer they are left alive. Each cast of Blaze becomes successively faster.
- When a Flame Geyser is defeated, players must split the damage caused by Dying Flare.
- Taunt Lord Incendius to prevent the other tank from being pushed off the bridge by Blowback.
- Be wary of being pushed off the bridge by Dying Flare or Scorching Wind.
Damage Dealers
- Flame Geysers become more deadly the longer they are left alive. Each cast of Blaze becomes successively faster.
- When a Flame Geyser is defeated, players must split the damage caused by Dying Flare.
- Be wary of being pushed off the bridge by Dying Flare or Scorching Wind.
Healers
- Consumptive Flames inflicts a short burst of high damage.
- Flame Geysers have the potential to inflict high damage to the entire raid until they are brought under control and defeated.
- It will be difficult to stop and cast during Scorching Wind.
- Be wary of being pushed off the bridge by Dying Flare or Scorching Wind.


 Summon Flame Geyser
Flame Geyser


Loot
7 drops · item level 584 · 4 slots (Back, One-Hand, Two-Hand, Wrist) · all Bind on Pickup


Golem Lord Argelmach
Argelmach's lifelong obsession with immortality drove him to forge enchanted constructs in his own image. Rumor has it that he has also dabbled in some form of black magic that would allow the golem lord's new creations to act as vessels for his spirit should his flesh-and-blood body be destroyed.
Abilities & Strategy
Overview
When Golem Lord Argelmach's spirit is released from his mortal coil, he will possess the golems around the Mold Foundry. The golem that is Possessed will gain energy over time. At maximum energy, it will unleash a powerful ability. Toxitron and Electron are stationary casters, while Magmatron and Arcanatron are powerful melee combatants. Moving the golems too close together will active Golem Overdrive, increasing their combat prowess.
Tanks
- Each time Arcanotron's Arcane Overcharge is caught, the explosion that occurs when it hits the ground will be reduced.
- Magmatron's Flamethrower can be used to burn away Chemical Bombs before Incineration combusts all of them at once.
- Moving golems too close together will activate Golem Overdrive.
Damage Dealers
- Power Generator will empower golems or players that intercept the energy orbs moving towards Arcanotron.
- Poison-Soaked must be burned away from players with Magmatron's Flamethrower.
- Players afflicted by Livewire will emit an Electrical Discharge when it is dispelled or expires.
- Players paired by Lethal Attraction must stand together or suffer lethal damage.
Healers
- Incineration and Poison Mist will inflict heavy damage to the entire raid.
- Poison-Soaked must be burned away from players with Magmatron's Flamethrower.
- Players afflicted by Livewire will emit an Electrical Discharge when it is dispelled or expires.
- Players paired by Lethal Attraction must stand together or suffer lethal damage.
Golem Lord Argelmach


Arcanotron Mk. II


Magmatron Mk. II


Electron Mk. II


Loot
8 drops · item level 584 · 6 slots (Chest, Feet, Finger, Shoulder, Trinket, Two-Hand) · all Bind on Pickup


The Seven
Centuries ago, sorcerer-thane Thaurissan and seven of his most powerful Dark Iron allies accidentally summoned Ragnaros into Azeroth and damned their entire clan to enslavement. Although the Seven perished during the ritual, their restless spirits still linger in Blackrock Depths, cursed to serve their elemental master and the current Dark Iron ruler.
Abilities & Strategy
Overview
The Seven alternate between manifesting fully in the physical realm and returning to their ghostly state becoming Corporeal or Incorporeal. While Corporeal, each member of the Seven inflicts and suffers full damage and has access to more powerful abilities. Anger'rel and Gloom'rel will remain Corporeal through the entire encounter while the third Corporeal member of the Seven changes as the encounter progresses. When a member of the Seven reaches full energy, they will use their most powerful ability.
Tanks
- Gloom'rel and Anger'rel will remain Corporeal through the entire encounter.
- Anger'rel will charge a distant player and use Bladestorm when he reaches full energy.
- Gloom'rel will use Recklessness when he reaches full energy.
- Each of the Seven have a deadly ultimate ability they will use when they reach maximum energy. The entire raid must respond to these moments in order to defeat the Seven.
Damage Dealers
- Three of the Seven will be Corporeal at a time and suffer full damage.
- Seeth'rel's Blizzard creates a deadly hazard targeting a random player.
- Vile'rel's Power Word: Respite creates an absorb that heals its target while it persists.
- Each of the Seven have a deadly ultimate ability they will use when they reach maximum energy. The entire raid must respond to these moments in order to defeat the Seven.
Healers
- Doom'rel will Banish a random player when he is Corporeal.
- Dope'rel's Smoke Bomb will reduce spell range while it persists.
- Hate'rel's Magma Burn will become deadly if it stacks too high.
- Each of the Seven have a deadly ultimate ability they will use when they reach maximum energy. The entire raid must respond to these moments in order to defeat the Seven.
Anger'rel


Gloom'rel


Dope'rel


Seeth'rel


Loot
10 drops · item level 584 · 8 slots (Chest, Feet, Hands, Head, Legs, One-Hand +2 more) · all Bind on Pickup


General Angerforge
Through a lifetime of study, General Angerforge has become an expert on dwarven military history and tactics. He recently incurred Emperor Dagran Thaurissan's fury by writing a scathing treatise on his clan's failures in past conflicts. This political blunder aside, Angerforge is a Dark Iron to his core. He will bleed--and die, if necessary--to protect his people and his emperor.
Abilities & Strategy
Overview
General Angerforge commands an army within the Lyceum in defense of the Imperial Throne. Players will need to overcome an array of firepower in order to reach the general. Harbingers of Flame channel World In Flames, wreathing all players within the Lyceum in intensifying Fire damage. The Harbingers of Flame cannot be damage until the Shadowforge Braziers are lit using the Shadowforge Torches carried by the Shadowforge Flame Keepers. After both Shadowforge Braziers are lit, the burning barriers protecting General Angerforge will fall, opening the general up to attack directly.
Tanks
- The Commanding Aura of General Angerforge and Anvilrage Officers drastically increases the combat prowess of nearby Dark Iron.
- General Angerforge and Anvilrage Officers cast Shatter Armor. It will not be removed until the end of the encounter.
- Your allies will need to be protected from many different Dark Iron soldiers in order to succeed.
Damage Dealers
- Anvilrage Medics will attempt to Heal their allies.
- Anvilrage Rogues Fixate a player until death.
- Anvilrage Sappers will Detonate upon reaching a player, inflicting high Physical damage.
- General Angerforge's Fireburst Grenade can be avoided by taking cover behind a column.
Healers
- World In Flames will continue to deal increasing Fire damage. Defeating a Harbinger of Flames will slow incoming damage.
- Anvilrage Rogues Fixate a player until death.
- Anvilrage Sappers will Detonate upon reaching a player, inflicting high Physical damage.
- The pillars within the Lyceum can be used to avoid Firing Lines and Fireburst Grenade, but will also make it challenging to heal players who move on their own.


Harbinger of Flames

Shadowforge Flame Keeper


Anvilrage Officer
Anvilrage Medic


Anvilrage Soldier
Anvilrage Rogue


Anvilrage Sapper

Anvilrage Artillerist

Anvilrage Dragoon

Loot
13 drops · item level 584 · 10 slots (Chest, Feet, Hands, Legs, One-Hand, Ranged +4 more) · all Bind on Pickup


Ambassador Flamelash
For his unwavering service to Ragnaros, Flamelash ascended to the rank of ambassador to the Dark Iron clan. This depraved being initially despised his dwarven allies, but he has come to respect their penchant for destruction.
Abilities & Strategy
Overview
Ambassador Flamelash calls upon the denizens of the Firelands to incinerate his foes. When Ambassador Flamelash casts Open Firelands Portals, players must quickly spread in order to defeat Burning Spirits and destroy portal anchors. If too many spirits successfully cast Fury of the Firelands, the damage from Ambassador Flamelash will become overwhelming. Until all portal anchors are destroyed, Unstable Portal will continue to inflict damage to the entire raid. When Ambassador Flamelash reaches maximum energy, he casts Cremate, which must be split between multiple players. The Cremation left behind by Cremate should be quickly dispelled or will overwhelm the raid.
Tanks
- Tanks will need to split the damage of Cremate in order to survive, and the Flamelash it leaves behind makes a player more susceptible to Fire damage until it fades.
- Firestarter's Explosive Impact inflicts heavy Physical damage.
- Flamewalkers are a powerful melee combatant that is also capable of casting Magma Infusion.
Damage Dealers
- Firestarters should be lured away from the raid. The explosion from Torch is large and inflicts high damage.
- Flamewalkers cast Magma Infusion until they are defeated, making it more difficult to navigate the Iron Hall.
- Players should destroy portal anchors as quickly as possible while ensuring Burning Spirits do not successfully cast Fury of the Firelands.
Healers
- Healers should quickly dispel Cremation from players that split the damage of Cremate.
- Tanks afflicted by Flamelash will suffer increased Fire damage.
- When a Flamewalker is killed, it will depart with an Explosive Demise.
- Incoming damage can quickly become overwhelming during Open Firelands Portals unless the raid manages every threat successfully.


Loot
9 drops · item level 584 · 7 slots (Back, Hands, Head, One-Hand, Shoulder, Trinket +1 more) · all Bind on Pickup


Emperor Dagran Thaurissan
Emperor Dagran Thaurissan rules alongside Princess Moira of the rival Bronzebeard clan. Debate rages over whether the emperor ensorcelled his bride or she willingly joined him. Whatever the truth, Thaurissan's continued presence bodes ill for the future of his clan. So long as he lives, the Dark Irons will remain pawns of Ragnaros, and a dire threat to kingdoms throughout Azeroth.
Abilities & Strategy
Overview
Emperor Dagran Thaurissan and Princess Moira Bronzebeard are both formidable combatants. Moira's Shadow Word: Nemesis and Shadow Word: Necrosis must be managed carefully or they will overwhelm the raid. Moira will attempt to heal Dagran with Radiant Infusion. Dagran is a dangerous melee combatant that will Call Imperial Guard and Call Twilight's Hammer Ambassadors to repel the invaders. When Moira is defeated, Dagran will transform into a powerful Avatar of Flame, empowering all his abilities. When he becomes desperate, Dagran willl Beseech The Firelord to save him. The Avatar of Ragnaros unleashes devastation that will slowly consume the entire room in molten fire until Dagran is defeated. Dagran will no longer call Imperial Guard or Twilight's Hammer Ambassadors to his side once Ragnaros joins the battle.
Tanks
- Moira and Dagran's abilities are more difficult to avoid if they are near one another.
- Imperial Guards will arrive in mole machines on both ends of the room.
- Ironfoe's multiattack inflicts bursts of physical damage to Dagran's tank.
- Iron Brand will become lethal if it stacks too high.
- Fireguard Destroyers summoned by the Avatar of Ragnaros are powerful melee combatants in addition to inflicting high Fire damage to the entire raid.
Damage Dealers
- If Moira is not defeated quickly, Shadow Word: Nemesis and Shadow Word: Necrosis will overwhelm the raid.
- Twilight's Hammer Ambassadors inflict high damage with Pyroblast and they must be killed before they finish casting Moment of Twilight.
- Dagran's abilities will be more difficult to avoid and inflict higher damage when he becomes an Avatar of Flame.
- The damage of Avatar of Ragnaros' Volcanic Blast must be split and it will create Volcanic Stone beneath the target's feet.
- When a Fireguard Destroyer is destroyed, it will erupt in a Fiery Demise.
Healers
- If Shadow Word: Nemesis is dispelled, it will jump to two players. Try to delay removal as long as possible.
- When Shadow Word: Necrosis is passed, it will inflict raid wide damage, but target's cannot be healed while they suffer from it.
- Dagran's tank will suffer frequent burst of high damage.
- Once the Avatar of Ragnaros is summoned, the damage to the raid will spike significantly. All of his abilities inflict raid wide damage.
Emperor Dagran Thaurissan
 Ironfoe
 Hand of Thaurissan
 Magma Clap
 Avatar of Flame

 Call Imperial Guard
Dark Iron Imperial Guard
 Call Twilight's Hammer Ambassador
Twilight's Hammer Ambassador
 Beseech the Firelord
Princess Moira Bronzebeard


Avatar of Ragnaros


Loot
11 drops · item level 1 to 584 · 10 slots (Chest, Feet, Finger, Hands, Head, Held In Off-hand +4 more) · all Bind on Pickup


More Classic Raids
Other raids from the same expansion.