 TheWoWDB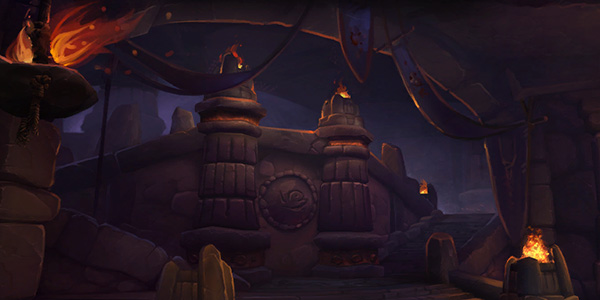
Raid - Warlords of Draenor
Highmaul
7 encounters, 98 boss abilities and 149 drops, with the Adventure Guide’s own ability and strategy notes for each fight. Every drop links to its item page; tradeable drops carry a live Auction House price.
Highmaul is the seat of power for the Gorian Empire, the ogre civilization that ruled Draenor for generations, until the arrival of the draenei. A massive city that belies the ogre reputation for brutish stupidity, Highmaul is full of bustling markets, wealthy nobles, and the roar of the Coliseum crowd echoing through the streets of the slums. Visible from everywhere within the city's walls, Imperator Mar'gok's citadel casts a long shadow, a reminder of his watchful eye and iron grip.
Quick Facts
| Type | Raid |
|---|---|
| Expansion | Warlords of Draenor |
| Encounters | 7 |
| Boss abilities | 98 |
| Drops | 149 |
| Item level | 1 to 44 |
| Tradeable drops | 4 |
| Difficulties | Looking For Raid, Normal, Heroic, Mythic |
Difficulties and Lockouts
Highmaul has 4 difficulties in the game data: Normal, Heroic, Mythic and Looking For Raid save you to a weekly lockout.
| Difficulty | Players | Level range | Lockout |
|---|---|---|---|
| Normal | 30 | 40 | Weekly |
| Heroic | 30 | 40 | Weekly |
| Mythic | 20 | 40 | Weekly |
| Looking For Raid | 30 | 40 | Weekly |
Raid Finder splits Highmaul into 3 wings:
- Walled City
- Arcane Sanctum
- Imperator's Rise
Loot Table Value
4 of Highmaul’s 149 drops are tradeable, and 4 of those are on the Auction House right now. The richest is Gauntlets of the Heavy Hand at 4,769g (median across 49 realms).
| Tradeable drop | Median price | Cheapest listing | Listed on |
|---|---|---|---|
| Gauntlets of the Heavy Hand | 4,769 gold | 100 gold | 49 realms |
| Grips of Vicious Mauling | 3,308 gold | 150 gold | 57 realms |
| Throat-Ripper Gauntlets | 3,038 gold | 36 gold | 50 realms |
| Meatmonger's Gory Grips | 2,475 gold | 200 gold | 53 realms |
Median is the middle price across every connected realm that currently lists the item, from our own Auction House scan, updated 1h ago.
Where It Is
The entrance to Highmaul is in Nagrand at 32.8, 38.4.
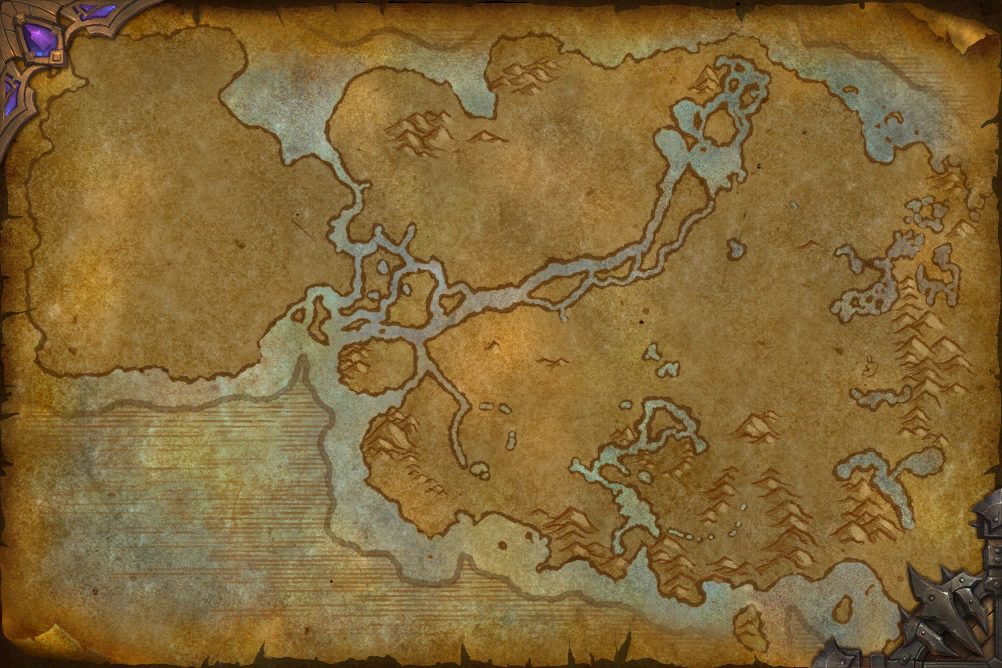 Abandoned CargoAdventurer's MaceAdventurer's PackAdventurer's PouchAdventurer's SackAdventurer's StaffA Pile of DirtAppropriated Warsong SuppliesBag of HerbsBone-Carved DaggerBounty of the ElementsBrilliant DreampetalBurning Blade CacheElemental OfferingElemental ShacklesFragment of Oshu'gunFreshwater ClamFungus-Covered ChestGambler's PurseGenedar DebrisGoblin PackGolden Kaliri EggGoldtoe's PlunderGrizzlemaw's BonepileHidden StashHighmaul SledgeImportant Exploration SuppliesLost PendantMountain Climber's PackOgre BeadsPale ElixirPokkar's Thirteenth AxePolished Saberon SkullSaberon StashSmuggler's CacheSpirit CofferSpirit's GiftSteamwheedle SuppliesTelaar Defender ShieldTreasure of Kull'kroshVoid-Infused CrystalWarsong CacheWarsong HelmWarsong LockboxWarsong SpearWarsong SpoilsWarsong SuppliesWatertight BagEntrance 32.8, 38.4
Nagrand, from the game’s own world map art. The framed marker is the Adventure Guide entrance; gold diamonds are the zone’s landmarks.
3D Model
First-party render from the game files. Model © Blizzard Entertainment.
Instance Map
The Adventure Guide places 7 bosses of Highmaul on 4 maps. Numbers follow the encounter order; each links to that fight below.
Highmaul
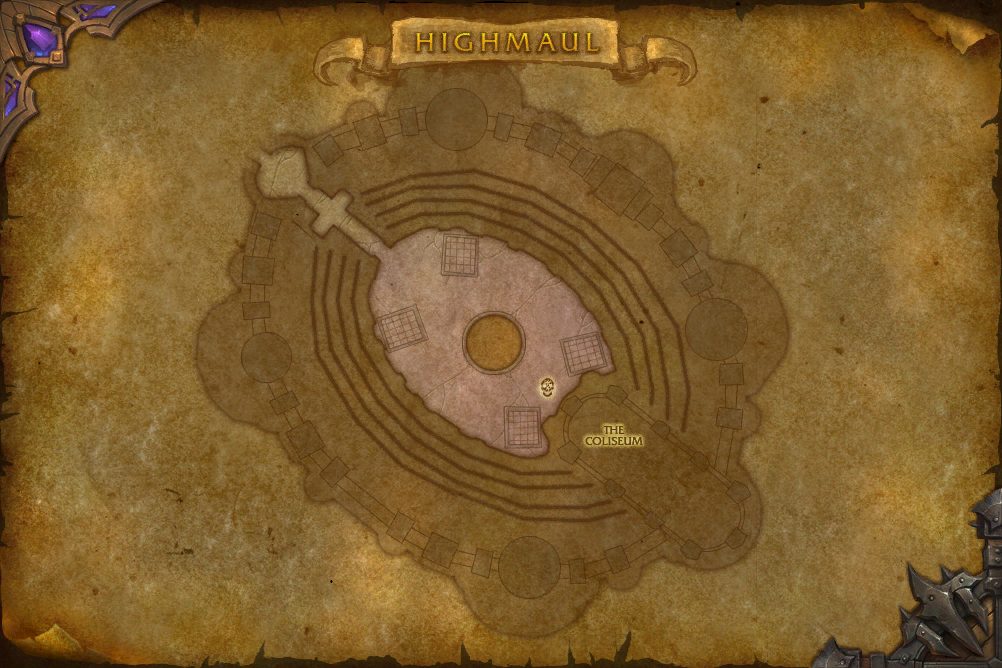 1Kargath Bladefist
- 1 Kargath Bladefist 54.8, 57.7
Highmaul
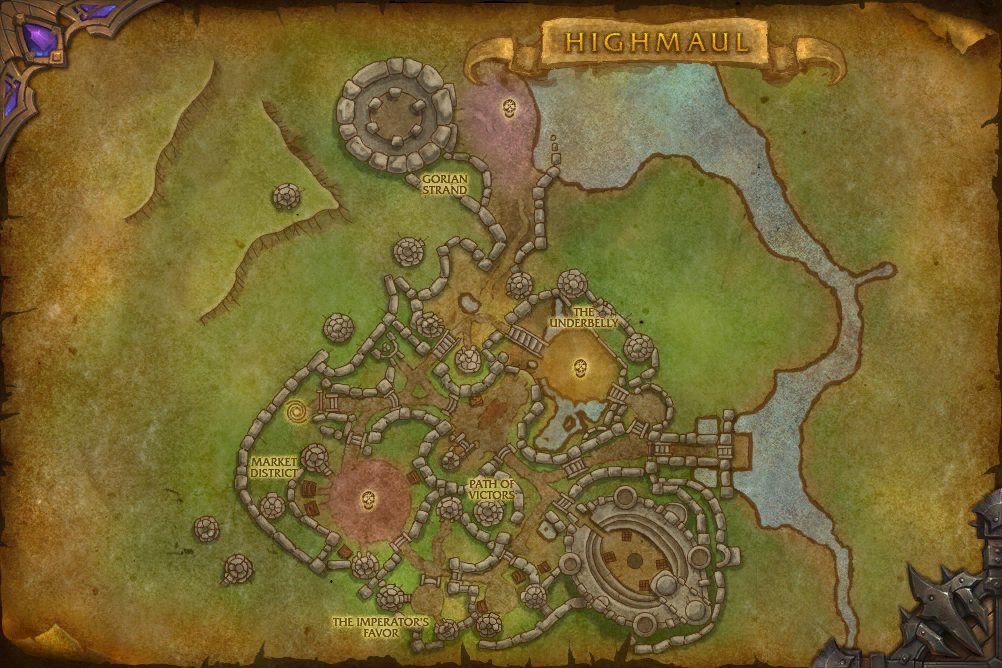 2The Butcher3Tectus4Brackenspore
- 2 The Butcher 57.9, 55.1
- 3 Tectus 37.0, 74.8
- 4 Brackenspore 50.9, 16.4
Highmaul
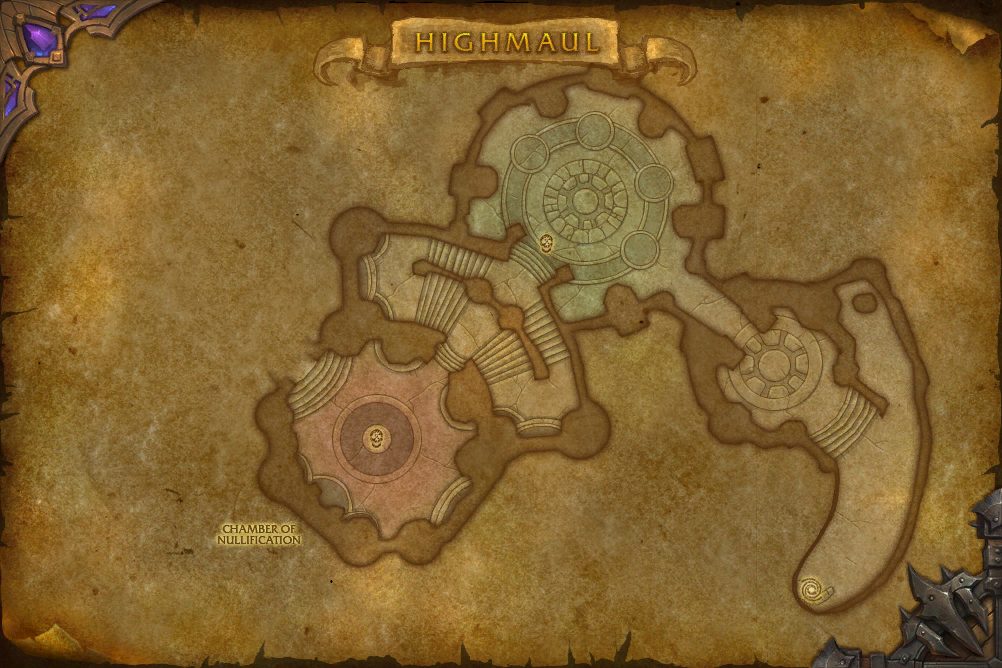 5Twin Ogron6Ko'ragh
- 5 Twin Ogron 55.1, 36.4
- 6 Ko'ragh 37.8, 65.5
Highmaul
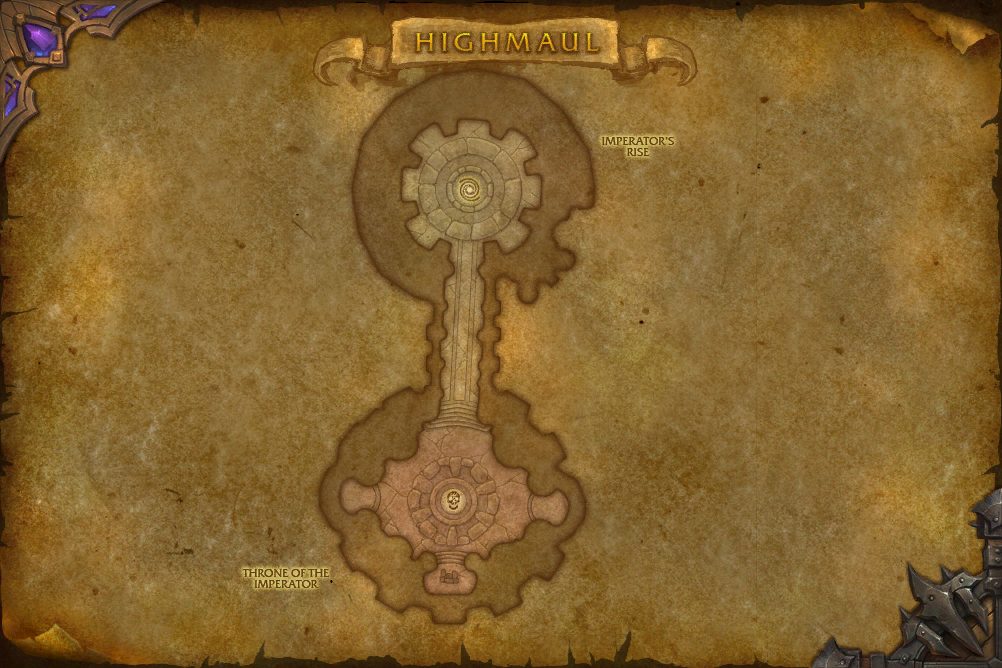 7Imperator Mar'gok
- 7 Imperator Mar'gok 45.3, 75.2
Encounters
LFRLooking For RaidNNormalHHeroicMMythic
The Butcher
Born in the fetid Underbelly of Highmaul, this ogre may have once had a proper name, but it is long forgotten. Abused and beaten from his earliest days, the hardship only strengthened his body even as it broke his mind. Now there is not an ogre in Highmaul who will not give him a wide berth as he hacks away at slaughtered carcasses to pass his days.
Abilities & Strategy
Overview
The Butcher attacks relentlessly, hacking at his foes with his dual implements of destruction. His main abilities seek to target large clumps of enemies, and positioning is key to handling and overcoming his attacks.
Damage Dealers
- Players in melee range must form clumps of varying sizes throughout the fight to manage the Butcher's Cleave and allow Gushing Wounds to fade.
- Players at range must clump in order to survive the Butcher's Bounding Cleave sequence.
Healers
- Groups that are struck by Cleave suffer periodic damage from Gushing Wounds, which can stack.
- All players in the raid suffer Physical damage when the Butcher begins his Bounding Cleave sequence.
Tanks
- Heavy Handed causes the Butcher to attack the player closest to his current target with a copy of all of his melee attacks. These attacks can be mitigated and avoided as usual. If another player is not close enough, the second attack will trigger on the primary target.
- The Tenderizer will always hit. It cannot be dodged or parried, but it can be blocked.
- The Cleaver will only apply its damage over time effect if the attack successfully lands on its target.
Heavy Handed
All of the Butcher's standard auto attacks trigger a second attack on the next closest target within 5 yards. If no target is found, the primary target is struck again.


Bounding Cleave
When the Butcher reaches 100 Energy he begins the Bounding Cleave sequence by knocking all players back, then charging to a clump at range and cleaving targets within that clump.

Frenzy
After the Butcher reaches 30% health remaining, he Frenzies. While Frenzied the Butcher deals 10% more damage and attacks 30% faster.
Night-Twisted Cadaver
In Mythic Difficulty, Night-Twisted Cadavers will spawn and walk towards The Butcher in a final, vain attempt to slay him. When the Cadaver reaches The Butcher or when they walk near a player, they will Explode, leaving a pool of Pale Vitriol behind for the duration of the encounter.


Loot
21 drops · item level 44 · 10 slots (Back, Feet, Finger, Hands, Head, One-Hand +4 more) · 2 tradeable
 Belt of Bloody Guts
 Bloodstone Seal
 Bonebreaker Boots
 Bracers of Spare Skin
 Butcher's Bloody Cleaver
 Butcher's Cruel Chopper
 Butcher's Terrible Tenderizer
 Cloak of Frenzied Rage
 Emblem of Gushing Wounds
 Entrail Squishers
 Flenser's Hookring
 Fleshhook Cloak
 Gauntlets of the Heavy Hand
 Gutwrench Ring
 Hood of Dispassionate Execution
 Meatmonger's Gory Grips
 Ogre-Eater Treads
 Scales of Doom
 Slaughterhouse Spaulders
 Spine-Ripper Bracers
 Sterilized Handwraps
Kargath Bladefist
Kargath Bladefist, Warlord of the Shattered Hand, honed his brutal skills as a slave in the ogres' gladiatorial games. He slaughtered countless opponents for the promise of freedom, but after winning, was locked away with the other retired "champions." Fueled by rage, Kargath tore off his own hand to escape and led a revolt that soaked Draenor in ogre blood. Now, he returns to the arena to teach you the true meaning of savagery.
Abilities & Strategy
Overview
Kargath's Berserker Rush cannot be stopped until he either kills his target, or finds something else to take his anger out on. As the fight progresses, Iron Bombers and Drunken Bileslingers rain destruction from the arena stands. Players can dispatch these creatures after being tossed into the crowd by Kargath's Chain Hurl. In Mythic difficulty, the raid must perform well to gain favor that is tracked by Roar of the Crowd. If the raid gains enough favor from Roar of the Crowd, the raid is granted increased damage dealing.
Damage Dealers
- Iron Bombers and Drunken Bileslingers will continue to harass the raid from the stands until they are killed.
Healers
- Kargath inflicts massive damage to the tank with his Impale ability.
- Iron Bombers inflict raidwide damage until they are killed.
Tanks
- Kargath's Impale leaves Open Wounds on his target that increases the damage of consecutive Impales.
Roar of the Crowd
Favor gained by performing well is tracked by Roar of the Crowd. As the raid's favor increases, they gain Crowd Favorite buffs that increase the raid's damage done.
Kargath Bladefist
 Impale
 Blade Dance
 Berserker Rush
In Mythic difficulty, the raid gains favor for Roar of the Crowd the longer Kargath stays in Berserker Rush. However, if Kargath's fixate target dies, the raid loses a big chunk of favor.
 Chain Hurl
In Looking for Raid difficulty, Kargath automatically tosses the tank with the highest amount of Open Wounds stacks, one random healer, and three random DPS into the crowd.
Monster's Brawl
Kargath uses Chain Hurl to toss raid members into the arena stands. Once in the stands, the raid members can attack the audience until either the Highmaul Sweeper knocks them out of the stands, or their corpse is thrown back into the arena.
Drunken Bileslinger
Drunken Bileslingers appear in the stands and throw Mauling Brew into the arena.


Iron Bomber
Iron Bombers appear in the stands and hurl Iron Bombs into the raid.


Iron Grunt
A seemingly endless throng of rowdy orcs. In Mythic difficulty, killing Iron Grunts grants favor for Roar of the Crowd.

Fire Pillar
A pillar of screaming skulls that belch a continuous stream of flames.


Ravenous Bloodmaw
Ravenous Bloodmaws prowl hungrily within their pits, waiting to maul anyone unfortunate enough to fall in. In Mythic Difficulty, the Ravenous Bloodmaws are released from their pits. Setting these beasts on fire will gain favor for Roar of the Crowd.

Loot
21 drops · item level 1 to 44 · 12 slots (Back, Chest, Feet, Finger, Hands, Head +6 more) · 2 tradeable
 Bileslinger's Censer
 Blade Dancer's Claws
 Bloodmaw's Tooth
 Bracer of Amputation
 Casque of the Iron Bomber
 Champion's Medallion
 Chestguard of the Roaring Crowd
 Fireproof Greatcloak
 Firewalker's TreadsFlamescarred Drape
 Grips of Vicious Mauling
 Grunt's Rusty Ring
 Grunt's Solid Signet
 Iron Bomb Spaulders
 Kargath's Last Link
 Spectator's Sandals of Carnage
 The Bladefist
 Throat-Ripper Gauntlets
 Treads of Sand and Blood
 Vilebreath Mask
 Illusion: Mark of the Shattered Hand
Twin Ogron
Guarding the entrance to the Gorthenon atop Highmaul, Pol and Phemos are the personal guard of Imperator Mar'gok. Peerless in strength and determination, what these ogron brothers lack in intelligence, they make up for with sheer size and brute force.
Abilities & Strategy
Overview
The Twin Ogron combat players while performing attacks at specific energy thresholds. At 33 energy, an Ogron uses his special weapon attack. At 66 energy, an Ogron performs a large shout. Finally, at 100 energy, an Ogron performs a large, raid-wide attack. As the distance between the Ogron increases, their haste increases and casting time additionally decreases, reducing the amount of time players have to react to various abilities.
Damage Dealers
- Stand near Phemos for Enfeebling Roar, as he splits damage, effectiveness, and duration amongst nearby targets.
- Be wary of the radius of Whirlwind and the path of Shield Charge.
Healers
- Be ready to heal on the move when Quake and Blaze begins.
- Watch for Interrupting Shout, as it will interrupt and lock you out of spellcasting for a short duration.
Tanks
- Whirlwind has a large radius, and can be deadly when combined with Shield Bash.
- Controlling the distance between the Twin Ogron is essential to managing the potency of their abilities.
Pol


Phemos


Loot
20 drops · item level 44 · 13 slots (Back, Chest, Finger, Hands, Held In Off-hand, Legs +7 more) · all Bind on Pickup
 Absalom's Bloody Bulwark
 Belt of Imminent Lies
 Bracers of Cursed Cries
 Bracers of the Crying Chorus
 Captured Arcane Fragment
 Chestplate of Arcane VolatilityCloak of Ruminant Deception
 Dagger of Enfeeblement
 Fire-Blind Necklace
 Golden-Tongued Seal
 Odyssian Choker
 Phemos' Double Slasher
 Pol's Blinded Eye
 Pulverizing Grips
 Ring of Enfeebling Accusations
 Sea-Cursed LeggingsShards of Nothing
 Shoulderguards of the Shepherd
 Treacherous Palms
 Twin-Gaze Spaulders
Ko'ragh
Ko'ragh was the only ogre to survive direct exposure to a mysterious relic unearthed by the Highmaul excavations of Nagrand, and was left with a near-complete immunity to all magic. Rumors abound regarding his connection to the Imperator, with some wondering why Ko'ragh would remain subservient to a sorcerer despite his unique gifts.
Abilities & Strategy
Overview
Ko'ragh is protected by a Nullification Barrier that absorbs all magic damage taken. When the barrier is removed, he activates a rune that recharges it. While recharging, one player may also absorb some of the rune's energy and receive a Nullification Barrier. As the fight progresses, an increasing amount of Overflowing Energy orbs spill from the rune and float to the ground, exploding when they land. Players who have a Nullification Barrier can catch and absorb Overflowing Energy to mitigate the amount of raid wide damage and prevent a lethal amount of damage from occurring. In Mythic difficulty, two players may enter the rune per phase of Charging.
Damage Dealers
- Absorb Caustic Energy to gain a Nullification Barrier.
- Avoid Overflowing Energy until you have a Nullification Barrier. Absorb Overflowing Energy when you do have a Nullification Barrier.
Healers
- Focus intense healing on players absorbing Caustic Energy to allow them to survive the transformation.
- Expel Magic: Fire inflicts heavy raid wide damage and requires dispels to mitigate some of the damage.
- Expel Magic: Shadow absorbs all healing on the raid until it is removed.
Tanks
- Tanks marked with Expel Magic: Arcane must run away from their allies and avoid the periodic explosions.
- Volatile Anomalies will spawn periodically during the charging phase. If they are killed within a Suppression Field, they will not cast Destabilize.
 Nullification Barrier
 Breaker's Strength
Charging
When the Ko'ragh's Nullification Barrier is removed, he begins to recharge. After 20 sec, the barrier is restored.
Caustic Energy
One player may enter the rune with Ko'ragh, absorbing a portion of its energy. This effect pierces all immunities and damage reductions. When the rune powers down, the player receives their own Nullification Barrier, proportional to the amount of time spent inside the rune. The Nullification Barrier received by players can absorb up to Magic damage. In Mythic difficulty, two players may enter the rune per phase of Charging. In Raid Finder difficulty, five players may enter the rune per phase of Charging.
Volatile Anomalies
While the Rune of Nullification is active, 3 Volatile Anomalies spawn every 8 sec.

Expel Magic


 Overflowing Energy
In Mythic difficulty, the rate that Overflowing Energy forms is accelerated.


Loot
22 drops · item level 44 · 12 slots (Back, Chest, Feet, Finger, Head, Legs +6 more) · all Bind on Pickup
 Alloy-Inlaid Cap
 Bracers of Mirrored Flame
 Cloak of Overflowing Energies
 Cloak of Searing Shadows
 Crackle-Proof Chestguard
 Destablized Sandals
 Emblem of Caustic Healing
 Fel-Flame Coronet
 Gar'tash, Hammer of the Breakers
 Idol of Suppression
 Ko'ragh's Boot Knife
 Ko'ragh's Family Locket
 Leggings of Broken Magic
 Legplates of Arcanic Absorbtion
 Magic-Breaker Greatsword
 Necklace of Volatile Anomalies
 Polearm of Expulsion
 Rod of Fel Nullification
 Rune-Enscribed Hood
 Seal of Unbound Frost
 Shield-Shatter Longbow
 Spell-Sink Signet
Tectus
An ancient embodiment of the chaotic forces that shaped the terrain of Draenor, Tectus has been twisted and enslaved by the maddened Pale Orcs - who themselves barely maintain control over this imposing force of nature.
Abilities & Strategy
Overview
Tectus cannot be killed by traditional means. He builds energy, channeling Tectonic Upheaval whenever he reaches 100. Depleting Tectus's health before the end of Upheaval shatters it into two Shards of Tectus; otherwise, Tectus heals and resumes gaining energy. Each Shard splits into four Motes of Tectus when shattered. Players must kill all eight Motes to defeat Tectus.
Damage Dealers
- Deplete Tectus' health before the end of Tectonic Upheaval.
- Move out of the rumbling earth before the eruption of Earthen Pillar!
Healers
- Players will take heavy damage during Tectonic Upheaval.
- Move out of the rumbling earth before the eruption of Earthen Pillar!
Tanks
- Face Night-Twisted Earthshapers away from other players to minimize damage from Earthen Flechettes.
- Intercept Gift of Earth if you are not tanking Tectus.
- Move out of the rumbling earth before the eruption of Earthen Pillar!
Tectus, The Living Mountain
Tectus begins the battle fully formed, able to inflict full damage.
 The Living Mountain
 Accretion
of Tectus when he gains Accretion, they will also gain Accretion.
 Earthen Pillar
On Mythic difficulty, Tectus also uses this ability at 50 Energy.
 Crystalline Barrage
 Fracture
 Tectonic Upheaval
 Hollowed Heart of the Mountain
Shard of Tectus
When shattered, the remnants of Tectus will form two Shards of Tectus. Shards of Tectus share Tectus' abilities, but individually deal less damage.
 Shard of the Mountain
Accretion
of Tectus when he gains Accretion, they will also gain Accretion.
Crystalline Barrage
Fracture
Earthen Pillar
On Mythic difficulty, Tectus also uses this ability at 50 Energy.
Tectonic Upheaval
Hollowed Shard of the Mountain
Mote of Tectus
When shattered, the remnants of each Shard of Tectus will form four Motes of Tectus. Motes of Tectus do not need to be shattered. Players are victorious over Tectus after they have killed all of the Motes of Tectus.
 Mote of the Mountain
Accretion
Crystalline Barrage
Fracture
Earthen Pillar
On Mythic difficulty, Tectus also uses this ability at 50 Energy.
Tectonic Upheaval
Night-Twisted Pale
While Tectus is fully formed, Night-Twisted Pale will attempt to enter the fight, empowering Tectus and attacking players. In Mythic difficulty, Night-Twisted pale continue to attack after Tectus is shattered.


Loot
23 drops · item level 1 to 44 · 12 slots (Chest, Feet, Finger, Head, Legs, Neck +6 more) · all Bind on Pickup
 Chestwrap of Violent Upheaval
 Cratermaker Choker
 Crown of the Crags
 Crystal-Woven BracersEarthfury Band
 Earthwarped Bladestaff
 Eye of Tectus
 Flechette-Riddled Chain
 Frostcap Band
 Legguards of Ravenous Assault
 Legplates of Fractured Crystal
 Living Mountain Shoulderguards
 Mote of the Mountain
 Mountainslide Robes
 Mountainwalker's Boots
 Pillar of the Earth
 Ring of Infinite Accretion
 Shard of Crystalline Fury
 Shield of Violent Upheaval
 Signet of Crystalline Barrage
 Spire of Tectus
 Tectus' Beating HeartIllusion: Rockbiter
Brackenspore
The Iron Horde juggernaut moored in the waters beside Highmaul drew the attention of Brackenspore, ancient walker of the deep. The aquatic giant spreads fungal growth and moss in his wake, and is driven by primal instinct to eradicate any traces of civilization on Draenor.
Abilities & Strategy
Overview
Brackenspore emerges from the infested waters beneath the cliffs of Highmaul, spreading fungal growth that will engulf the beach if left unchecked. Players must use available Flamethrowers to keep Creeping Moss in check, while defeating hostile fungi that Brackenspore creates in his wake.
Tanks
- Grab the attention of Fungal Flesh-Eaters as they stream in from the sea.
- Interrupt Decay which is cast by the Fungal Flesh-Eaters.
Damage Dealers
- Interrupt Decay which is cast by the Fungal Flesh-Eaters.
- Intercept the damage from Spore Shot away from other players, to avoid splashing the damage.
Healers
- Heal friendly mushrooms to full to gain their effects. Once they are healed to full they will begin to wither and die at an increasing rate. Keep them healed in order to maintain their beneficial effects.
- Heal Living Mushrooms to full to gain Living Spores in order to survive the damage caused by Infesting Spores.


Hostile Fungus


Beneficial Mushrooms
Living Mushroom
Heal this unit to full to gain the effects of Living Spores.


Rejuvenating Mushroom
Heal this unit to full to gain Rejuvenating Spores.

Blackfuse Company 9000
Players may use this weapon to burn away Creeping Moss.


Loot
19 drops · item level 44 · 11 slots (Back, Chest, Feet, Hands, Neck, Ranged +5 more) · all Bind on Pickup
 Bottle of Infesting Spores
 Carnage Breath Gauntlets
 Cloak of Creeping Necrosis
 Collar of Wailing Mouths
 Crystalline Branch of the Brackenspore
 Deep Walker Paulders
 Fleshchewer Greatbelt
 Girdle of the Infected Mind
 Grips of Burning Infusion
 Immaculate Living Mushroom
 Maw of Souls
 Mosscrusher Sabatons
 Moss-Woven Mailshirt
 Robes of Necrotic Whispers
 Rotmelter Mosscloak
 Rotmonger BracersSandals of Mycoid Musing
 Shoulderguards of Perpetually Exploding Fungus
 Tide-Caller's Gorget
Imperator Mar'gok
As the grand Imperator of Highmaul, Mar'gok is descended from a long line of sorcerers who have ruled the Gorian Empire. Equal parts cunning and brutality, Mar'gok recognized the rising tide of the Iron Horde and what it would mean to oppose them. He has acquiesced to an alliance with Grommash, even as he continues to search for a way to tip the balance of power back into his favor.
Abilities & Strategy
Overview
Imperator Mar'gok assaults players with destructive Arcane magic and summons Arcane Aberrations to fight for him. When Imperator Mar'gok reaches 85%, 55% and 25% health remaining, he activates one of the runestones in his throne room, augmenting his abilities with additional effects. The runestones activated at 55% and 25% must be awakened from their dormant state. As they charge, guards arrive to defend the Imperator as Volatile Anomalies pour from the stone. In Mythic difficulty, Imperator Mar'gok maintains the effects of 2 runestones at once and begins to awake a new runestone at 66% and 33% health remaining.
Damage Dealers
- Arcane Wrath spreads to nearby allies.
- Destructive Resonance will inflict lethal damage if triggered.
- Arcane Aberrations inflict heavy raid wide damage as long as they are alive.
Healers
- Arcane Wrath inflicts heavy damage when it expires from a target.
- Arcane Aberrations will inflict raid wide damage every second that they are alive.
- Force Nova inflicts heavy damage to players as it moves over them.
Tanks
- Accelerated Assault will stack indefinitely until Imperator Mar'gok melee attacks a different target.
- Mark of Chaos will inflict damage to allies within 35 yards when it expires.
- Imperator Mar'gok will periodically summon Arcane Aberrations.
Stage One: Might of the Crown
 Arcane Wrath
 Destructive Resonance
Arcane Aberration
Imperator Mar'gok summons an Arcane Aberration.
 Mark of Chaos
 Force Nova
 Accelerated Assault
Stage Two: Rune of Displacement
When Imperator Mar'gok reaches 85% health remaining, he activates the Rune of Displacement. In Mythic difficulty, Imperator Mar'gok begins the fight with both the Rune of Displacement and Rune of Replication active.
Arcane Wrath: Displacement
In addition to Arcane Wrath's normal effects, Branded Players are unable to move more than 10 yards from the location they were marked. Attempting to leave the marked area will teleport the player back to the location they were originally marked.
Destructive Resonance: Displacement
In addition to Destructive Resonance's normal effects, it grows to twice its original size over 30 seconds.
Displacing Arcane Aberration
Imperator Mar'gok summons a Displacing Arcane Aberration.

Mark of Chaos: Displacement
In addition to Mark of Chaos' normal effects, the target is teleported to a random location.
Force Nova: Displacement
In addition to Force Nova's normal effects, it now also pushes players away as the nova moves outwards.
Intermission: Dormant Runestones
When Imperator Mar'gok reaches 55% health remaining, he begins to awaken the Rune of Fortification. The rune charges for 1 minute before releasing its power. In Mythic difficulty, Imperator Mar'gok begins to awaken the Rune of Fortification at 66% health remaining. This causes the Rune of Replication to become dormant.
Gorian Warmage
Two Gorian Warmages come to defend Imperator Mar'gok as he charges the Rune of Fortification.


Volatile Anomaly
As the Rune of Fortification charges, Volatile Anomalies pour from the rune stone every 12 sec.
Stage Three: Rune of Fortification
Arcane Wrath: Fortification
In addition to Arcane Wrath's normal effect, the jump range of Arcane Wrath is only decreased by 25% with each jump.
Destructive Resonance: Fortification
In addition to Destructive Resonance's normal effects, it persists for 2 minutes.
Fortified Arcane Aberration
Imperator Mar'gok summons a Fortified Arcane Aberration.

Mark of Chaos: Fortification
In addition to Mark of Chaos' normal effects, the target is rooted in place.
Force Nova: Fortification
In addition to Force Nova's normal effects, an additional nova is released every 8 sec,. for 16 sec.
Intermission: Lineage of Power
When Imperator Mar'gok reaches 25% health remaining, he begins to awaken the Rune of Replication. The rune charges for 1 minute before releasing its power. In Mythic difficulty, Imperator Mar'gok begins to awaken the Rune of Replication at 33% health remaining. This causes the Rune of Displacement to become dormant.
Gorian Reaver
A Gorian Reaver comes to defend Imperator Mar'gok as he charges the Rune of Replication.


Gorian Warmage
Two Gorian Warmages come to defend Imperator Mar'gok as he charges the Rune of Replication.
Volatile Anomaly
As the Rune of Replication charges, Volatile Anomalies pour from the rune stone every 12 sec.
Stage Four: Rune of Replication
Arcane Wrath: Replication
In addition to Arcane Wrath's normal effects, a second player will be Branded the first time Arcane Wrath jumps.
Destructive Resonance: Replication
In addition to Destructive Resonance's normal effects, two additional Destructive Resonances are created nearby when it detonates or expires.
Replicating Arcane Aberration
Imperator Mar'gok summons a Replicating Arcane Aberration.
Replicate
Upon death, Replicating Arcane Aberrations split into 7 Arcane Remnants.
Mark of Chaos: Replication
In addition to Mark of Chaos' normal effects, 8 Orbs of Chaos are conjured when Mark of Chaos expires. Each orb flies out from the wearer and inflicts Arcane damage to all players that they move through.
Force Nova: Replication
Loot
23 drops · item level 44 · 11 slots (Back, Chest, Feet, Finger, Head, Legs +5 more) · all Bind on Pickup
 Captive Micro-Aberration
 Chain of the Unbroken Lineage
 Chestplate of Destructive Resonance
 Choker of Violent Displacement
 Evergaze Arcane Eidolon
 Face KickersForce Nova Cloak
 Gor'gah, High Blade of the Gorians
 Gorian Royal Crown
 Greatcloak of Impactful Pulses
 High Arcanist Leggings
 Imperator's Warstaff
 Mark of Rapid Replication
 Mirrorshield of Arcane Fortification
 Nether Blast Leggings
 Quiescent Runestone
 Reaver's Nose Ring
 Robes of the Arcane Ultimatum
 Seal of Arcane WrathShockwave Signet
 Staff of the Grand Imperator
 Uncrushable Shoulderplates
 Warmage's Legwraps
Quests
3 quests Blizzard’s quest data files under Highmaul, all for level 40:

Achievements
15 achievements tied to Highmaul, worth 140 achievement points in total.
 Mythic: Kargath BladefistDefeat Kargath Bladefist in Highmaul on Mythic difficulty.10
 Mythic: The ButcherDefeat The Butcher in Highmaul on Mythic difficulty.10
- Mythic: TectusDefeat Tectus in Highmaul on Mythic difficulty.10
 Mythic: BrackensporeDefeat Brackenspore in Highmaul on Mythic difficulty.10
 Mythic: Twin OgronDefeat the Twin Ogron in Highmaul on Mythic difficulty.10
 Mythic: Ko'raghDefeat Ko'ragh in Highmaul on Mythic difficulty.10
 Mythic: Imperator's FallComplete the Imperator Mar'gok encounter in Highmaul on Mythic difficulty.Title: Empire's Twilight10
 Flame On!Defeat Kargath Bladefist in Highmaul without destroying any Fire Pillars on Normal difficulty or higher.10
 Hurry Up, Maggot!Cause the Butcher in Highmaul to slay 6 Maggots before defeating him on Normal difficulty or higher.10
 More Like Wrecked-usDefeat Tectus in Highmaul by destroying all eight Motes of Tectus within 10 seconds of each other on Normal difficulty or higher.10
 A Fungus Among UsGain 15 stacks of Burning Infusion and then defeat Brackenspore in Highmaul on Normal difficulty or higher.10
- Brothers in ArmsDefeat the Twin Ogron in Highmaul without their Disposition ever exceeding 30% on Normal difficulty or higher.10
 Pair AnnihilationDefeat Ko'ragh in Highmaul with fewer than 15 Overflowing Energy orbs touching the ground or players without Nullification Barrier, on Normal difficulty or higher.10
 Lineage of PowerEmpower and defeat a Fortified Replicating Gorian Warmage and then defeat Imperator Mar'gok in Highmaul on Normal difficulty or higher.10
- Cutting Edge: Imperator's FallComplete the Imperator Mar'gok encounter in Highmaul on Mythic difficulty, before the release of patch 6.2.
More Warlords of Draenor Raids
Other raids from the same expansion.