 TheWoWDB
Raid - Battle for Azeroth
The Eternal Palace
8 encounters, 201 boss abilities and 118 drops, with the Adventure Guide’s own ability and strategy notes for each fight. Every drop links to its item page; tradeable drops carry a live Auction House price.
Ten thousand years ago, as the seas engulfed Zin-Azshari, Queen Azshara forged a dark bargain with N'Zoth that transformed her loyal subjects into the sinister naga. Through millennia of brutal conquest, Azshara has built a new empire from the ruins of the old and now holds dominion over the depths that once threatened to claim her. Ever the gracious host, she has invited the Alliance and Horde alike into her eternal palace to witness her glorious ascension... and their ultimate demise.
Quick Facts
| Type | Raid |
|---|---|
| Expansion | Battle for Azeroth |
| Encounters | 8 |
| Boss abilities | 201 |
| Drops | 118 |
| Item level | 1 to 72 |
| Tradeable drops | 0 |
| Difficulties | Heroic, Mythic |
Difficulties and Lockouts
The Eternal Palace has 4 difficulties in the game data: Normal, Heroic, Mythic and Looking For Raid save you to a weekly lockout.
| Difficulty | Players | Level range | Lockout |
|---|---|---|---|
| Normal | 30 | 50 | Weekly |
| Heroic | 30 | 50 | Weekly |
| Mythic | 20 | 50 | Weekly |
| Looking For Raid | 30 | 50 | Weekly |
Raid Finder splits The Eternal Palace into 3 wings:
- The Grand Reception
- Depths of the Devoted
- The Circle of Stars
Loot Table Value
Every one of The Eternal Palace’s 118 drops is Bind on Pickup, so none of this loot can ever reach the Auction House. The table below the bosses is the complete reward list; its value is item level, not gold.
3D Model
First-party render from the game files. Model © Blizzard Entertainment.
Instance Map
The Adventure Guide places 8 bosses of The Eternal Palace on 7 maps. Numbers follow the encounter order; each links to that fight below.
The Eternal Palace
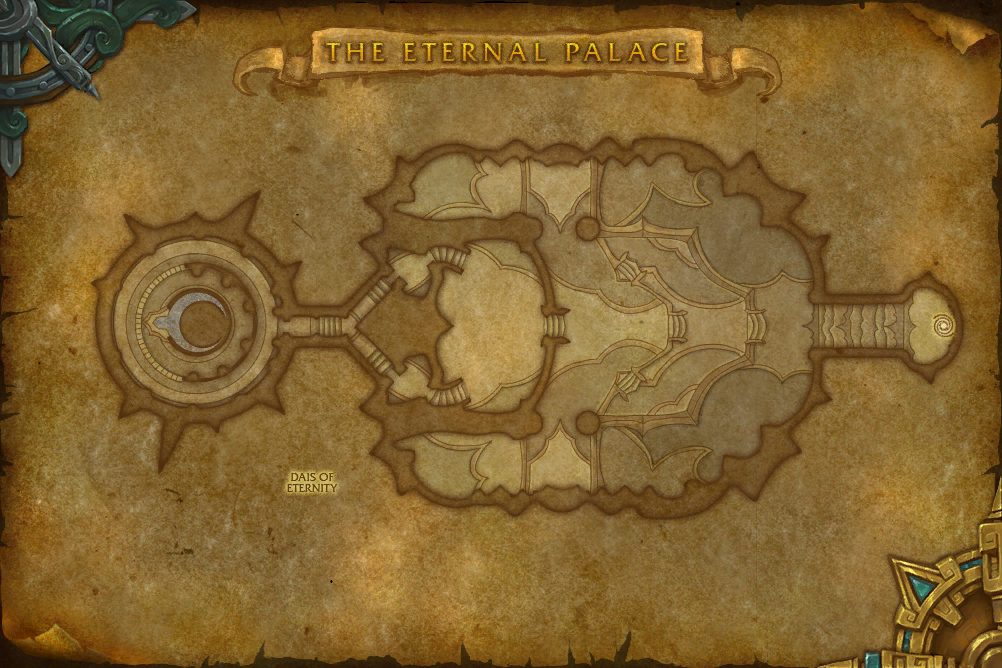 1Abyssal Commander Sivara
- 1 Abyssal Commander Sivara 50.0, 48.4
The Eternal Palace
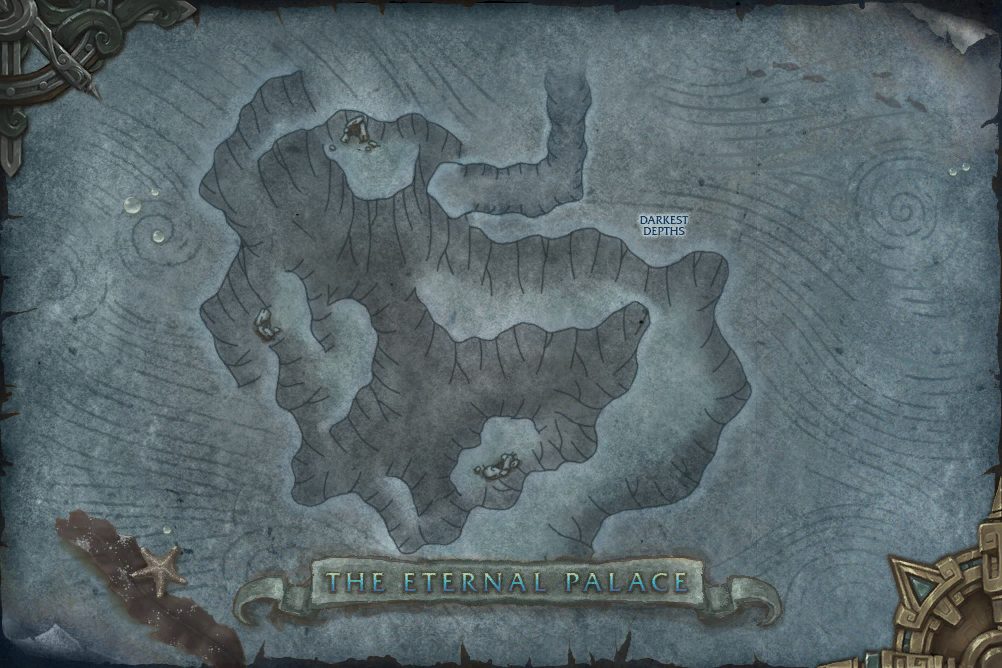 2Blackwater Behemoth
- 2 Blackwater Behemoth 35.7, 19.9
The Eternal Palace
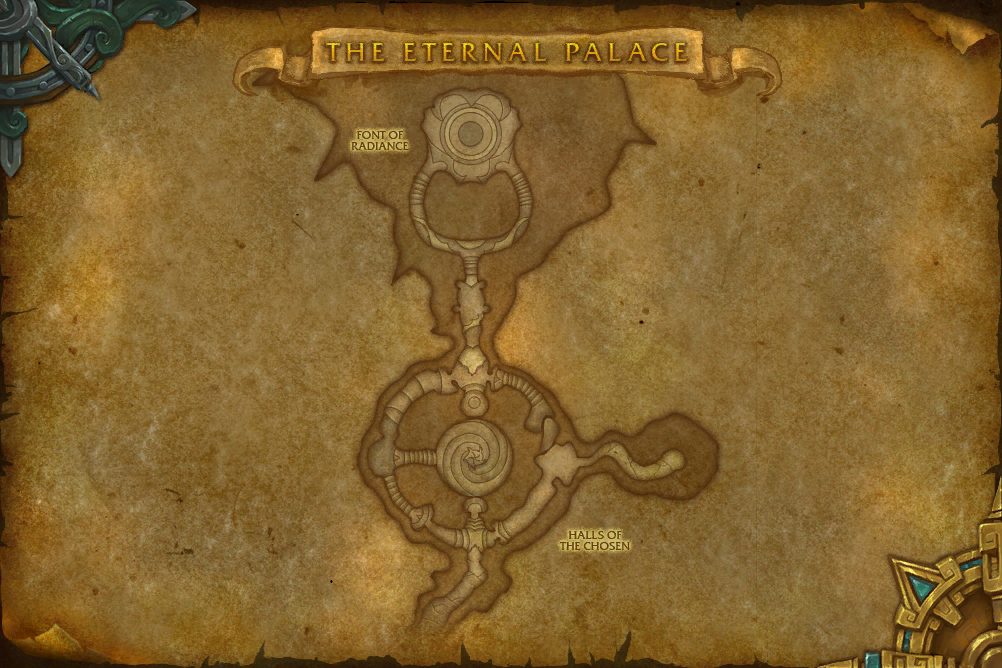 3Radiance of Azshara4Lady Ashvane
- 3 Radiance of Azshara 47.1, 19.2
- 4 Lady Ashvane 47.7, 68.3
The Eternal Palace
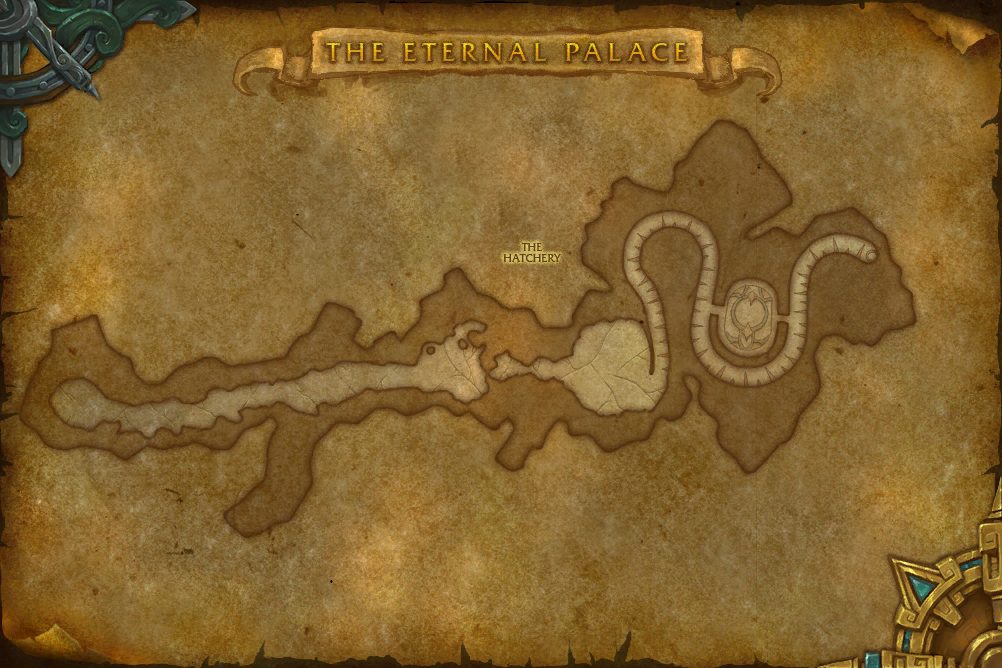 5Orgozoa
- 5 Orgozoa 75.0, 47.5
The Eternal Palace
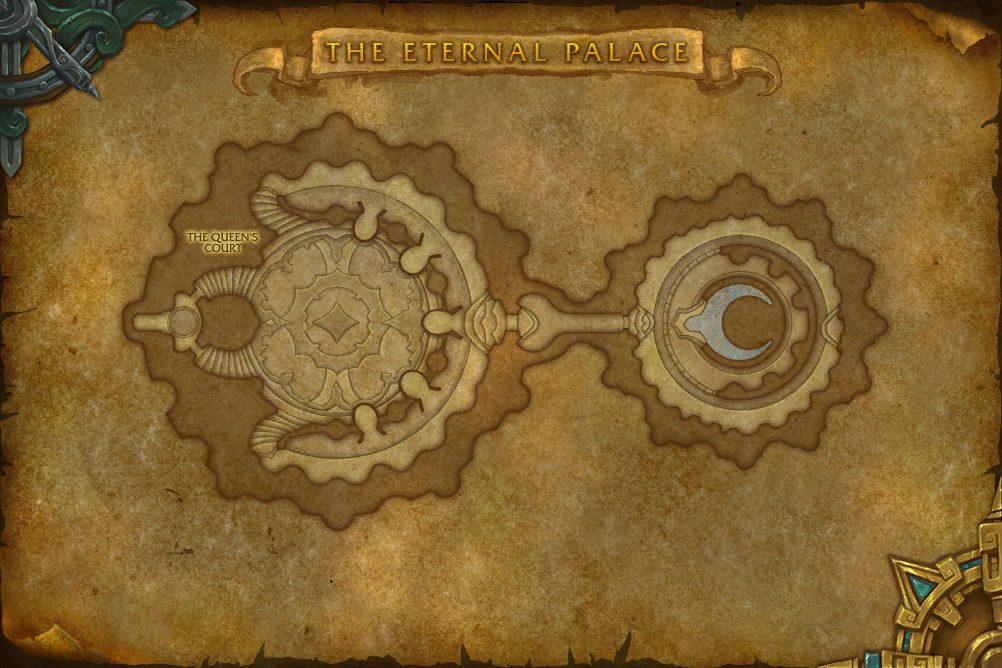 6The Queen's Court
- 6 The Queen's Court 33.7, 48.0
The Eternal Palace
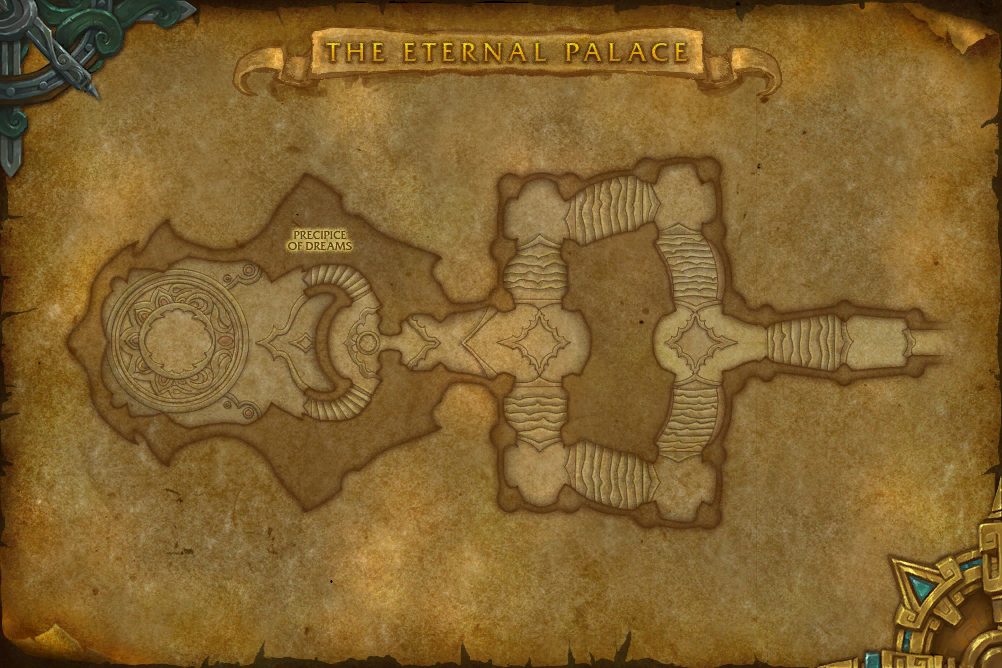 7Za'qul, Harbinger of Ny'alotha
- 7 Za'qul, Harbinger of Ny'alotha 17.7, 51.1
The Eternal Palace
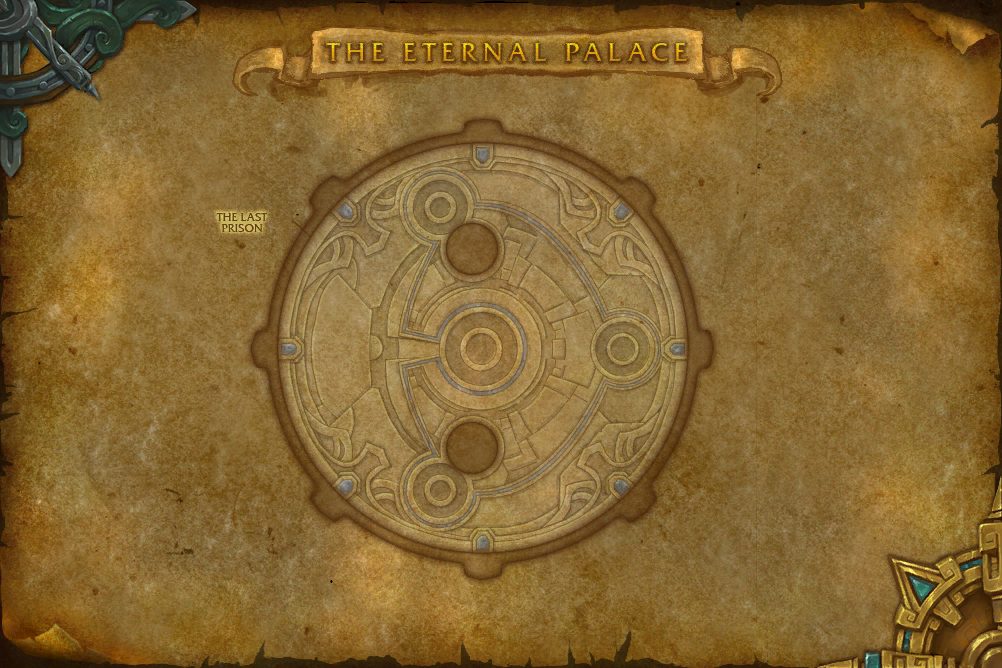 8Queen Azshara
- 8 Queen Azshara 48.2, 51.8
Encounters
HHeroicMMythic
Blackwater Behemoth
Summoned from depths unknown, the Blackwater Behemoth lurks in an abyss so dark that not even the naga dare to venture into it. Only Azshara is capable of taming the beast, and she has trained it to faithfully guard her treasures.
Abilities & Strategy
Overview
The Blackwater Behemoth makes its home in the Darkest Depths of the ocean, where healing magic fails to function normally. Players must acquire Bioluminescence in order to be healed by their allies. Swimming over open water while covered in Bioluminescence will draw attention from creatures that dwell beneath, via Gaze from Below. Periodically, the Behemoth will retreat to another platform and begin channeling a lethal Cavitation wave if not interrupted.
Tanks
- Minimize the number of stacks of Feeding Frenzy gained by the Behemoth.
- Maintain Radiant Biomass on yourself or all incoming healing will be blocked by Darkest Depths.
Healers
- Trigger Bioluminescent Cloud strategically to ensure Bioluminescence can be maintained by your allies.
- Allow Bioluminescence to expire before pursuing the Behemoth over the open abyss so you are not targeted by Gaze from Below.
Damage Dealers
- Swim toward Bioluminescent Cloud when active to gain Bioluminescence, allowing healers to heal you.
- Allow Bioluminescence to expire before pursuing the Behemoth over the open abyss so you are not targeted by Gaze from Below.
- Swim across the abyss quickly to interrupt Cavitation before the Behemoth finishes casting.
 Darkest Depths
Shimmerskin Pufferfish


Ravenous Behemoth
The Blackwater Behemoth defends its cave from intruders, lashing out with Toxic Spines and powerful bioelectric attacks.


Delve Deeper
The Behemoth retreats to a deeper part of its habitat and begins forming a lethal Cavitation wave.


Loot
16 drops · item level 1 to 72 · 9 slots (Chest, Feet, Hands, Head, Legs, One-Hand +3 more) · all Bind on Pickup
 Anglerfish Feelers
 Blackwater Shimmerscale Vest
 Diver's Folly
 Eelskin Flippers
 Fang of the Behemoth
 Fathom-Feeder's Mantle
 Fleetwrecker's Greaves
 Hood of Lightless Depths
 Leviathan's Lure
 Luminous Jellyweed
 Pelagos Predator's Legguards
 Ship Swallower's Belt
 Slipstreamer's Saltwalkers
 Trench Tyrant's Shoulderplates
 Undercove Crushers
 Mindlost Bloodfrenzy
Za'qul, Harbinger of Ny'alotha
The harbinger for the end of days, Za'qul shreds the last vestiges of sanity from a world in chaos, laying the foundation for Azeroth's new master.
Abilities & Strategy
Overview
At health percentages, Za'qul assaults the players' minds, pulling them deeper into realms of insanity. While players are in these insanity realms, they continually gain stacks of Hysteria. The further they dive into these realms, the faster it stacks. Each realm employs its own method of assaulting players' minds. Within the Fear Realm, players continually spawn Horrific Visions from Manifest Nightmares. Within the Delirium Realm, everyone becomes hostile but has their haste increased. After all realms have opened, Za'qul gains empowered versions of his abilities that allow the players to move between realms in order to combat his mechanics.
Damage Dealers
- Defeat Horrific Summoners before the raid becomes overwhelmed.
- Defeat Horrific Visions before they transform into Unleashed Nightmares.
Healers
- Dispel allies effected by Dread and Manic Dread.
- Don't stop moving when affected by Manifest Nightmares to avoid Nightmare Pools.
Tanks
- Use damage reduction cooldowns when under the effect of Mind Tether.
- Move the boss into Maddening Eruptions to prevent the raid from taking damage.
- Don't stop moving when affected by Manifest Nightmares to avoid Nightmare Pools.


Stage One: The Harbinger
 Mind Tether

 Portal of Madness
Horrific Summoner
Summoned during the encounter by Za'qul.
 Crushing Grasp
 Dread
Dread
Stage Two: Grip of Fear
Za'qul pulls players into the Fear Realm at 85% health.
 Fear Realm
 Manifest Nightmares
 Nightmare Pool
Horrific Vision
Emerge from the darkness as long as players are effected by Manifest Nightmares.
 Maddening Eruption

Mind Tether
Crushing Grasp
Dread
Stage Three: Delirium's Descent
Za'qul begins pulling players into the Delirium Realm at 70% health.


Stage Four: All Pathways Open
When Za'qul reaches 60% health, Thalyssra returns players to reality.
First Arcanist Thalyssra
Pulls everyone back to reality to prevent them from succumbing to Za'qul's madness. Pulls everyone back to reality to prevent them from succumbing to Za'qul's madness, then falls victim to the whispers of the old gods.

Dark Pulse
 Psychotic Split
Echo of Fear
Summoned during Psychotic Split and resides within the Fear Realm.
Echo of Delirium
Summoned during Psychotic Split and resides within the Delirium Realm.
 Dark Shield
 Mind Fracture
Dark Passage
Horrific Summoner
Summoned from the Fear Realm during the encounter by Za'qul.
 Manic Dread
Mind Tether
Crushing Grasp
Loot
14 drops · item level 1 to 72 · 7 slots (Back, Chest, Head, One-Hand, Shoulder, Trinket +1 more) · all Bind on Pickup
 Bindings of the Herald
 Chain of Suffering
 Cloak of Ill Tidings
 Dark Passenger's Breastplate
 Dream's End
 Gardbrace of Fractured Reality
 Pauldrons of Za'qul
 Sever, Edge of Madness
 Shackles of Dissonance
 Shroud of Unmooring Whispers
 Vestments of Creeping Terror
 Vision of Demise
 Za'qul's Portal Key
 Nameless Octopode
Orgozoa
Orgozoa tends to Azshara's hatchery, preparing for the day her incubating horrors are unleashed upon Azeroth.
Abilities & Strategy
Overview
Orgozoa tends to the Naga's hatchery within The Eternal Palace, incubating and empowering all manner of creatures. Dribbling Ichor signifies the arrival of Zoatroids in Phase One, and Orgozoa's Naga allies in Phase Two. When reduced to 40% health remaining Orgozoa will transition to the Naga Chamber. Follow it!
Tanks
- Swap with an allied tank before Desensitizing Sting causes Heart-Stopping Paralysis.
- Soak Amniotic Splatter from Zoatroids so allies aren't afflicted with Amniotic Eruption.
- Keep Naga and Zoatroids away from Orgozoa so they can't be empowered by Chaotic Growth.
Healers
- Position carefully to avoid spreading Incubation Fluid.
- Beware Powerful Stomp from the Dreadcoil Hulk; it will deal significant damage to the raid.
- Tanks will take heavy damage from Orgozoa until they gain enough stacks of Desensitizing Sting.
Damage Dealers
- Position carefully to avoid spreading Incubation Fluid.
- Run away from allies when targeted with Aqua Lance, and help soak Powerful Stomp.
- Interrupt Conductive Pulse.
Phase One: Egg Chamber


Intermission: The Moulting Hatchery
Orogozoa departs from the egg chamber and makes its way to the Naga chambers, below. All stacks of Incubation Fluid reset.


Phase Two: Naga Chamber
Orgozoa
Zoatroid
Zanj'ir Myrmidon


Azsh'ari Witch
Dreadcoil Hulk

Loot
15 drops · item level 72 · 11 slots (Back, Chest, Head, Legs, One-Hand, Ranged +5 more) · all Bind on Pickup


Abyssal Commander Sivara
A master of both martial and magical arts, Abyssal Commander Sivara has ruthlessly led Azshara's vanguard to countless victories.
Abilities & Strategy
Overview
Sivara begins her assault by marking all players with Frost Mark or Toxic Brand. These volatile compounds will cause an Unstable Mixture if a player is ever afflicted with both marks.
Tanks
- Position away from players of an opposing mark and avoid attacks of the opposing element.
- Minimize the number of Rimefrost and Septic Taint stacks.
- Rimefrost and Septic Taint creates Frozen Ground and Septic Ground upon expiration.
Healers
- Position away from players of an opposing mark and avoid attacks of the opposing element.
- Chimeric Marks inflicts periodic damage to the entire raid.
- Unstable Mixture causes high raid wide damage.
Damage Dealers
- Position away from players of an opposing mark and avoid attacks of the opposing element.
- Intercept Frostshock Bolts that are the same element as your mark.
- Overflow damage is evenly divided amongst all players it hits.
 Chimeric Marks
Coming into contact with a player of an opposite mark or taking damage of the opposite element afflicts players with Unstable Mixture. On Mythic Difficulty, Abyssal Commander Sivara continues casting Chimeric Marks, stacking Frost Mark and Toxic Brand.


 Overwhelming Barrage
Abyssal Commander Sivara casts Overwhelming Barrage when she reaches 100 Energy.


 Inversion
On Heroic difficulty and above, Inversion also inverts all pools of Frozen Ground and Septic Ground.

Loot
18 drops · item level 72 · 13 slots (Chest, Feet, Hands, Head, Held In Off-hand, Legs +7 more) · all Bind on Pickup
Abyssal Commander's Mantle Claw of the MyrmidonGauntlets of Overflowing ChillHelm of the Inexorable TideNaga Centaur's Shellplate
 Palace Sentinel VambracesRoyal Scaleguard's Battleaxe
 Sabatons of the Stalwart
 Scepter of the Azsh'ari
 Seawrath Legwraps
 Shiver Venom Crossbow
 Shiver Venom Lance
 Shiver Venom RelicSiren Mystic's Vestments
 Sivara's Slitherblade
 Tidebinder's Driftglobe
 Tideblood Bracers
 Wavespine Clutch
Radiance of Azshara
Using her handmaiden as a willing sacrifice, Azshara has forged into being an elemental of storm and magic. Powered by the soul of the devoted vassal, the resulting monstrosity is the avatar of Azshara's radiance.
Abilities & Strategy
Overview
Radiance of Azshara harrasses players with stray magic, building energy until it can summon an Ancient Tempest, centered around a Stormwraith. The Ancient Tempest's energy builds, dealing increasing damage to players not within the Eye of the Storm. Slaying a Stormwraith will cause the tempest to recede. In Mythic difficulty, Ancient Tempest creates two Eyes of the Storm and two Stormwraiths. The Ancient Tempest will not recede until both Stormwraiths are slain.
Tanks
- Ensure that you are within melee range of Radiance of Azshara when your tank partner is knocked out of melee range by Tide Fist.
- Keep Stormwraiths and Stormlings within the Eye of the Storm to prevent them from gaining Swirling Winds.
Healers
- Dispel Arcane Bomb when the affected player has moved the bomb to a safe location.
- Position yourself so that the Stormwraith's Gale Buffet does not eject you from the Eye of the Storm.
Damage Dealers
- Run Arcane Bomb away from your allies so it can be safely dispelled.
- Position yourself so that the Stormwraith's Gale Buffet does not eject you from the Eye of the Storm.
Rising Fury
The Radiance of Azshara's untamed magic summons traps and hazards to punish unwary players.


Raging Storm
The Radiance of Azshara unleashes its terrifying power, conjuring a deadly Ancient Tempest.


Loot
16 drops · item level 50 to 72 · 11 slots (Chest, Feet, Hands, Head, Legs, Shield +5 more) · all Bind on Pickup
 Ancient Tempest Striders
 Aqueous ReliquaryArcanamental Bindings
 Belt of Blind Devotion
 Bulwark of the Seaborn Avatar
 Gloves of Unshackled Arcana
 Grips of the Scaled Arcanist
 Handmaiden's Cowl of Sacrifice
 Leggings of the Stormborn
 Monstrosity's Shipbreaker
 Phial of the Arcane TempestSea Sculptor's Cuffs
 Servitor's Heartguard
 Shoulderpads of Frothing Rage
 Storm-Tempered Girdle
 Warhelm of Dread Waters
Lady Ashvane
Priscilla Ashvane's relentless pursuit of power has ultimately led her to the Eternal Palace and into a dark pact with Queen Azshara. But what Ashvane receives in return for her loyalty may be more than she bargained for.
Abilities & Strategy
Overview
Lady Ashvane begins the encounter encased in a Hardened Carapace, absorbing all damage. When the carapace is destroyed, the Azerite crystals embedded into Lady Ashvane flare to life and she begins to gain energy. Upon reaching 100 energy, she regenerates her Hardened Carapace.
Tanks
- Coordinate with your allies to ensure no Rippling Waves reach Lady Ashvane.
- Move Lady Ashvane away from patches of Cutting Coral.
- Avoid other players when targeted with Briny Bubble.
- Coordinate with your allies to use Arcing Azerite to destroy Coral Growths.
DPS
- Coordinate with your allies to ensure no Rippling Waves reach Lady Ashvane.
- Avoid other players when targeted with Briny Bubble.
- Coordinate with your allies to use Arcing Azerite to destroy Coral Growths.
Healers
- Rippling Wave inflicts heavy damage to all players in the raid.
- Coordinate with your allies to ensure no Rippling Waves reach Lady Ashvane.
- Avoid other players when targeted with Briny Bubble.
- Coordinate with your allies to use Arcing Azerite to destroy Coral Growths.
Stage 1: Hardened Carapace
 Hardened Carapace
 Coral Growth
 Rippling Wave
On Mythic difficulty, the Coral Growth furthest from Lady Ashvane creates an Empowered Rippling Wave.

 Briny Bubble
 Upsurge
 Barnacle Bash

Stage 2: Exposed Azerite


Loot
14 drops · item level 1 to 72 · 10 slots (Chest, Feet, Finger, Head, Legs, One-Hand +4 more) · all Bind on Pickup
 Aquipotent Nautilus
 Ashvane's Razor CoralBarnacle-Crusted Breastplate
 Bloodthirsty Urchin
 Boralus Noble's SealCoralshell WarbootsCultured Pearl ArmbandsCurrent-Weaver's GavelHelm of Hideous TransformationPriscilla's FishnetsRobes of Sunken NobilityShoulderguards of Crushing DepthsTanglekelp Waistwrap
 Lightless Ambusher
The Queen's Court
For ten thousand years, the Queen's Court has never failed to enforce the word of Azshara. Now, the queen's most powerful servants stand ready to fulfill her final decree.
Abilities & Strategy
Overview
Each member of Queen Azshara's court represents a facet of the Nazjatar forces, with Silivaz represent the might of the oceans and Pashmar the mastery over storms and sky. While overseeing the fight, Queen Azshara will become bored, and issue a series of decrees, changing up the rules of engagement.
Tanks
- Coordinate with your tanking partner to ensure Commander's Fury or Pashmar's Touch doesn't stack too high.
- Move either boss out of Mighty Rupture.
- Use personal cooldowns when affected by Suffering.
Healers
- Queen Azshara's decree Deferred Sentence has your team taking damage throughout, with a potential huge spike at the end.
- Anyone afflicted by Suffering can not be healed for its duration.
- Help split the damage from Silivaz's Frenetic Charge with the targeted player.
- Positioning is important, especially during the Form Ranks and Stand Alone decrees.
Damage Dealers
- Help split the damage from Silivaz's Frenetic Charge with the targeted player.
- Damage Potent Sparks so that they expire at least 5 seconds apart to avoid lethal damage when they explode.
- Positioning is important, especially during the Form Ranks and Stand Alone decrees.


Queen Azshara
Decrees
Throughout the fight, Queen Azshara enacts various decrees that must be dealt with. On higher difficulties, the amount of downtime between decrees is reduced.


Silivaz the Zealous


Loot
14 drops · item level 50 to 72 · 11 slots (Chest, Feet, Finger, Hands, Head, Held In Off-hand +5 more) · all Bind on Pickup
Amice of the Reef WitchAqueous ReliquaryArdent Worshipper's BootsCourt Dagger of Sentencing Deferred Sentence
 Edicts of the FaithlessHands of the FanaticNaga Executor's Armguards
 Pashmar's FinialPauldrons of Fanatical Might
 Ring of the Highborne CourtierSilivaz's SkullguardStormtamer's OrbTunic of the Sycophant
Queen Azshara
Queen of the Naga, Empress of Nazjatar, and one of the most powerful entities Azeroth has ever known, Azshara has plotted and schemed for millennia in preparation for this fateful moment. Now, with all the pieces in place, the time has finally come to reveal her end game.
Abilities & Strategy
Overview
Queen Azshara will use all of the forces at her command to disable the Ancient Wards and override the Titan device keeping N'zoth imprisoned.
Tanks
- Powering up Ancient Wards or draining Azshara's Ward of Power drains the player.
- Make sure your healers have line of sight to you!
- Coordinate the lovers' line of sight to each other with every cast of Longing or Painful Memories.
- Move Azshara to keep her from Draining your Ancient Wards or Energizing the Ward of Power too much.
- Hide from Azshara to reset stacks of Arcane Vulnerability, or to avoid the damage of Arcane Detonation.
Healers
- Powering up Ancient Wards or draining Azshara's Ward of Power drains the player.
- Coordinate your positioning to make sure you have line of sight to your allies.
- Hide from Azshara to reset stacks of Arcane Vulnerability, or to avoid the damage of Arcane Detonation.
- Hide from your allies and Azshara when afflicted with Arcane Burst.
- Coordinate the rate at which players attempt to Release charges from the Titan Console before a Massive Energy Spike.
Damage Dealers
- Powering up Ancient Wards or draining Azshara's Ward of Power drains the player.
- Make sure your healers have line of sight to you!
- Make sure that Charged Spear does not impact any surface inside the playspace; but passes through any Crystalline Shields.
- Hide from Azshara to reset stacks of Arcane Vulnerability, or to avoid the damage of Arcane Detonation.
- Hide from your allies and Azshara when afflicted with Arcane Burst.
- Overzealous Hulks will Drain your Ancient Wards
- Azshara's Devoted and Indomitable will Sacrifice themselves to the Ward of Power.
Ancient Wards
Ancient Wards keep the pressure of the surrounding ocean depths at bay but must be powered up by players standing on them. Azshara's forces will use various means to power them down.


Stage One: Cursed Lovers
Azshara summons the cursed lovers: Aethanel, and Cyranus to attack the players. Overzealous Hulks storm the playspace in an effort to disable the Ancient Wards while Azshara herself torments players with her own abilities. This stage ends when both Aethanel and Cyranus are defeated.
Aethanel and Cyranus, the Cursed Lovers
Aethanel and Cyranus have been cursed to constantly swap between periods of Longing to see each other and Painful Memories of a life that could have been. Their Cursed Hearts poison the ground beneath them.
 Painful Memories
 Longing
 Torment
When either lover dies, the other gains Torment until they are defeated.
 Cursed Heart
Aethanel
Cyranus
Overzealous Hulk
These hulks from Azshara's army rush toward Ancient Wards and pound them into dust. After these Hulks have been crowd-controlled one time, they become Infuriated.


Queen Azshara
In this stage Queen Azshara circles the playspace, looking for opportunities to employ her own abilities.
Intermission One: Queen's Decree
Azshara releases Arcane Orbs across the playspace; but issues a personal decree to all players limiting their actions. Any player who fails to follow their decree will be sanctioned. This phase ends shortly after the Arcane Orbs expire.
 Arcane Orb
 Queen's Decree
In Normal Difficulty, players are given one decree they must obey. In Heroic Difficulty, players are given up to two decrees they must obey. In Mythic Difficulty, players are given up to three decrees they must obey. In Raid Finder Difficulty, players are given one decree they must obey.


Stage Two: Hearts Unleashed
Azshara activates the final ward and joins the fight. This stage ends when Azshara is reduced to 70% life remaining.
 Ward of Power
Azshara's Devoted
Can be crowd-controlled.

Azshara's Indomitable
Immune to crowd-controlling effects.
Queen Azshara
 Arcane Mastery
In Mythic Difficulty, victims hit by Arcane Missiles are afflicted with Arcane Vulnerability.
 Arcane Jolt
 Beckon
 Titanic Machinations
 Arcane Detonation
Reversal of Fortune
 Arcane Burst
In difficulties other than Raid Finder Difficulty, the triggered burst occurs immediately if this effect is dispelled. In Heroic and Mythic Difficulties, if Azshara is hit by the Arcane Burst it will afflict additional players the next time she uses this ability. In Mythic Difficulty, victims hit by Arcane Burst are afflicted with Arcane Vulnerability.
 Divide and Conquer
Intermission Two: Adoration
Azshara summons waves of her minions to attack the wards. This stage ends when Azshara finishes summoning her minions.
Overzealous Hulk
These hulks from Azshara's army rush toward Ancient Wards and pound them into dust. After these Hulks have been crowd-controlled one time, they become Infuriated.
Azshara's Devoted
Azshara's Indomitable
Immune to crowd-controlling effects.
Queen Azshara
Arcane Orb
Queen's Decree
In Normal Difficulty, players are given one decree they must obey. In Heroic Difficulty, players are given up to two decrees they must obey. In Mythic Difficulty, players are given up to three decrees they must obey. In Raid Finder Difficulty, players are given one decree they must obey.
Stage Three: Song of the Tides
Azshara calls her Tidemistresses to join the fight. Each will stand on one of the Ancient Wards and periodically drain them.
Loyal Myrmidon
Tidemistresses


Queen Azshara
Beckon
Titanic Machinations
Arcane Jolt
Arcane Mastery
In Mythic Difficulty, victims hit by Arcane Missiles are afflicted with Arcane Vulnerability.
Arcane Detonation
 Greater Reversal of Fortune
Reversal of Fortune
Arcane Burst
In difficulties other than Raid Finder Difficulty, the triggered burst occurs immediately if this effect is dispelled. In Heroic and Mythic Difficulties, if Azshara is hit by the Arcane Burst it will afflict additional players the next time she uses this ability. In Mythic Difficulty, victims hit by Arcane Burst are afflicted with Arcane Vulnerability.
Divide and Conquer
Stage Four: My Palace Is a Prison
Azshara turns her full force upon the raid. Players must contend with Azshara while attempting to keep the Titan Console under control.
Beckon
Titanic Machinations
 Piercing Gaze
Reversal of Fortune
Greater Reversal of Fortune
 Void Touched
Nether Portal
Divide and Conquer
 Overload
Standing near the Titan Console will give you the ability to perform a Controlled Release of one of the charges.


Loot
13 drops · item level 1 to 72 · 7 slots (Feet, Finger, Hands, Legs, Trinket, Two-Hand +1 more) · all Bind on Pickup
 Anu-Azshara, Staff of the EternalAqueous Reliquary
 Azshara's Font of PowerBeloved Monarch's WaistwrapCherished Empress's Leggings
 Cursed Lover's RingEternity Keeper's GreatbeltGloves of Incomparable BeautyHandguards of the Highest-BornSlippers of the Sorceress-QueenTide Goddess's WargreavesVethan's Icewalkers
 Zanj'ir Poker
Quests
2 quests Blizzard’s quest data files under The Eternal Palace, all for level 50:
- Reward:46 gold80 silver
- Reward:93 gold60 silver 500 reputation with The Unshackled
Achievements
26 achievements tied to The Eternal Palace, worth 210 achievement points in total.
 The Eternal Palace Guild RunDefeat the bosses The Eternal Palace on Normal difficulty or higher, while in a guild group.10
 Mythic: Queen Azshara Guild RunDefeat Queen Azshara in The Eternal Palace on Mythic difficulty while in a guild group.10
- Hall of Fame: Queen Azshara (Alliance)Among the first one hundred Alliance guilds worldwide to defeat Queen Azshara on Mythic difficulty.Title: Famed Slayer of Azshara
- Hall of Fame: Queen Azshara (Horde)Among the first one hundred Horde guilds worldwide to defeat Queen Azshara on Mythic difficulty.Title: Famed Slayer of Azshara
 Mythic: Abyssal Commander SivaraDefeat Abyssal Commander Sivara in The Eternal Palace on Mythic difficulty.10
- The Grand ReceptionDefeat the following bosses in The Eternal Palace.10
 Depths of the DevotedDefeat the following bosses in The Eternal Palace.10
- The Circle of StarsDefeat the following Bosses in The Eternal Palace.10
- The Circle of Stars (char specific hidden copy)Defeat the following Bosses in The Eternal Palace.
 Mythic: Radiance of AzsharaDefeat Radiance of Azshara in The Eternal Palace on Mythic difficulty.10
 Mythic: Blackwater BehemothDefeat Blackwater Behemoth in The Eternal Palace on Mythic difficulty.10
 Mythic: Lady AshvaneDefeat Lady Ashvane in The Eternal Palace on Mythic difficulty.10
 Mythic: OrgozoaDefeat Orgozoa in The Eternal Palace on Mythic difficulty.10
- Mythic: The Queen's CourtDefeat The Queen's Court in The Eternal Palace on Mythic difficulty.10
 Mythic: Za'qulDefeat Za'qul in The Eternal Palace on Mythic difficulty.10
- Mythic: Queen AzsharaDefeat Queen Azshara in The Eternal Palace on Mythic difficulty.Title: The Eternal10
- Ahead of the Curve: Queen AzsharaDefeat Queen Azshara in The Eternal Palace on Heroic difficulty or higher, before the release of the next raid tier.
 You and What Army?Defeat Abyssal Commander Sivara in The Eternal Palace while all three of her lieutenants are alive and engaged in the fight on Normal difficulty or higher.10
- Cutting Edge: Queen AzsharaDefeat Queen Azshara in The Eternal Palace on Mythic difficulty, before the release of the next raid tier.
 Intro to Marine BiologyDefeat the Blackwater Behemoth in The Eternal Palace after collecting 50 samples of sea life from within the Darkest Depths on Normal Difficulty or higher.10
 Fun RunDefeat Radiance of Azshara in The Eternal Palace after running 6 consecutive complete laps around her arena without falling into the water on Normal difficulty or higher.10
 Simple GeometryDefeat Lady Ashvane in The Eternal Palace after having each cast of Arcing Azerite pass through her on Normal difficulty or higher.10
 A Smack of JellyfishDefeat Orgozoa in the Hatchery in The Eternal Palace after incubating a baby Zoatroid on Normal Difficulty or higher.10
 If It Pleases the CourtPerform various emotes to earn Queen Azshara's Favor in the Eternal Palace, then defeat The Queen's Court on Normal Difficulty or higher.10
 Lactose IntolerantDefeat Za'qul in the Eternal Palace after killing ten Twinklehoof Bovine on Normal difficulty or higher.10
 The Best of UsDefeat Queen Azshara in The Eternal Palace with one player still alive who is currently affected by Essence of Azeroth on Normal difficulty or higher.10
More Battle for Azeroth Raids
Other raids from the same expansion.