 TheWoWDB
Raid - Legion
Tomb of Sargeras
9 encounters, 201 boss abilities and 200 drops, with the Adventure Guide’s own ability and strategy notes for each fight. Every drop links to its item page; tradeable drops carry a live Auction House price.
Aegwynn used this sacred temple of Elune to lock away the defeated Sargeras' avatar. She hoped it would remain dormant, buried deep within the earth, but the lure of power has continued to draw foul entities to this site. When Gul'dan re-entered the tomb, he tore down Aegwynn's wards and opened a doorway for the Legion to invade. Now, the fel army tears at the vault, hoping to reclaim their master's power.
Quick Facts
| Type | Raid |
|---|---|
| Expansion | Legion |
| Encounters | 9 |
| Boss abilities | 201 |
| Drops | 200 |
| Item level | 10 to 50 |
| Tradeable drops | 0 |
Difficulties and Lockouts
Tomb of Sargeras has 4 difficulties in the game data: Normal, Heroic, Mythic and Looking For Raid save you to a weekly lockout.
| Difficulty | Players | Level range | Lockout |
|---|---|---|---|
| Normal | 30 | 45 | Weekly |
| Heroic | 30 | 45 | Weekly |
| Mythic | 20 | 45 | Weekly |
| Looking For Raid | 30 | 45 | Weekly |
Raid Finder splits Tomb of Sargeras into 4 wings:
- The Gates of Hell
- Wailing Halls
- Chamber of the Avatar
- Deceiver's Fall
Loot Table Value
Every one of Tomb of Sargeras’s 200 drops is Bind on Pickup, so none of this loot can ever reach the Auction House. The table below the bosses is the complete reward list; its value is item level, not gold.
Where It Is
The entrance to Tomb of Sargeras is in Broken Shore at 65.0, 20.3.
 AqueuxBrood Mother NixBrother BadatinCorrupted BonebreakerDoombringer Zar'thozDreadblade AnnihilatorDreadeyeDuke SithiziEmberfireEye of GurghFelbringer Xar'thokFelcaller ZelthaeFelmaw EmberfiendFlllurlokkrGrossirImp Mother BruvaInquisitor ChillbaneLady EldratheLord Hel'NurathMalgrazothMalorus the SoulkeeperPotionmaster GloopSalethan the BroodwalkerSomber DawnThe SentinaxXorogun the FlamecarverEntrance 65.0, 20.3
Broken Shore, from the game’s own world map art. The framed marker is the Adventure Guide entrance; gold diamonds are the zone’s landmarks.
3D Model
First-party render from the game files. Model © Blizzard Entertainment.
Instance Map
The Adventure Guide places 9 bosses of Tomb of Sargeras on 6 maps. Numbers follow the encounter order; each links to that fight below.
Tomb of Sargeras
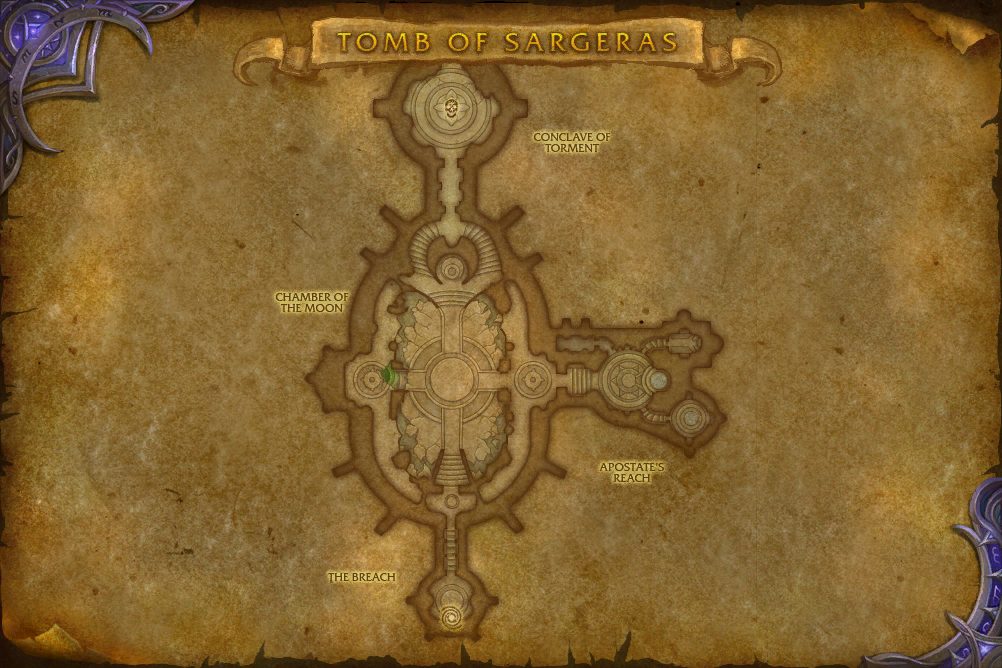 1Goroth2Demonic Inquisition
- 1 Goroth 45.1, 56.7
- 2 Demonic Inquisition 45.0, 16.2
Tomb of Sargeras
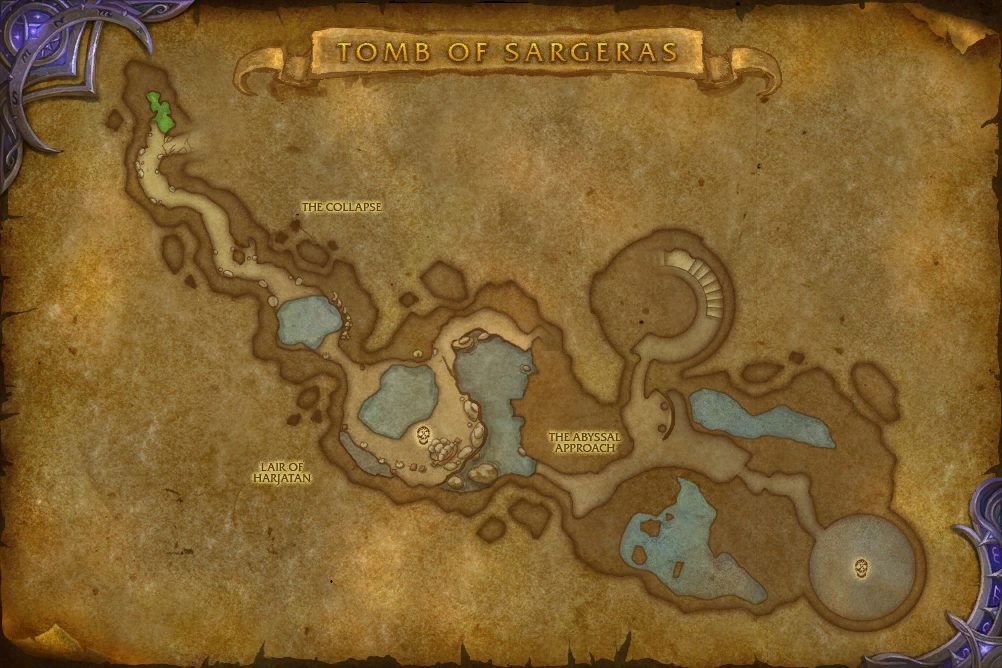 3Harjatan5Mistress Sassz'ine
- 3 Harjatan 45.9, 69.9
- 5 Mistress Sassz'ine 84.8, 86.1
Tomb of Sargeras
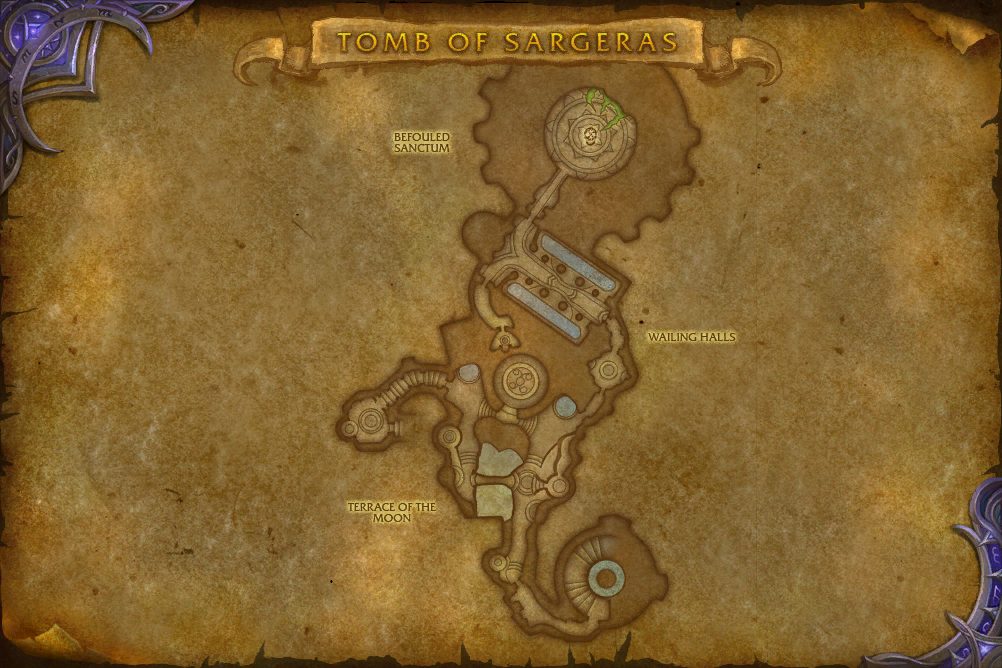 4Sisters of the Moon6The Desolate Host
- 4 Sisters of the Moon 51.9, 57.2
- 6 The Desolate Host 58.8, 20.2
Tomb of Sargeras
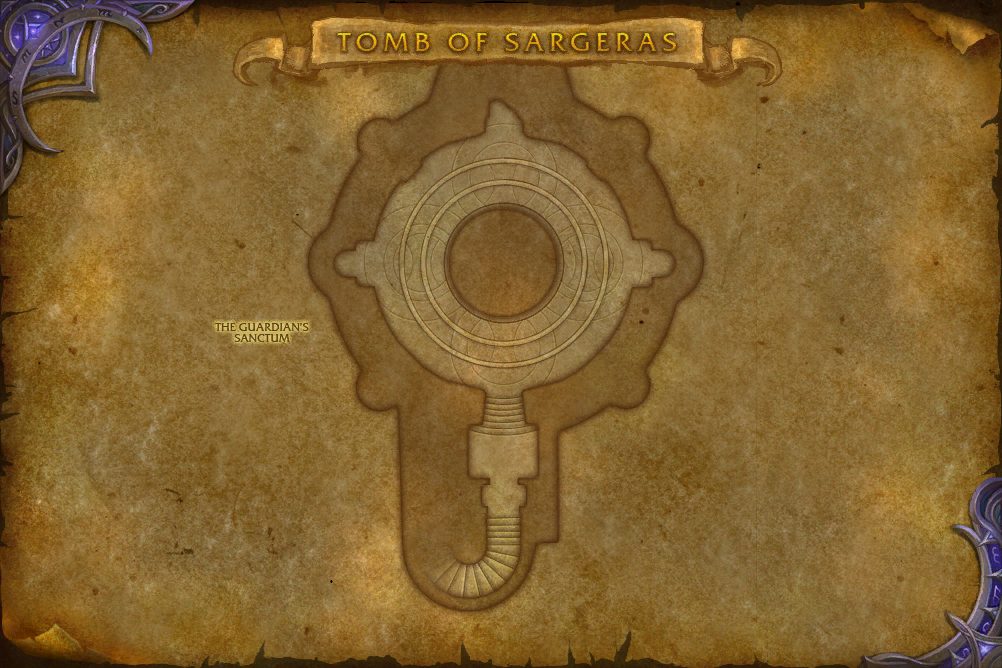 7Maiden of Vigilance
- 7 Maiden of Vigilance 50.2, 26.5
Tomb of Sargeras
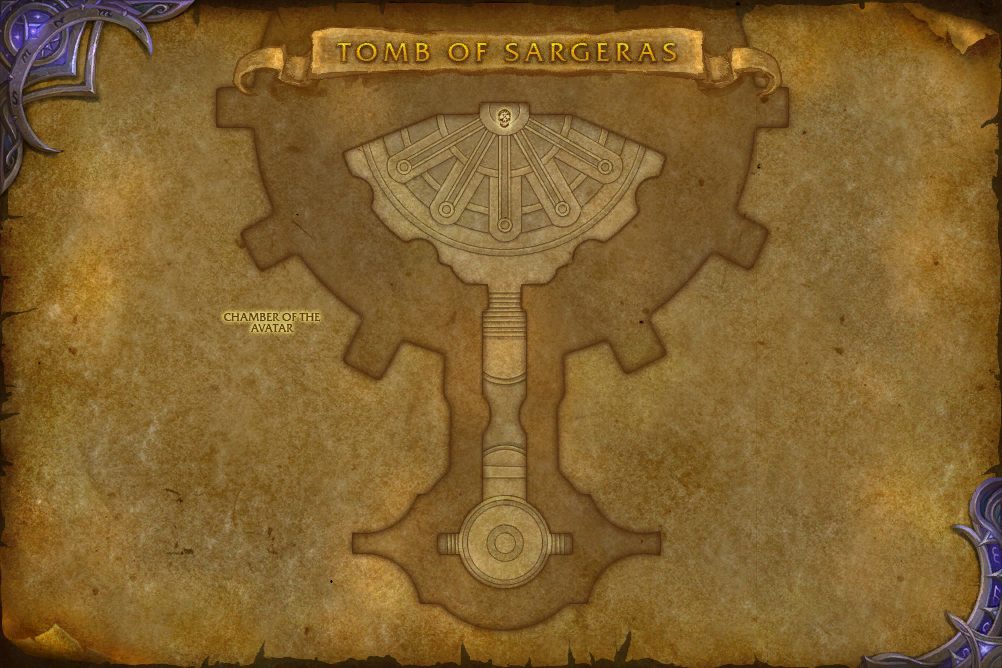 8Fallen Avatar
- 8 Fallen Avatar 50.5, 18.8
Tomb of Sargeras
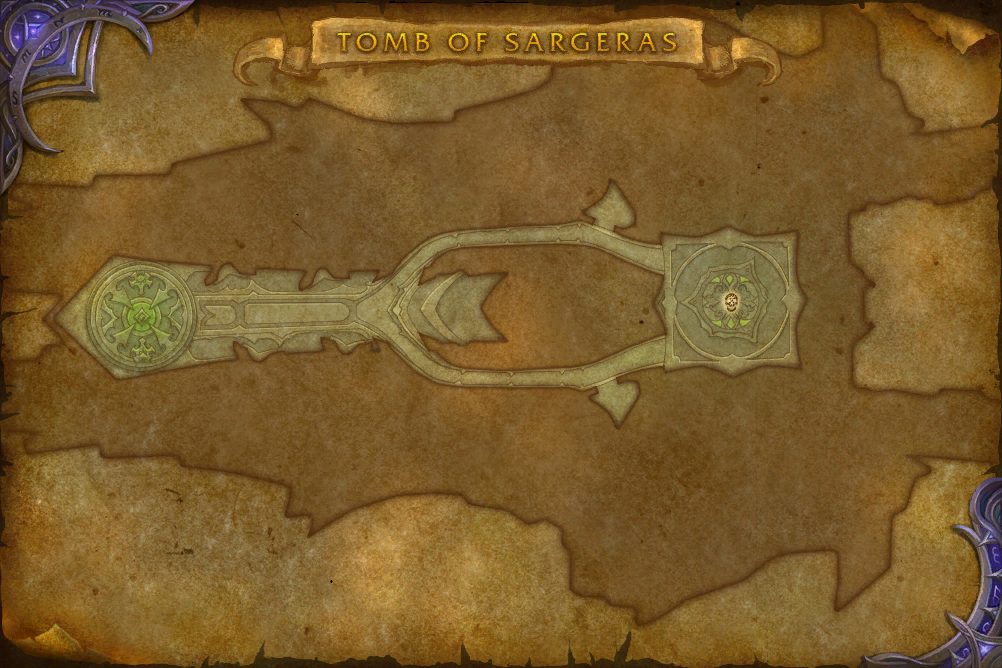 9Kil'jaeden
- 9 Kil'jaeden 72.8, 44.6
Encounters
Harjatan
Harjatan was trained from birth to demolish his enemies. Through a conquest of savage brutality, he gathered throngs of cave dwelling murlocs who see him as a god. Now, the naga brute merely has to bark a command and hordes of devout followers set themselves to task.
Abilities & Strategy
Overview
Stick together in order to spread out the damage done by Unchecked Rage. Try to keep the amount of Drenched stacks you have low in order to reduce the damage taken from all sources of Frost damage throughout the fight.
Tanks
- Make sure not to get too many stacks of Jagged Abrasion.
- Pick up the Razorjaw Wavemenders when they spawn in order to keep them away from the raid.
Damage Dealers
- When the boss casts Draw In, make sure to move to avoid being hit by moving pools of Drenching Waters.
- Move out of the impact point of Drenching Slough to avoid taking unnecessary damage or stacks of Drenched.
Healers
- Raid-wide healing is a top priority each time the boss casts Unchecked Rage and Frosty Discharge.
- Move out of the impact point of Drenching Slough to avoid taking unnecessary damage or stacks of Drenched.


 Commanding Roar
Razorjaw Wavemender


Razorjaw Gladiator


Incubated Egg
At set points throughout the fight, Incubated Eggs will begin Hatching.


Loot
25 drops · item level 50 · 8 slots (Chest, Feet, Finger, Hands, Shoulder, Trinket +2 more) · all Bind on Pickup
 Calcified Barnacle
 Charm of the Rising Tide
 Demonbane Gauntlets
 Diabolic Gloves
 Dripping Arcfin Shoulderpads
 Fanged Slayer's Handguards
 Glacier Walkers
 Gloves of Blind Absolution
 Gloves of the Arcane Tempest
 Gravewarden Handguards
 Grips of the Skybreaker
 Harjatan's Leering Eye
 Hauberk of Frozen Mist
 Ice-Threaded Conch
 Insulated Finpads
 Radiant Lightbringer Gauntlets
 Ravenous Devotee's Bracelets
 Robe of Aqueous Command
 Scaled Band of Servitude
 Shiversleet Waistguard
 Stormheart Gloves
 Titanic Onslaught Handguards
 Wave-Hammered Breastplate
 Wildstalker Gauntlets
 Xuen's Gauntlets
Mistress Sassz'ine
Mistress Sassz'ine has spent a lifetime binding the denizens of the ocean to her dark will. With this power, she summons nightmares from the briny depths to wash away any who dare challenge her.
Abilities & Strategy
Overview
Handpicked to watch over the flooded passageways, Mistress Sassz'ine stands ready to retrieve the Tidestone from those foolish enough to enter her domain.
Damage Dealers
- Slay Abyss Stalkers at the correct time to ensure that Concealing Murk is available for Slicing Tornado.
- Stand behind Concealing Murk to prevent being struck by Slicing Tornado.
- Bring Befouling Ink to Sarukel, The Unending Hunger when he opens his Devouring Maw.
- Avoid being struck by Slicing Tornado to prevent unnecessary damage.
Healers
- Stand behind Concealing Murk to prevent being struck by Slicing Tornado.
- Bring Befouling Ink to Sarukel, The Unending Hunger when he opens his Devouring Maw.
- Avoid being struck by Slicing Tornado to prevent unnecessary damage.
Tanks
- When afflicted with Burden of Pain, attempt to minimize Physical damage taken.
- Stand behind Concealing Murk to prevent being struck by Slicing Tornado.
- Avoid being struck by Slicing Tornado to prevent unnecessary damage.
Delicious Bufferfish
Picking up a Delicious Bufferfish grants an additional 3% damage dealt. Taking any damage causes the Delicious Bufferfish to drop onto the ground.
Dread Shark
A Dread Shark may catch the scent of a Delicious Bufferfish!


 From the Abyss
Abyss Stalker
Abyss Stalkers' melee attacks inflict shadow damage to their target instead of physical damage.


Stage One: Ten Thousand Fangs
Thousands of creatures rise from the depths of the ocean to assist their mistress.


Stage Two: Terrors of the Deep
Deep sea leviathans approach and answer the call of their master.


Stage Three: Vast Oceans of Wrath
Mistress Sassz'ine uses her full powers to wipe away her enemies.
Loot
26 drops · item level 10 to 50 · 6 slots (Back, Chest, Feet, Head, Legs, Trinket) · all Bind on Pickup
 Abyss Worm
 Azure Squallshaper's Helm
 Demonbane Leggings
 Diabolic Leggings
 Fanged Slayer's Legguards
 Flawless Hurricane Pearl
 Globe of Frothing Eddies
 Gravewarden Legplates
 Hide of the Abyssal Behemoth
 Hundred-Fathom Veil
 Iron Ballast Sabatons
 Leggings of Blind Absolution
 Leggings of the Arcane Tempest
 Legguards of the Skybreaker
 Leviathan's Hunger
 Mutated Nautilus
 Pungent Chum
 Radiant Lightbringer Greaves
 Sea Star of the Depthmother
 Shroud of the Drowned Adherent
 Stormheart Legguards
 Terror From Below
 Titanic Onslaught Greaves
 Vial of Ceaseless Toxins
 Wildstalker Leggings
 Xuen's Legguards
Goroth
As punishment for past failures, Goroth's flesh is marred with searing wounds. With every movement this behemoth makes, his flesh crackles and hisses with unending torment, a scourge he is happy to inflict upon those who oppose him.
Abilities & Strategy
Overview
Goroth continuously gains fel energy until he can unleash Infernal Burning, decimating any enemy it hits. Use Infernal Spikes to survive Infernal Burning and Shattering Star. In Mythic difficulty, Infernal Spikes explode when destroyed inflicting raid wide damage.
Damage Dealers
- Hide behind Infernal Spikes to avoid being hit by Infernal Burning.
- Avoid destroying Infernal Spikes when targeted with Crashing Comet.
- Aim Shattering Star to collide with multiple Infernal Spikes to decrease damage taken.
Healers
- Hide behind Infernal Spikes to avoid being hit by Infernal Burning.
- Avoid destroying Infernal Spikes when targeted with Crashing Comet.
- Aim Shattering Star to collide with multiple Infernal Spikes to decrease damage taken.
Tanks
- Hide behind Infernal Spikes to avoid being hit by Infernal Burning.
- Avoid destroying Infernal Spikes when affected by Burning Armor.


 Infernal Spike
In Mythic difficulty, when an Infernal Spike is destroyed, it explodes for Fire damage.

 Rain of Brimstone
Brimstone Infernal

Loot
16 drops · item level 50 · 8 slots (Back, Chest, Feet, Legs, Shoulder, Trinket +2 more) · all Bind on Pickup
 Belt of Screaming Slag
 Brand of Relentless Agony
 Charred Hymnal of the Moon
 Cinch of Sizzling Flesh
 Cloak of Stifling Brimstone
 Emberscatter Treads
 Felsoul Vortex
 Feverish Carapace
 Icon of Perverse AnimationImploding Infernal Star
 Infernal CindersLava-Slough LegguardsLegwraps of Fused Loathing
 Pain-Singed Armguards
 Shoulderplates of Crackling Flame
 Spirebreaker Harness
Demonic Inquisition
Anticipating the arrival of mortal forces invading the Tomb of Sargeras, Kil'jaeden has called on his best captors, Atrigan and Belac, to lock down the interlopers and prevent them from using the Pillars to advance deeper into the dungeon.
Abilities & Strategy
Overview
Atrigan and Belac share health. Both Atrigan and Belac's abilities all inflict Torment. Reaching full Torment results in Unbearable Torment.
Damage Dealers
- Confess when at full Torment to collect Remnants of Hope from Belac's cage and alleviate Unbearable Torment.
- Avoid attacking Atrigan and Belac during Bone Saw and Fel Squall respectively, so you don't incur additional Torment.
- Avoid standing near allies when afflicted with Echoing Anguish.
- Interrupt Pangs of Guilt!
Healers
- Confess when at full Torment to collect Remnants of Hope from Belac's cage and alleviate Unbearable Torment.
- Stagger dispelling Echoing Anguish to spread out the damage caused by Anguished Outburst.
Tanks
- Confess when at full Torment to collect Remnants of Hope from Belac's cage and alleviate Unbearable Torment.
- Coordinate with the other tank so only one has to Confess at a time.
- Avoid attacking Atrigan and Belac during Bone Saw and Fel Squall respectively, so you don't incur additional Torment.


Tormented Soul
A massive soul has coalesced within Belac's cage, trapped and tormented for thousands of years. While on the surface it is no more than a mass of ill will and pain, remnants of hope from long-forgotten prisoners remain trapped inside.


Tormented Fragment
When prisoners escape Belac's cage these fragments of the Tormented Soul abscond alongside them.

Loot
26 drops · item level 50 · 7 slots (Head, Legs, Neck, Shoulder, Trinket, Waist +1 more) · all Bind on Pickup
 Barbaric Mindslaver
 Blood of the Unworthy
 Bonemeal-Crusted ArmplatesBonespur Studded Legwraps
 Braided Torture Lash
 Cradle of Anguish
 Crown of the Arcane Tempest
 Demonbane Faceguard
 Diabolic Helm
 Fanged Slayer's HelmFlesh-Raking Leggings
 Gravewarden VisageHelmet of the SkybreakerHood of Blind Absolution
 Inexorable Truth Serum
 Inquisition's Master Key
 Mantle of Broken Spirits
 Pauldrons of the Gibbering Eye
 Radiant Lightbringer Crown
 Sinew-Stitched Wristguards
 Smoldering Thumbscrews
 Stormheart Headdress
 String of Extracted Incisors
 Titanic Onslaught Greathelm
 Wildstalker Helmet
 Xuen's Helm
Fallen Avatar
When Aegwynn defeated the Avatar of Sargeras, she was unable to destroy his avatar. In an effort to seal it away, the armor was entombed beneath the Temple of Elune, where it remained dormant for hundreds of years. Now, with the Legion tearing down the tomb's barriers, Kil'jaeden is in a position to reanimate the armor and unleash its power on Azeroth.
Abilities & Strategy
Overview
The encounter begins with the Fallen Avatar immobile, trapped in titan machinery, accompanied by the corrupted Maiden of Valor. While assaulting the raid, the Avatar periodically attempts to draw energy from Containment Pylons around the room. The Maiden of Valor will absorb this energy if she is positioned to intercept it. Once allowed to reach 100 Energy, the Fallen Avatar shatters the floor, becoming fully mobile and dropping players into the chamber below. The raid must then defeat the Fallen Avatar quickly, before [Rupture Realities] completely destroys the platform upon which they stand.
Damage Dealers
- Help soak the effects of Touch of Sargeras and Dark Mark.
- Avoid Unbound Chaos and the targets of Shadowy Blades.
- Move away from the Fallen Avatar while he casts Rupture Realities.
- Focus damage on the Maiden of Valor while she is casting Cleansing Protocol to trigger a Malfunction.
- Help soak the effects of Dark Mark.
Healers
- Help soak the effects of Touch of Sargeras and Dark Mark.
- Avoid Unbound Chaos and the targets of Shadowy Blades.
- Move away from the Fallen Avatar while he casts Rupture Realities.
- Help soak the effects of Dark Mark.
Tanks
- Position the Maiden of Valor in Corrupted Matrix to prevent the Fallen Avatar from gaining energy.
- Take turns tanking the Fallen Avatar to manage the application of Desolate.
- Move away from the Fallen Avatar while he casts Rupture Realities.
Stage One: A Slumber Disturbed
Locked into an ancient titan device, the Fallen Avatar struggles to regain his full power by corrupting the machinery around him.
 Touch of Sargeras
 Rupture Realities
 Unbound Chaos
 Shadowy Blades

 Desolate
 Consume
 Ripple of Darkness
Maiden of Valor

Containment Pylon
 Corrupted Matrix
15, 16 The Maiden of Valor can intercept the beam causing her to gain energy instead.
 Tainted Matrix
Stage Two: An Avatar Awakened
Upon reaching 100 Energy the Avatar shatters his bonds, destroying the platform and dropping players deeper into the Tomb of Sargeras.


Loot
23 drops · item level 50 · 8 slots (Back, Feet, Hands, Head, Legs, Shoulder +2 more) · all Bind on Pickup
 Archive of FaithBlackened Mask of Disgrace
 Bracers of Rippling Darkness
 Cape of Mindless Fury
 Cleansing Ignition Catalyst
 Demonbane Shoulderpads
 Diabolic Mantle
 Fanged Slayer's Shoulderpads
 Felscape Pathfinders
 Gravewarden PauldronsGroundshatter GauntletsLegguards of Siphoned PowerMantle of Blind Absolution
 Mantle of the Arcane Tempest
 Oathbreaker's Cuffs
 Pauldrons of the SkybreakerRadiant Lightbringer Shoulderguards
 Reactive Pylon Casing
 Stormheart Mantle
 Titanic Onslaught Pauldrons
 Valorous Spark of HopeWildstalker SpauldersXuen's Shoulderguards
The Desolate Host
Once, this was a sacred burial site for the Night Elves, but the Legion has twisted these grounds with the Engine of Souls. This foul machine draws upon the energy of the dead, twisting them into abominations. Due to this corruption, these tormented spirits have become monstrosities, looking to feed on any who descend into the tomb's depths.
Abilities & Strategy
Overview
The Engine of Souls exists within the corporeal realm while the corrupted soul of High Priestess Dejahna controls the Spirit Realm. Both share health and call upon the spirits and the undead to serve the Legion. At 30% health remaining, the Engine of Souls lurches forward and ejects The Desolate Host, a fearsome amalgamation of the corrupted dead. In Mythic difficulty, players are only able to voluntarily switch realms while under 50% health.
Damage Dealers
- If afflicted with Soulbind, quickly move to another similarly afflicted player in the opposing realm.
- Manage the final explosion from Shattering Scream to ensure it removes applications of Bonecage Armor.
Healers
- Players in the Spirit Realm will require large amounts of healing while Wailing Souls is occurring.
- If afflicted with Soulbind, quickly move to another similarly afflicted player in the opposing realm.
Tanks
- Manage the final explosion from Shattering Scream to ensure it removes applications of Bonecage Armor.
- If targeted with Tormented Cries, attempt to aim the blast away from other players.
Corporeal Realm
In the realm of the living, the Engine of Souls siphons fallen Night Elf spirits for the Burning Legion.
Engine of Souls


Reanimated Templar


Ghastly Bonewarden

Spirit Realm
In the realm of the dead, High Priestess Dejahna's soul has been corrupted into dark servitude.
Soul Queen Dejahna


Fallen Priestess


Soul Residue

Tormented Souls
Upon reaching 30% health, the Engine of Souls draws forth a vast number of tormented spirits to form the Desolate Host. In Mythic difficulty, this begins a chain reaction that destroys the Spiritual Fonts.
The Desolate Host


Loot
24 drops · item level 50 · 8 slots (Back, Chest, Hands, Head, Neck, Shoulder +2 more) · all Bind on Pickup
Armet of the Rotten Mind Befouled Effigy of Elune
 Demonbane Shroud
 Diabolic Shroud
 Drape of the Arcane Tempest
 Drape of the Skybreaker
 Etched Bone Waistband
 Fanged Slayer's ShroudGauntlets of Spiteful Haunting
 Glowing Prayer CandleGrave-Dredged Pauldrons
 Gravewarden Cloak
 Grimacing Highborne Skull
 Locket of Splintered Souls
 Preserved Starlight Incense
 Radiant Lightbringer Cape
 Reliquary of the Damned
 Shawl of Blind Absolution
 Soul Queen's Ceremonial Robes
 Spectral Thurible
 Stormheart Drape
 Titanic Onslaught Cloak
 Wildstalker Cape
 Xuen's Cloak
Maiden of Vigilance
Charged by Aegwynn to defend the Tomb of Sargeras, the Maiden of Vigilance has stood watch for hundreds of years. Yet, the guardian did not forsee what effect the avatar's seeping fel energy would have on this titan construct. Slowly warped by this maleficence, the Maiden now seeks to destroy any in her path.
Abilities & Strategy
Overview
The Maiden of Vigilance has been partially corrupted by the Legion, and wields both Holy and Fel magic in equal proportion. Periodically, the Maiden infuses all players with either Light Infusion or Fel Infusion. When players with opposing auras move too close together, the magics react, triggering Unstable Soul. Making contact with, or taking damage from, energy of the opposite element also triggers Unstable Soul. In Mythic difficulty, Fragments not collected by players will trigger Fragment Burst. Additionally, Blowback will remove stacks of Creator's Grace and Demon's Vigor.
Damage Dealers
- Don't stand near allies with the opposite Infusion aura.
- Dive into the pit when Unstable Soul is about to expire to keep from damaging allies with the explosion.
- Collect stacks of either Creator's Grace or Demon's Vigor by touching Fragments that match your Infusion during Watcher's Wrath.
- Quickly break Titanic Bulwark and interrupt Wrath of the Creators.
- Dive into the pit when Unstable Soul is about to expire.
Tanks
- Don't stand near allies with the opposite Infusion aura.
- Dive into the pit when Unstable Soul is about to expire to keep from damaging allies with the explosion.
- Prevent Hammer of Creation and Hammer of Obliteration from striking allies with the opposite Infusion.
- Dive into the pit when Unstable Soul is about to expire.
Healers
- Don't stand near allies with the opposite Infusion aura.
- Dive into the pit when Unstable Soul is about to expire to keep from damaging allies with the explosion.
- Collect stacks of either Creator's Grace or Demon's Vigor by touching Fragments that match your Infusion during Watcher's Wrath.
- Damage from Wrath of the Creators increases with each wave.
- Dive into the pit when Unstable Soul is about to expire.


Stage One: Divide and Conquer
The Maiden of Vigilance infuses and hammers her enemies with both Holy and Fel magic.
 Infusion

Hammers
The Maiden imbues her hammer with either Holy or Fel energy and strikes the ground with tremendous force.


 Mass Instability
 Spontaneous Fragmentation
Stage Two: Watcher's Wrath
The Maiden of Vigilance jumps away, shields herself, and buffets the raid with Fragments of Creation and Obliteration.
Infusion
 Blowback
 Titanic Bulwark
 Wrath of the Creators

 Essence Fragments
Grace and Vigor
Collecting Fragments of Creation or Obliteration with a matching Infusion will trigger Creator's Grace or Demon's Vigor for all nearby allies.
Loot
25 drops · item level 50 · 8 slots (Chest, Feet, Finger, Hands, Head, Legs +2 more) · all Bind on Pickup
 Band of Rescinded TruthsCrown of Discarded Hope
 Demonbane Harness
 Diabolic Robe
 Engine of EradicationFanged Slayer's Chestguard
 Fragment of GraceGloves of Wayward Compulsions
 Gravewarden ChestplateHarness of the SkybreakerLeggings of Divine PortentsRadiant Lightbringer Breastplate
 Recompiled Guardian ModuleRobes of Blind AbsolutionRobes of the Arcane Tempest
 Stabilized Extinction Protocol
 Steadfast Purifier's Warboots
 Stormheart Tunic
 Strife-Riddled Cinch
 Tears of the Maiden
 Titanic Onslaught Breastplate
 Unfurling Origination
 Virus of Lethargy
 Wildstalker ChestguardXuen's Tunic
Kil'jaeden
Since striking the bargain that chased the draenei into the stars, Kil'jaeden believed the Legion could not be stopped. Yet, none of his deceptions have prevented you from reaching this critical moment. Infuriated that Sargeras' promise of victory has never come to pass, the demon lord prepares to face you himself, for a final battle that will shape Azeroth's destiny forever.
Abilities & Strategy
Overview
Players engage Kil'jaeden on his command ship, engaging both him and the Shadow Reflections of their comrades' souls that he turns to his will. At 80% health, Kil'jaeden takes to the sky, launching a punishing barrage of attacks on players, after which he re-engages the players with greater power. At 40% health, Kil'jaeden wraps the platform in darkness, limiting players' vision to a short range around them, and summons several Shadowsouls. Players must find Illidan in the darkness, who grants the players his sight, and use it to defeat the Shadowsouls and dispel the darkness. Once players have escaped the darkness, Kil'jaeden arrives at Argus and unleashes his ultimate attack - Darkness of a Thousand Souls. Players must use the rifts that he opens to absorb the missiles from Darkness of a Thousand Souls to avoid being killed by them.
Tanks
- Alternate tanks on Kil'jaeden to avoid Felclaws stacking too high.
- When Kil'jaeden casts Armageddon, one of the missiles will be much larger than the others. This is Armageddon Hail, and a tank should move to intercept this.
Healers
- Heal Hopeless Reflections to minimize the effects of Hopelessness.
- Avoid the effects of Darkness of a Thousand Souls by moving close enough to the rifts created by Tear Rift to be affected by Gravity Squeeze.
- Move into Armageddon Rain to avoid the affects of Armageddon Blast.
Damage Dealers
- Interrupt Malignant Reflections' Malignant Anguish.
- Avoid the effects of Darkness of a Thousand Souls by moving close enough to the rifts created by Tear Rift to be affected by Gravity Squeeze.
- Move into Armageddon Rain to avoid the affects of Armageddon Blast.
Stage One: The Betrayer
 Felclaws
On Heroic difficulty and above, Felclaws additionally causes Kil'jaeden's melee attacks to inflict 100% of his melee attack damage to all enemies in a cone in front of him.
 Rupturing Singularity
 Armageddon

Shadow Reflection
Kil'jaeden severs the souls of players, creating copies of them.

Intermission: Eternal Flame
 Bursting Dreadflame
 Focused Dreadflame
On Heroic difficulty and above, a Focused Dreadburst goes off at the location of each player hit by Focused Dreadflame.
 Nether Gale
Rupturing Singularity
Armageddon
Stage Two: Reflected Souls
Bursting Dreadflame
Focused Dreadflame
On Heroic difficulty and above, a Focused Dreadburst goes off at the location of each player hit by Focused Dreadflame.
Shadow Reflection
Kil'jaeden severs the souls of players, creating copies of them.

Felclaws
On Heroic difficulty and above, Felclaws additionally causes Kil'jaeden's melee attacks to inflict 0% of his melee attack damage to all enemies in a cone in front of him.
Rupturing Singularity
Armageddon
Intermission: Deceiver's Veil
Kil'jaeden gathers the shadows around him, applying Deceiver's Veil to all players and creating several Shadowsouls. Killing the Shadowsouls pushes back the darkness, removing Deceiver's Veil from all players.
 Deceiver's Veil
Rupturing Singularity
Shadowsoul
Lord Illidan Stormrage
Illidan will fly to the platform during Deceiver's Veil. Any players who move within 8 yards of him are granted Illidan's Sightless Gaze.

Stage Three: Darkness of A Thousand Souls
 Darkness of a Thousand Souls
 Demonic Obelisk
 Tear Rift
 Flaming Orb
Bursting Dreadflame
Focused Dreadflame
On Heroic difficulty and above, a Focused Dreadburst goes off at the location of each player hit by Focused Dreadflame.
Felclaws
On Heroic difficulty and above, Felclaws additionally causes Kil'jaeden's melee attacks to inflict 100% of his melee attack damage to all enemies in a cone in front of him.
Loot
18 drops · item level 50 · 7 slots (Feet, Finger, Hands, Head, Legs, Trinket +1 more) · all Bind on Pickup
 Boon of the ProphetGloves of Furtive OppressionGreaves of Impure Midnight
 Man'ari Blood Pact
 Ruinous Ashes
 Scornful Reflection
 Seal of the Second DuumvirateShadow-Scarred Headcover
 Shifting Cosmic Sliver
 Soul-Render's Greatbelt
 Specter of Betrayal
 Sphere of Entropy
 Star-Stalker Treads
 The Deceiver's Grand Design
 Tome of Unraveling Sanity
 Torn Fabric of RealityVicegrip of the Unrepentant
 Waistguard of Profane Duplicity
Sisters of the Moon
The Sisters of the Moon served as wardens for the temple long before the avatar of Sargeras was buried beneath it. Even in death, the sisters maintained their vigil, but over the millennia something twisted their ability to distinguish friend from foe. Their madness slowly consumed them, and now any who enter their sacred chambers are put to death.
Abilities & Strategy
Overview
The Sisters of the Moon are trapped in a fading incorporeal state, bound together and sharing health. Between them they maintain only enough power to sustain the physical form of one of them at a time. Huntress Kasparian initiates the fight, followed by Captain Yathae Moonstrke at 70% health remaining, and then followed by Priestess Lunaspyre at 40% health remaining. The floor of the Font of Elune is a projected moon that changes through the moon phases. At Full Moon and New Moon the Font of Elune empowers the incorporeal Sisters of the Moon to use Glaive Storm, Incorporeal Shot, and Embrace of the Eclipse. In Mythic difficulty, Astral Purge inflicts raid wide damage when players move to a different side of the moon.
Damage Dealers
- If targeted by Rapid Shot move to the light side of the moon to clear stacks of Umbra Suffusion.
- If affected by Moon Burn move to the other side of the moon.
- Defeat the Moontalon before Deathly Screech becomes lethal.
- If Umbra Suffusion or Lunar Suffusion stacks get too high, move to the other side of the moon to clear them.
Healers
- If targeted by Rapid Shot move to the light side of the moon to clear stacks of Umbra Suffusion.
- If affected by Moon Burn move to the other side of the moon.
- If Umbra Suffusion or Lunar Suffusion stacks get too high, move to the other side of the moon to clear them.
Tanks
- Position to allow Moon Glaive to hit 3 players to decrease overall tank damage.
- If affected by Moon Burn move to the other side of the moon.
- Avoid taking too many stacks of Lunar Fire.
- If Umbra Suffusion or Lunar Suffusion stacks get too high, move to the other side of the moon to clear them.
 Font of Elune
 Lunar Suffusion
 Umbra Suffusion
 Astral Purge
In Mythic difficulty, Astral Purge inflicts Spellshadow damage to all allies.

Stage One: The Huntress
Huntress Kasparian

Captain Yathae Moonstrike


Priestess Lunaspyre


Stage Two: Bow of the Night
Captain Yathae Moonstrike

Priestess Lunaspyre
Huntress Kasparian
Stage Three: Wrath of Elune
Priestess Lunaspyre

Huntress Kasparian
Captain Yathae Moonstrike
Loot
17 drops · item level 50 · 8 slots (Chest, Feet, Finger, Hands, Head, Shoulder +2 more) · all Bind on Pickup
 Blessing of the White Lady
 Chalice of Moonlight
 Chiseled StarlightCuirass of Blinding DawnDusk-Crusher Handguards
 Ferocity of the DevoutLunar-Wrath HeadgearMantle of Waning RadianceMoonfire Stranglers
 Moontalon's Feather
 Mote of Astral SuffusionShoulderpads of Whispering Twilight
 Slippers of Enduring Vigilance
 Tarnished Sentinel Medallion
 Umbral Moonglaives
 Waistguard of Interminable Unity
 Yathae's Thumb Ring
Quests
5 quests Blizzard’s quest data files under Tomb of Sargeras, all for level 45:
- Reward:40 gold44 silver
Achievements
32 achievements tied to Tomb of Sargeras, worth 250 achievement points in total.
 Tomb of Sargeras Guild RunDefeat the bosses of Tomb of Sargeras on Normal difficulty or higher, while in a guild group.10
- Mythic: Kil'jaeden Guild RunDefeat Kil'jaeden in Tomb of Sargeras on Mythic difficulty, while in a guild group.10
 The Gates of HellDefeat the following bosses near the entrance to the Tomb of Sargeras.10
 Wailing HallsDefeat the following bosses in the lower levels of the Tomb of Sargeras.10
 Chamber of the AvatarDefeat the following bosses in the ancient vault beneath the Tomb of Sargeras.10
 Deceiver's FallDefeat Kil'jaeden in the Tomb of Sargeras.10
 Tomb of SargerasDefeat the bosses within the Tomb of Sargeras on Normal difficulty or higher.10
 Mythic: GorothDefeat Goroth in Tomb of Sargeras on Mythic difficulty.10
- Ahead of the Curve: Kil'jaedenDefeat Kil'jaeden in Tomb of Sargeras on Heroic difficulty or higher, before the opening of Antorus, the Burning Throne.
 Mythic: Demonic InquisitionDefeat Demonic Inquisition in Tomb of Sargeras on Mythic difficulty.10
- Cutting Edge: Kil'jaedenDefeat Kil'jaeden in Tomb of Sargeras on Mythic difficulty, before the opening of Antorus, the Burning Throne.
 Mythic: HarjatanDefeat Harjatan in Tomb of Sargeras on Mythic difficulty.10
- Mythic: Mistress Sassz'ineDefeat Mistress Sassz'ine in Tomb of Sargeras on Mythic difficulty.10
 Mythic: Sisters of the MoonDefeat Sisters of the Moon in Tomb of Sargeras on Mythic difficulty.10
- Mythic: The Desolate HostDefeat the Desolate Host in Tomb of Sargeras on Mythic difficulty.10
 Mythic: Maiden of VigilanceDefeat the Maiden of Vigilance in Tomb of Sargeras on Mythic difficulty.10
- Mythic: Fallen AvatarDefeat the Fallen Avatar in Tomb of Sargeras on Mythic difficulty.10
- Mythic: Kil'jaedenDefeat Kil'jaeden in Tomb of Sargeras on Mythic difficulty.Title: The Darkener10
 Fel Turkey!Destroy 30 Infernal Spikes with Shattering Stars and then defeat Goroth in Tomb of Sargeras on Normal difficulty or higher.10
- Grin and Bear ItDefeat the Demonic Inquisition in Tomb of Sargeras while every party member is at maximum Torment on Normal difficulty or higher.10
 Grand Fin-aleSummon Elder Murk-Eye using a Mrgrglhjorn, then defeat him and Harjatan in Tomb of Sargeras on Normal difficulty or higher.Decor Reward: Murloc's Wind Chimes10
 Five Course Seafood BuffetDefeat Mistress Sass'zine in Tomb of Sargeras after feeding the following items to Sarukel on Normal difficulty or higher.10
 Wax On, Wax OffDefeat a Waxing Twilight Soul and then defeat the Sisters of the Moon in Tomb of Sargeras on Normal difficulty or higher.10
 Great Soul, Great PurposeDefeat the Desolate Host in Tomb of Sargeras while keeping the Diminishing Soul from perishing on Normal difficulty or higher.10
- Sky WalkerDefeat the Maiden of Vigilance in Tomb of Sargeras having captured every Titanic Anomaly on Normal difficulty or higher.10
 Bingo!Defeat the Fallen Avatar in Tomb of Sargeras without breaking any floor segments in the following patterns on Normal difficulty or higher.10
 Dark SoulsDefeat Kil'jaeden in Tomb of Sargeras without any Shadowsouls finishing a cast of Destabilized Shadowsoul on Normal difficulty or higher.10
- Tomb of SargerasDefeat the bosses withiin the Tomb of Sargeras on any difficulty.+1 Infinite Knowledge
- The Gates of HellDefeat the following bosses near the entrance to the Tomb of Sargeras.Minor Bronze Cache
- Wailing HallsDefeat the following bosses in the lower levels of the Tomb of Sargeras.Minor Bronze Cache
- Deceiver's FallDefeat Kil'jaeden in the Tomb of Sargeras.Minor Bronze Cache
- Chamber of the AvatarDefeat the following bosses in the ancient vault beneath the Tomb of Sargeras.Minor Bronze Cache
More Legion Raids
Other raids from the same expansion.
Recent hotfixes for Tomb of Sargeras
- August 14, 2026 Dungeons and Raids
Archmage Timear again permits players to queue for the Raid Finder wings of Tomb of Sargeras.
Blizzard Entertainment's official hotfix notes, shown in full at the hotfix tracker.