 TheWoWDB
Raid - Legion
Antorus, the Burning Throne
11 encounters, 267 boss abilities and 238 drops, with the Adventure Guide’s own ability and strategy notes for each fight. Every drop links to its item page; tradeable drops carry a live Auction House price.
At the core of Argus lies Antorus, the Burning Throne. From this seat of power, Sargeras drives his burning crusade to ravage the cosmos. Within the Throne's nigh-impenetrable depths, primordial powers are being forged into weapons of utter annihilation. Should these forces rise to serve their master, the final hour will fall upon all of creation.
Quick Facts
| Type | Raid |
|---|---|
| Expansion | Legion |
| Encounters | 11 |
| Boss abilities | 267 |
| Drops | 238 |
| Item level | 1 to 51 |
| Tradeable drops | 0 |
| Difficulties | Normal, Heroic, Mythic |
Difficulties and Lockouts
Antorus, the Burning Throne has 4 difficulties in the game data: Normal, Heroic, Mythic and Looking For Raid save you to a weekly lockout.
| Difficulty | Players | Level range | Lockout |
|---|---|---|---|
| Normal | 30 | 45 | Weekly |
| Heroic | 30 | 45 | Weekly |
| Mythic | 20 | 45 | Weekly |
| Looking For Raid | 30 | 45 | Weekly |
Raid Finder splits Antorus, the Burning Throne into 4 wings:
- Light's Breach
- Forbidden Descent
- Hope's End
- Seat of the Pantheon
Loot Table Value
Every one of Antorus, the Burning Throne’s 238 drops is Bind on Pickup, so none of this loot can ever reach the Auction House. The table below the bosses is the complete reward list; its value is item level, not gold.
Where It Is
The entrance to Antorus, the Burning Throne is in Antoran Wastes at 54.7, 62.8.
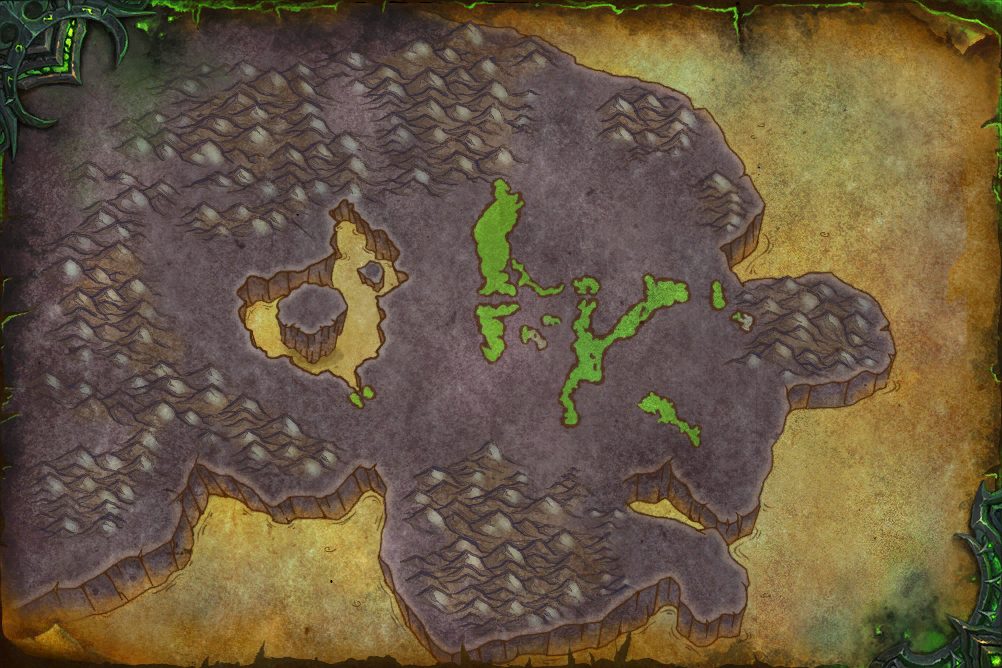 Army of the LightEntrance 54.7, 62.8
Antoran Wastes, from the game’s own world map art. The framed marker is the Adventure Guide entrance; gold diamonds are the zone’s landmarks.
3D Model
First-party render from the game files. Model © Blizzard Entertainment.
Instance Map
The Adventure Guide places 11 bosses of Antorus, the Burning Throne on 9 maps. Numbers follow the encounter order; each links to that fight below.
Antorus, the Burning Throne
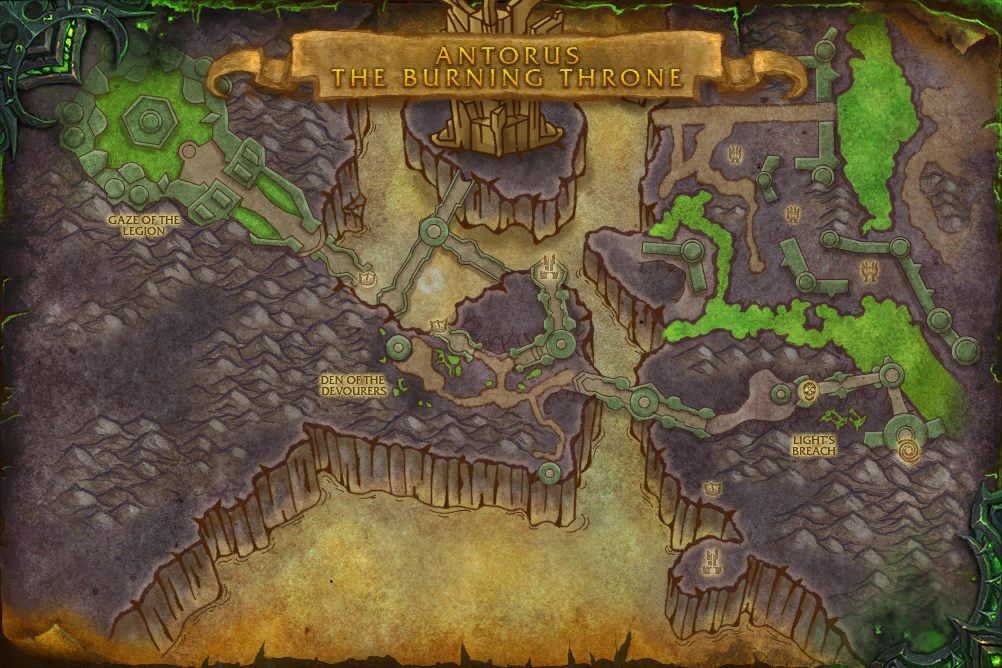 1Garothi Worldbreaker2Felhounds of Sargeras
- 1 Garothi Worldbreaker 72.8, 58.7
- 2 Felhounds of Sargeras 41.3, 53.5
Antorus, the Burning Throne
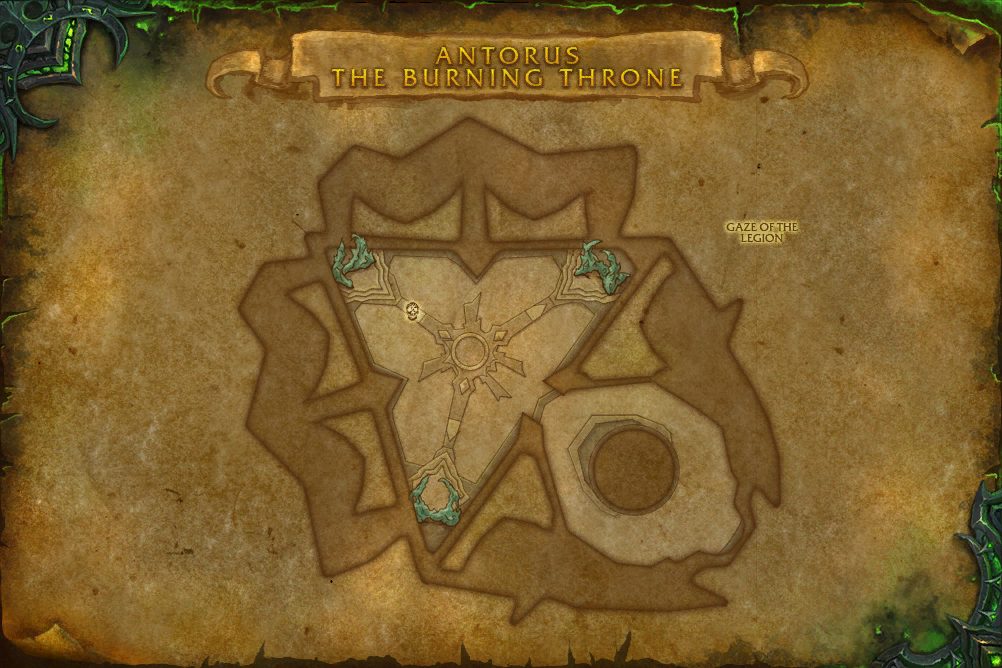 3Antoran High Command
- 3 Antoran High Command 41.2, 46.6
Antorus, the Burning Throne
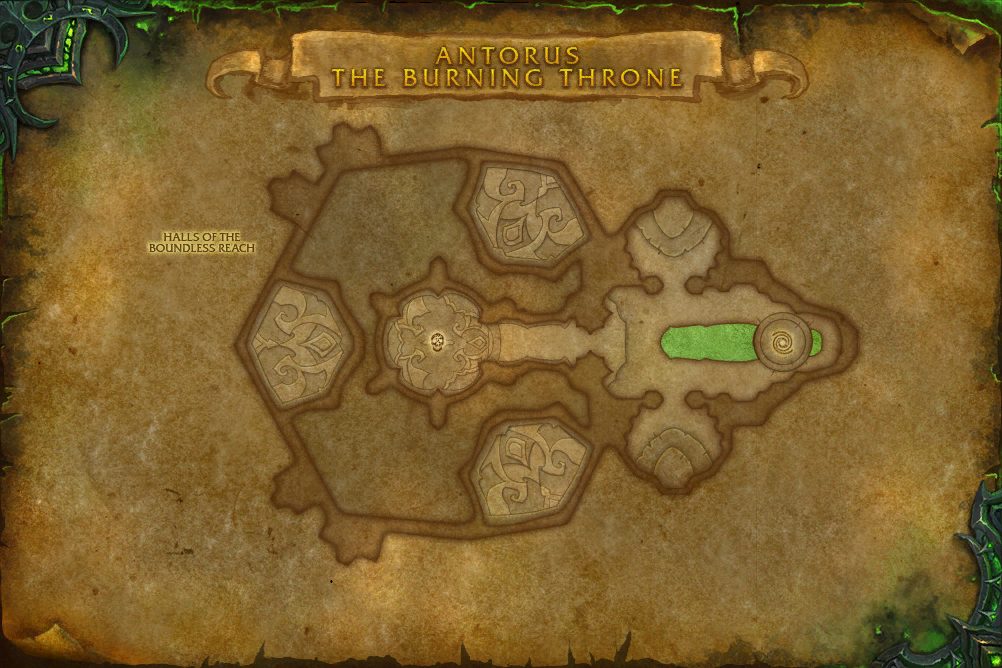 4Portal Keeper Hasabel
- 4 Portal Keeper Hasabel 43.5, 51.1
Antorus, the Burning Throne
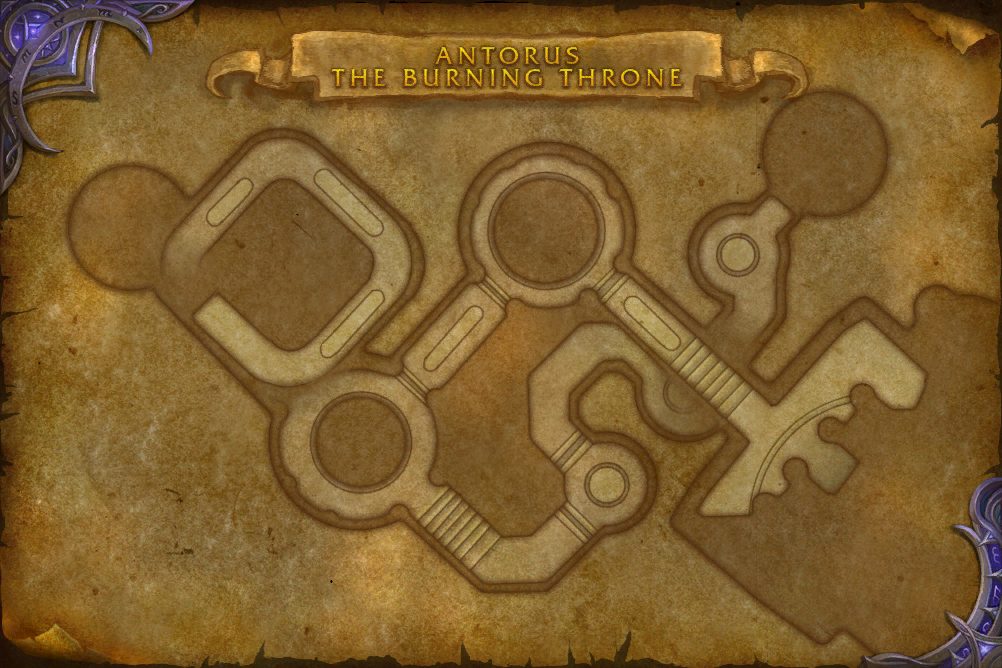 5Eonar the Life-Binder
- 5 Eonar the Life-Binder 40.1, 59.2
Antorus, the Burning Throne
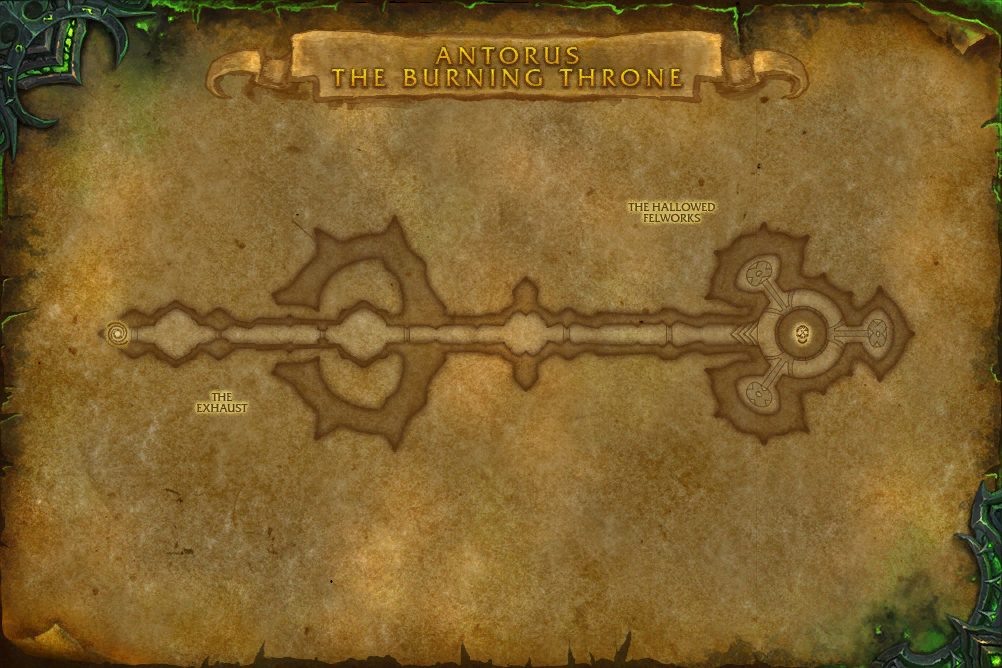 6Imonar the Soulhunter7Kin'garoth
- 6 Imonar the Soulhunter 17.6, 50.2
- 7 Kin'garoth 80.0, 49.9
Antorus, the Burning Throne
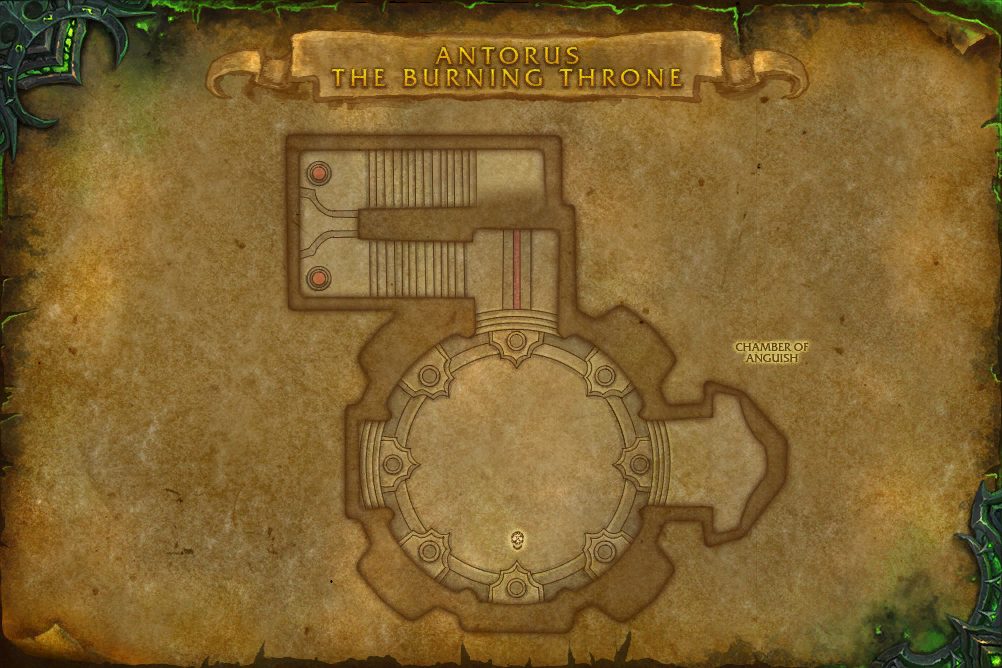 8Varimathras
- 8 Varimathras 51.6, 81.3
Antorus, the Burning Throne
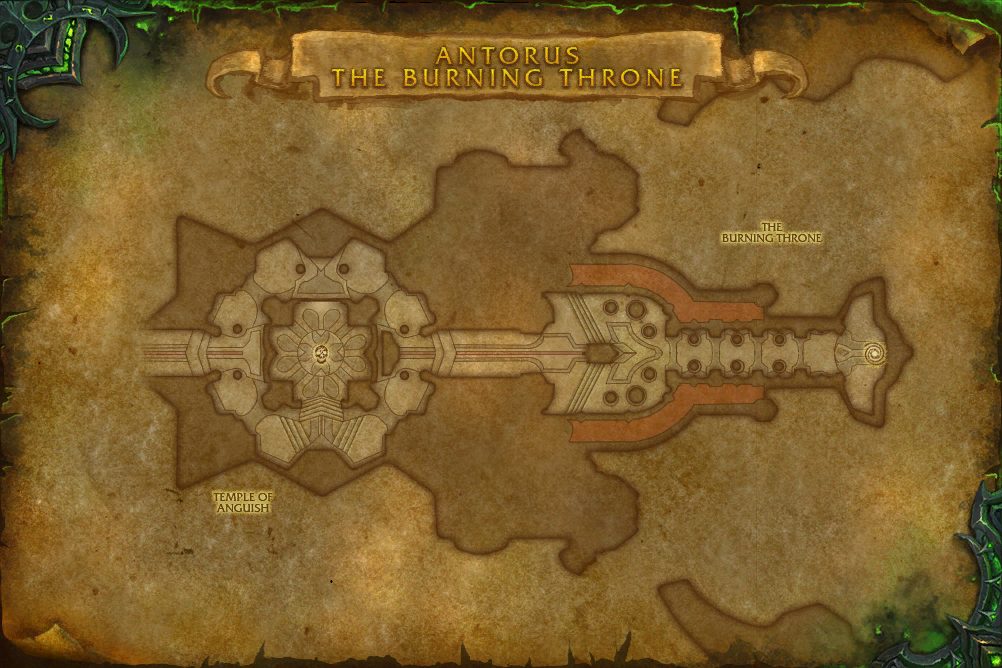 9The Coven of Shivarra
- 9 The Coven of Shivarra 32.1, 52.7
Antorus, the Burning Throne
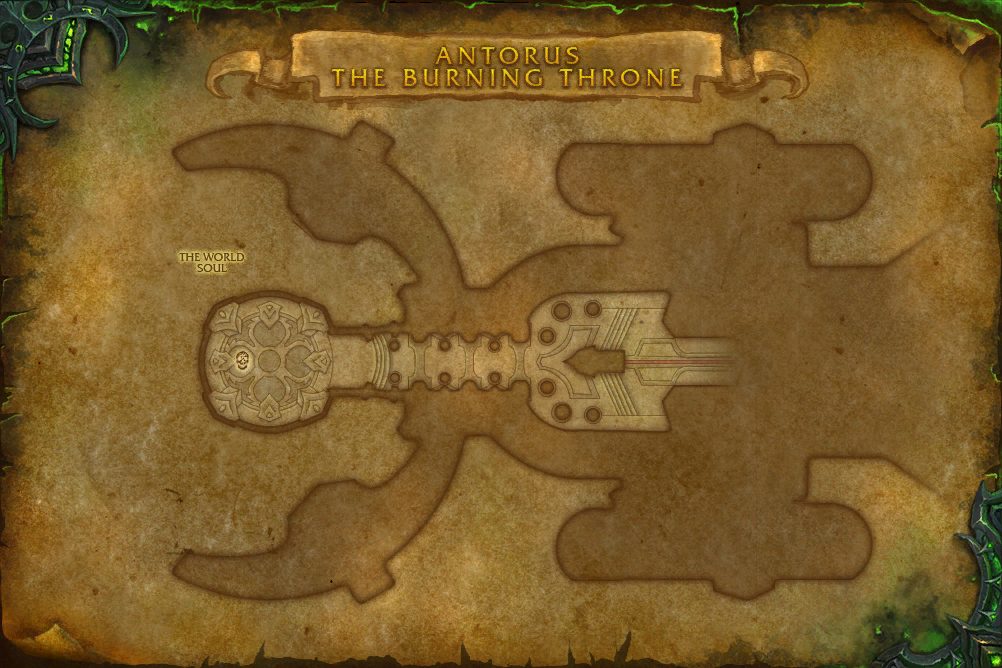 10Aggramar
- 10 Aggramar 24.2, 54.0
Antorus, the Burning Throne
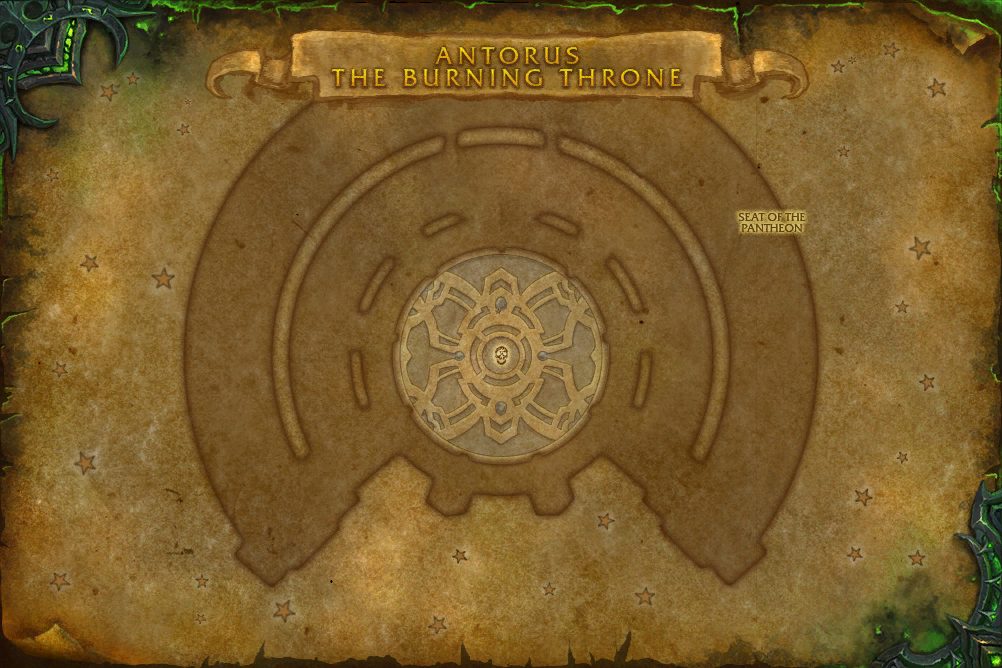 11Argus the Unmaker
- 11 Argus the Unmaker 50.1, 53.1
Encounters
NNormalHHeroicMMythic
Varimathras
As one the dreadlords overseeing the Legion's forces during the Third War, Varimathras failed to stop the rebellious Lich King. He submitted to an ill-fated alliance with Sylvanas Windrunner, then made one last bid for power before facing a humiliating defeat. In payment for his blunders, Varimathras has been tortured by the Coven of Shivarra. The vindictive sisters stripped away both flesh and sanity, leaving only a singular desire to inflict suffering upon the mortals who cost him everything.
Abilities & Strategy
Overview
Varimathras uses the darkness of his cell to stalk his prey, attacking them with Alone in the Darkness.
Damage Dealers
- Position Marked Prey to avoid being knocked out of range of your allies.
- Quickly move out of Dark Fissure.
- Avoid spreading Necrotic Embrace to multiple allies.
Healers
- Torments of the Shivarra inflict constant raid wide damage.
- Players who suffer any Shadow damage are afflicted with Misery and cannot be healed for 7 sec.
Tanks
- Avoid being hit by Shadow Strike while not tanking.
- Misery prevents all healing received and increases Physical damage taken for 7 sec.
Torments of the Shivarra
The Coven of Shivarra designed Varimathras' cell to torture him for all time.


The Fallen Nathrezim
 Misery
 Alone in the Darkness
 Shadow Strike
 Dark Fissure
 Marked Prey
 Necrotic Embrace
Shadow of Varimathras
Whenever Varimathras moves through the darkness, his shadow lingers and attacks players until killed.

Loot
15 drops · item level 50 · 7 slots (Chest, Feet, Legs, Neck, Trinket, Waist +1 more) · all Bind on Pickup
 Belt of Fractured Sanity
 Blood-Drenched Bindings
 Carafe of Searing Light
 Cord of Surging Hysteria
 Greaves of Mercurial Allegiance
 Nathrezim Incisor
 Nathrezim Shade-Walkers
 Neuroshock Electrode
 Riveted Choker of Delirium
 Robes of the Forsaken Dreadlord
 Seeping Scourgewing
 Thu'rayan Lash
 Tormentor's Brand
 Varimathras' Shattered Manacles
 Vest of Unfathomable Anguish
Aggramar
Once the noble Avenger of the Pantheon, Aggramar was struck down by Sargeras and reborn as a titan of destruction. He now stands at the core of Argus, guarding a power that could unmake the universe. Not even demons are permitted to tread within the titan's halls, and any mortals bold enough to trespass will be reduced to cinders by Aggramar's burning blade, Taeshalach.
Abilities & Strategy
Overview
15, 16Over the course of the encounter Aggramar passively generates energy. Upon reaching 100 Energy, his sword, Taeshalach, unleashes fiery energy and he begins Taeshalach Technique, a devastating combo attack, alternating between Foe Breaker and Flame Rend, ending with a Searing Tempest. Upon reaching 80% and 40% Aggramar activates his Corrupt Aegis, preventing all damage and the elemental forces within Taeshalach are unleashed. Several smaller Embers of Taeshalach erupt from the blade along with two Flames of Taeshalach. The Embers slowly move towards Aggramar causing a Blazing Eruption. Killing both Flames of Taeshalach causes Aggramar to resume his attacks. Over the course of the encounter Aggramar passively generates energy. Upon reaching 100 Energy, his sword, Taeshalach, unleashes fiery energy and he begins Taeshalach Technique, a devastating combo attack, casting Flame Rend several times before ending with a Searing Tempest. Upon reaching 60% Aggramar activates his Corrupt Aegis, preventing all damage and the elemental forces within Taeshalach are unleashed. The Embers slowy move towards Aggramar causing a Blazing Eruption.
Tanks
- Taeshalach's Reach causes all of Aggramar's melee attacks to hit the next closest target.
- Take turns tanking Aggramar to manage the application of Taeshalach's Reach.
- During Taeshalach Technique, turn Aggramar away from allies to mitigate the damage of Foe Breaker.
- Face Aggramar to help the raid split the damage of Flame Rend.
- With your co-tank, make sure to separate the Flames of Taeshalach to prevent the application of Catalyzing Presence.
Healers
- Avoid being close to allies as Scorching Blaze hits all nearby players.
- During Taeshalach Technique, help split the damage of Flame Rend and avoid Foe Breaker and Searing Tempest.
- Embers of Taeshalach that reach Aggramar cause a Blazing Eruption inflicting significant damage to all players.
- During Taeshalach Technique, help split the damage of Flame Rend.
Damage Dealers
- Avoid being close to allies as Scorching Blaze hits all nearby players.
- During Taeshalach Technique, help split the damage of Flame Rend and avoid Foe Breaker and Searing Tempest.
- Embers of Taeshalach cause Blazing Eruption when they touch Aggramar.
- During Taeshalach Technique, help split the damage of Flame Rend.
Stage One: Wrath of Aggramar
 Taeshalach's Reach
 Scorching Blaze
 Ravenous Blaze
 Wake of Flame
 Taeshalach Technique
 Foe Breaker
 Flame Rend
Empowered Flame Rend
 Searing Tempest
In Mythic difficulty, all Embers of Taeshalach that are hit with the effect are Catalyzed.
Intermission: Fires of Taeshalach
 Corrupt Aegis
 Meteor Swarm
Flame of Taeshalach

Ember of Taeshalach
These fragments of Taeshalach's essence move towards Aggramar. Upon reaching him they recombine with Taeshalach, causing a Blazing Eruption.


Stage Two: Champion of Sargeras
Taeshalach's Reach
Scorching Blaze
Ravenous Blaze
 Flare
Flare
In Mythic difficulty, all Embers of Taeshalach that are hit with the effect are Catalyzed.
 Empowered Flare
Taeshalach Technique
Foe Breaker
Flame Rend
Empowered Flame Rend
Searing Tempest
Empowered Searing Tempest
In Mythic difficulty, all Embers of Taeshalach that are hit with the effect are Catalyzed.
Intermission: Taeshalach's Rage
Corrupt Aegis
Meteor Swarm
Wake of Flame
Flame of Taeshalach
Ember of Taeshalach
These fragments of Taeshalach's essence move towards Aggramar. Upon reaching him they recombine with Taeshalach, causing a Blazing Eruption.
Stage Three: The Avenger
Taeshalach's Reach
Scorching Blaze
Ravenous Blaze
Empowered Flare
In Mythic difficulty, each Empowered Flare summons forth a Ember of Taeshalach. In addition, all Embers of Taeshalach that are hit with the effect are Catalyzed.
Wake of Flame
Ember of Taeshalach
These fragments of Taeshalach's essence move towards Aggramar. Upon reaching him they recombine with Taeshalach, causing a Blazing Eruption.
 Catalyzed
Taeshalach Technique
Foe Breaker
Empowered Foe Breaker
Flame Rend
Empowered Flame Rend
Searing Tempest
Empowered Searing Tempest
In Mythic difficulty, all Embers of Taeshalach that are hit with the effect are Catalyzed.
Loot
26 drops · item level 50 · 8 slots (Back, Chest, Feet, Head, Legs, Shoulder +2 more) · all Bind on Pickup
 Bearmantle Headdress
 Breastplate of Molten Rebirth
 Caustic Titanspite Legguards
 Cavalier Hat of the Dashing Scoundrel
 Douli of Chi-Ji
 Dreadwake Helm
 Fallen Avenger's Amice
 Felreaper Hood
 Gilded Seraph's Crown
 Gorshalach's LegacyGreatboots of the Searing Tempest
 Greatcloak of the Dark Pantheon
 Grim Inquisitor's Death Mask
 Grond-Father Girdle
 Headdress of Venerated Spirits
 Juggernaut Helm
 Light's Vanguard Helm
 Prototype Titan-DiscPyretic Bronze Clasp
 Runebound Collar
 Sandals of the Reborn Colossus
 Serpentstalker Helmet
 Sliver of CorruptionSmoldering Titanguard
 Sporemound Seedling
 World-Ravager Waistguard
Portal Keeper Hasabel
Portal Keeper Hasabel maintains the nexus through which the Legion has unleashed its insidious armies upon countless worlds. With portals that open to a myriad of strategic locations throughout the Great Dark Beyond, Hasabel is capable of bringing the might of the Legion's arsenal to bear upon any who oppose her.
Abilities & Strategy
Overview
Portal Keeper Hasabel commands the portal nexus for the Burning Legion, transporting demons to and from the frontlines. At 90% health remaining, Hasabel opens a fiery portal to Xoroth to burn her enemies. Vulcanar arrives through the portal and empowers it until his death. At 60% health remaining, Hasabel opens a fel portal to Rancora to liquify her enemies. Lady Dacidion arrives through the portal and empowers it until her death. At 30% health remaining, Hasabel opens a shadow portal to Nathreza to confuse the minds of her enemies. Lord Eilgar arrives through the portal and empowers it until his death.
Damage Dealers
- Move away from Collapsing World to prevent being knocked off the platforms.
- Interrupt and slay demons pouring forth from the Transport Portal when it is opened.
- Utilize the essence of the demon homeworlds, such as Everburning Light, Caustic Detonation, and Hungering Gloom to combat each of the other homeworld's properties.
Healers
- Allies will suffer high damage when Reality Tear expires.
- Players within Oppressive Gloom cannot be healed unless they are near an Everburning Light.
- Move away from Collapsing World to prevent being knocked off the platforms.
Tanks
- Manage applications of Reality Tear to reduce the damage from Bursting Darkness.
- Interrupt demons pouring forth from the Transport Portal when it is opened.
- Move away from Collapsing World to prevent being knocked off the platforms.
Platform: Nexus
A central platform that connects Legion portals.
 Reality Tear

 Collapsing World
 Felstorm Barrage
 Transport Portal
Felblaze Imp
Feltouched Skitterer
Hungering Stalker
 Catastrophic Implosion
Platform: Xoroth
Flames and fiery demons pour forth from Xoroth.


Platform: Rancora
Many skittering demons originate from the fel infused Rancora.


Platform: Nathreza
Latent shadows and deception is core to the homeworld of Nathreza.


Loot
15 drops · item level 50 · 8 slots (Feet, Finger, Hands, Head, Neck, Trinket +2 more) · all Bind on Pickup
 Aranasi Shadow-Weaver's Gloves
 Blazing Dreadsteed Horseshoe
 Crepuscular Skitterer Egg
 Fel-Engraved Handbell
 Grips of Hungering Shadows
 Lady Dacidion's Silk Slippers
 Nathrezim Battle GirdleNexus Conductor's Headgear
 Portal Keeper's Cincture
 Reality-Splitting Wristguards
 Riftworld Codex
 Seal of the Portalmaster
 Sublimating Portal Frost
 Tarratus Keystone
 Vulcanarcore Pendant
The Coven of Shivarra
Having proven themselves to be the most depraved and fanatical of all his followers, Sargeras entrusted the Coven with the unholy task of twisting the minds of the fallen titans into an unstoppable Dark Pantheon. Each sister employs her own signature brand of torture, eliciting screams which echo throughout the halls of Antorus. It is said that neither mortal nor demon can refuse their whispers, making it only a matter of time before the will of the titans is broken.
Abilities & Strategy
Overview
The Mothers of the Coven of Shivarra share a health pool. Two of the Shivarra stay within the arena and engage their enemies directly, while the titans' souls are being tormented. The Shivarra exchange places after forcing two titans' souls to use their abilities against the enemies of the Coven. While within 18 yards of each other, the Coven of Shivarra will take reduced damage. Defeating the tormented aparitions of the titans is the key to defeating the Coven itself, and freeing the souls of Aman'Thul, Golganneth, Khaz'goroth and Norgannon.
Damage Dealers
- Avoid standing next to allies when afflicted with Fury of Golganneth.
- Defeat Torments of Aman'Thul before they finish casting Machinations of Aman'Thul and are restored to full health.
- Use abilities to slow the movement of Torments of Norgannon until they are no longer affected by Visage of the Titan.
- Interrupt Touch of the Cosmos.
Healers
- Allies take increasingly high amounts of damage leading up to any Torment of the Titans ability.
- Avoid standing next to allies when afflicted with Fury of Golganneth.
- Heal allies afflicted with Chilled Blood.
Tanks
- Avoid gaining too many stacks of Flashfreeze and Fiery Strike.
- Position the Mothers so that they are unaffected by Shivan Pact.
- Avoid standing next to allies when afflicted with Fury of Golganneth.
The Coven of Shivarra
 Shivan Pact
 Sense of Dread
Noura, Mother of Flames


Asara, Mother of Night


Diima, Mother of Gloom


Thu'raya, Mother of the Cosmos

Torment of the Titans
Torment of Aman'Thul

Torment of Golganneth

Torment of Khaz'goroth

Torment of Norgannon

Loot
25 drops · item level 50 · 7 slots (Feet, Finger, Hands, Legs, Shoulder, Trinket +1 more) · all Bind on Pickup
 Bearmantle Shoulders
 Bracers of Wanton Morality
 Burning Coven Sabatons
 Coven Prayer Bead
 Diima's Glacial Aegis
 Dreadwake Pauldrons
 Felreaper Spaulders
 Fervent Twilight Legwraps
 Frigid GloomstoneGilded Seraph's Amice
 Grim Inquisitor's Shoulderguards
 Highfather's Machination
 Juggernaut Pauldrons
 Legguards of Numbing Gloom
 Light's Vanguard Shoulderplates
 Lurid Grips of the Obscene
 Meditation Spheres of Chi-Ji
 Pauldrons of Venerated Spirits
 Runebound Mantle
 Serpentstalker Mantle
 Sheath of Asara
 Shivarran Cachabon
 Shoulderpads of the Dashing Scoundrel
 Stormcaller's Fury
 Zealous Tormentor's Ring
Felhounds of Sargeras
Infused with fire and shadow, F'harg and Shatug are the prized pets of Sargeras. Bred for carnage, these hounds delight in eviscerating their master's enemies. With the Army of the Light and their allies advancing upon Antorus, the Legion prepares to unleash these vicious creatures onto the battlefield and put an end to the mortals' invasion.
Abilities & Strategy
Overview
The Felhounds of Sargeras combat players while performing attacks at specific power thresholds, but each has their own power generation rate. Focusing Power temporarily suspends this power generation. While within 40 yards of each other, Sargeras' Blessing imbues them with 25% increased damage.
Damage Dealers
- Be aware of targets afflicted with Desolate Gaze, as it inflicts damage from F'harg to the targets' direction.
- Avoid standing in front of F'harg and Shatug because of Burning Maw and Corrupting Maw.
- Help players afflicted with Weight of Darkness as the duration divides amongst nearby targets.
- Assist players afflicted with Siphoned during Siphon Corruption, and avoid players afflicted with Enflamed during Enflame Corruption.
Healers
- Be aware of targets afflicted with Desolate Gaze, as it inflicts damage from F'harg to the targets' direction.
- Pay attention when a Felhound reaches 100 power, as Erupting Flames and Erupting Shadows inflict sustained raid-wide damage.
- Assist players afflicted with Siphoned during Siphon Corruption, and avoid players afflicted with Enflamed during Enflame Corruption.
- Molten Touch targets take high amounts of Fire damage through Singed in a short period of time.
Tanks
- Be aware of targets afflicted with Desolate Gaze, as it inflicts damage from F'harg to the targets' direction.
- Watch for the Burning Maw or Corrupting Maw auras, as they indicate that the targeted boss can cast the aforementioned ability.
F'harg
 Burning Maw
 Molten Touch


 Desolate Gaze
 Erupting Flames
Enflame Corruption
In this difficulty, Enflame Corruption triggers Lingering Flames upon completion.

Shatug
 Corrupting Maw
 Consuming Sphere


 Weight of Darkness
 Erupting Shadows
Siphon Corruption
In this difficulty, Siphon Corruption triggers Siphoned Soul upon completion.


 Focusing Power
In this difficulty, this afflicts enemies with Flametouched or Shadowtouched.


Loot
17 drops · item level 1 to 50 · 8 slots (Chest, Feet, Hands, Head, Neck, Shoulder +2 more) · all Bind on Pickup
 Antoran Charhound
 Collar of Null-Flame
 Corrupting Dewclaw
 Eye of F'harg
 Eye of Shatug
 Flamelicked Girdle
 Fraternal Fervor
 Gravitational Condensate
 Harness of Oppressing Dark
 Molten Bite HandguardsPauldrons of the SoulburnerShadowfused Chain Coif
 Shadow-Singed FangSoul-Siphon Mantle
 Vestments of Enflamed Blight
 Vicious Flamepaws
 Whistling Ulna
Garothi Worldbreaker
Constructed deep within the core of Argus and outfitted with an arsenal capable of decimating worlds, this war machine has been designed for a single purpose: to bring the mortals' invasion to its knees.
Abilities & Strategy
Overview
The fel reaver's cannons continously alternate between Annihilation and Decimation. Upon reaching 60% and 20% health on Normal and Raid Finder difficulties, the fel reaver activates Apocalypse Drive exposing its weapon platforms. Unless one of these weapons is destroyed before the cast can complete, the party will be eradicated. On Heroic difficulty, the fel reaver activates Apocalypse Drive at 65% and 35% health. On Mythic difficulty, the fel reaver activates Apocalypse Drive at 65% and 35% health. Also, the cannons can no longer be destroyed, but instead go haywire, granting the cannons additional effects.
Damage Dealers
- When the Fel Reaver activates Apocalypse Drive, destroy a Fel Cannon to interrupt its cast.
- Move into Annihilation to avoid inflicting damage to the raid.
- Move away from your allies when targeted by Decimation.
Healers
- When a weapon platform is destroyed, the fel reaver continuously damages the raid with Searing Barrage.
- Move into Annihilation to avoid inflicting damage to the raid.
- Move away from your allies when targeted by Decimation.
- The raid takes constant damage during Luring Destruction while being pulled towards the boss.
Tanks
- Run away from the boss when targeted by Fel Bombardment.


Loot
15 drops · item level 50 · 9 slots (Back, Chest, Feet, Hands, Head, Legs +3 more) · all Bind on Pickup
 Battalion-Shattering Leggings
 Breach-Blocker Legguards
 Cloak of the Burning VanguardCrown of Relentless Annihilation
 Doomfire Dynamo
 Doomwalker Warboots
 Enhanced Worldscorcher Cinch
 Garothi Feedback Conduit
 Heedless Eradication Gauntlets
 Hellfire Ignition Switch
 Prototype Personnel DecimatorShoulderpads of the Demonic Blitz
 Soul-Tempered Chestplate
 Spurting Reaver Heart
 Viscous Reaver-Coolant
Antoran High Command
Long ago in the golden age of eredar civilization, a council was formed to oversee the defense of Argus and maintain peace. But after their dark bargain was struck with Sargeras, these master tacticians used their military expertise to help orchestrate a Burning Crusade that ravaged countless worlds. Now the full might of the Legion's army is theirs to command, and they wield this terrible power to annihilate all who oppose the Dark Titan's will.
Abilities & Strategy
Overview
The Antoran High Command's three commanders attack their enemies both face-to-face and from inside their command pods. Only one commander is out of their pod at any given time, and commanders still in their pods attack their enemies using the might of the Legion military. While a commander is attacking directly, their command pod is empty and can be commandeered. After a period attacking their enemies face to face, commanders will Assume Command and return to their pod. On Mythic difficulty, Screaming Shrikes will appear periodically and channel Extract Interloper in an to attempt to remove your allies from command pods they have commandeered. Additionally, the effects of Psychic Scarring last for the duration of combat.
Damage Dealers
- Group up under a Felshield to mitigate the effects of Fusillade.
- Interrupt Fanatical Pyromancers when they cast Pyroblast.
- Make maximum use of Legion command pods when one is vacated by the enemy.
Healers
- Group up under a Felshield to mitigate the effects of Fusillade.
- Focus additional healing on allies who enter a Command Pod as they suffer the effects of Psychic Assault.
- Quickly heal allies targeted by Chaos Pulse, and dispel the effects it leaves behind.
Tanks
- Group up under a Felshield to mitigate the effects of Fusillade.
- Position active commanders facing away from allies so they do not get hit by Exploit Weakness.
- Avoid taking too many consecutive strikes from Exploit Weakness.
In Pod
Each commander has powerful abilities they can only access while they inhabit their command pod.


Out of Pod
While out of their command pod, each commander fights their enemies more directly using a shared set of attacks.


Stealing Power
While a commander is out of their pod and attacking directly, players can commandeer the pod and use its powerful abilities. This causes the player to suffer a Psychic Assault, which will eventually overwhelm and kill the player for meddling with powers beyond their station.
 Psychic Assault
 Chaos Pulse
Screaming Shrike

 Defensive Countermeasures
Admiral's Pod
Engineer's Pod

General's Pod

Loot
26 drops · item level 50 · 9 slots (Back, Chest, Feet, Head, Legs, Shoulder +3 more) · all Bind on Pickup
 Bearmantle Cloak
 Cloak of Chi-Ji
 Cloak of the Dashing ScoundrelDepraved Tactician's Waistguard
 Drape of Venerated Spirits
 Dreadwake Greatcloak
 Eredar Warcouncil Sabatons
 Fasces of the Endless Legions
 Felreaper Drape
 Fiendish Logistician's Wristwraps
 Fleet Commander's HauberkGeneral Erodus' Tricorne
 Gilded Seraph's Drape
 Grim Inquisitor's Cloak
 Ishkar's Felshield Emitter
 Juggernaut Cloak
 Legwraps of the Seasoned Exterminator
 Lightshield Amplifier
 Light's Vanguard Greatcloak
 Man'ari Pyromancer CuffsPauldrons of the Eternal Offensive
 Runebound Cape
 Serpentstalker Drape
 Svirax's Grim Trophy
 Terminus Signaling Beacon
 Twisted Engineer's Fel-Infuser
Kin'garoth
The design of every Legion war machine stems from the depraved mind of Kin'garoth. Obsessed with crafting implements of death, Kin'garoth infused his very body into the production machinery so he could more efficiently churn out a never-ending supply of destruction. At the behest of the Legion's dark master, Kin'garoth's fevered brilliance has developed a new super-weapon which he plans to unleash upon the Army of the Light.
Abilities & Strategy
Overview
Kin'garoth alternates between his Construction and Deployment phases, creating Fel Reavers to fuel the Legions war machine. Upon reaching 100 energy, Kin'garoth enters the Construction phase and casts Apocalypse Protocol, which begins building 3 Fel Reavers while the automated defenses of his work shop rain death upon his enemies. During the Deployment phase, Kin'garoth joins his creations in combat until he regains enough energy to activate Apocalypse Protocol and enter his Construction phase.
Damage Dealers
- Target Fel Reavers immediately to take full advantage of the damage vulnerability from Initializing.
- Be sure to leave construction bays before Purging Protocol is initiated.
- Move in to Annihilation missiles to avoid the affects of Annihilation Blast.
- Clump to split the damage from Demolish.
Healers
- Be sure to leave construction bays before Purging Protocol is initiated.
- Move in to Annihilation missiles to avoid the affects of Annihilation Blast.
- Clump to split the damage from Demolish.
Tanks
- Avoid taking consecutive hits from Forging Strike.
- Be sure to leave construction bays before Purging Protocol is initiated.
- Move in to Annihilation missiles to avoid the affects of Annihilation Blast.
- Clump to split the damage from Demolish.
Stage: Deployment


Stage: Construction


Garothi Annihilator

Garothi Decimator
Garothi Demolisher
Loot
24 drops · item level 50 · 7 slots (Chest, Feet, Finger, Hands, Head, Trinket +1 more) · all Bind on Pickup
 Acrid Catalyst Injector
 Apocalypse Drive
 Band of the Sargerite Smith
 Bearmantle Paws
 Decimator Crankshaft
 Depraved Machinist's Footpads
 Dreadwake Gauntlets
 Eidolon of Life
 Felreaper Gloves
 Forgefiend's Fabricator
 Gilded Seraph's HandwrapsGloves of the Dashing ScoundrelGloves of Venerated Spirits
 Grim Inquisitor's GlovesGrips of Chi-Ji
 Juggernaut Gauntlets
 Kin'garoth's Oil-SumpLight's Vanguard Gauntlets
 Magma-Spattered Smock
 Obliterator PropellantRunebound Gloves
 Scalding Shatterguards
 Serpentstalker GripsTitan-Subjugator's Visage
Imonar the Soulhunter
The infamous Imonar serves as the Legion's bloodhound, capable of tracking prey across the cosmos. With a vast array of gadgets and traps at his disposal, Imonar has yet to lose a bounty... and he certainly doesn't intend to sully his perfect record by failing to fulfil his latest contract.
Abilities & Strategy
Overview
Imonar the Soulhunter is called forth by the Legion to hunt down and capture high priority targets. He starts out utilizing controlling and suppressing effects to defeat his enemies. At 66% health remaining, Imonar backs up to a secondary platform, dropping several traps along the way. He then begins to use more lethal effects on enemies, calling in Legion ships to assist him. At 33% health remaining, Imonar leaps back to the primary platform, once more planting traps along the way. His weapons are now empowered and fully operational. In Mythic difficulty, these transitions occur every time Imonar loses 20% of his maximum health.
Damage Dealers
- Interrupt Conflagration when the raid has safely arrived on the correct platform to prevent Gathering Power from stacking too high.
- Avoid triggering traps such as Stasis Trap and Blastwire when traversing the walkways!
- Move away from players afflicted with Sleep Canister to avoid Slumber Gas.
Healers
- Dispel Sleep Canister from affected players after allies move to a safe distance.
- Avoid triggering traps such as Stasis Trap and Blastwire when traversing the walkways!
Tanks
- Manage stacks of Shock Lance, Sever, and Empowered Shock Lance to ensure they don't stack too high.
- Interrupt Conflagration when the raid has safely arrived on the correct platform to prevent Gathering Power from stacking too high.
- Avoid triggering traps such as Stasis Trap and Blastwire when traversing the walkways!
Stage One: Attack Force


Stage Two: Contract to Kill
 Sever
Sever
 Charged Blasts
All targets struck are also knocked away from the blast.
 Shrapnel Blast
Infernal Rockets
Stage Three: The Perfect Weapon

Stage Three: Marked For Death
Stage Four: Kill Switch
Stage Five: The Perfect Weapon
Intermission: On Deadly Ground


Loot
24 drops · item level 50 · 6 slots (Back, Feet, Hands, Head, Legs, Shoulder) · all Bind on Pickup
Bearmantle Legguards Deft Soulhunter's SabatonsDrape of the Spirited HuntDreadwake Legplates
 Fallen Magi's SeerstoneFelreaper LeggingsGilded Seraph's LeggingsGrim Inquisitor's Leggings
 Hoarfrost-Beast TalonImonar's Demi-Gauntlets
 Juggernaut Legplates
 Leggings of Chi-JiLeggings of Venerated Spirits
 Light's Vanguard Legplates
 Mysterious Petrified Egg
 Pants of the Dashing ScoundrelPreysnare Vicegrips
 Runebound LeggingsSerpentstalker LegguardsShoulderguards of Indomitable PurposeSoulhunter's CowlSpaulders of the Relentless Tracker
 Venerated Puresoul Idol
 Whisperstep Runners
Eonar the Life-Binder
Though she was felled by the blade of Sargeras, the Life-Binder's essence escaped the grasp of the Dark Titan. After millennia spent hiding in isolation, Eonar's sanctuary has been discovered by the Legion. Should her soul fall into the enemy's hands, Eonar's powers of nature and growth will be perverted to make the Burning Crusade unstoppable.
Abilities & Strategy
Overview
The forces of the Legion will warp in and charge at Eonar's Essence and attempt to destroy her outright. Players must defend Eonar until she can gather her energies and strike back at her attackers.
Tanks
- Fel-Powered Purifiers will divert from their path to Eonar to engage players in combat once damaged.
- Fel-Infused Destructors will fire at a much faster rate unless engaged in melee combat.
- Move away from other players when targeted by Rain of Fel.
- Avoid getting hit by Meteor Storm.
Damage Dealers
- Most creatures are oblivious to your attempts to thwart their advance.
- Many of your crowd-controlling effects will work here.
- Move away from other players when targeted by Rain of Fel.
- Kite Spear of Doom away from the normal walkways to mitigate its impact on the encounter.
- Eonar will provide portals to board the Paraxis and interrupt its Final Doom attack.
- When interrupting Final Doom coordinate which Feedback effect you will take.
- Avoid getting hit by Meteor Storm.
Healers
- Most creatures will not turn to engage players. Instead, the Paraxis will fire off many spells that will damage the raid.
- Move away from other players when targeted by Rain of Fel.
- Kite Spear of Doom away from the normal walkways to mitigate its impact on the encounter.
- Eonar will provide portals to board the Paraxis and interrupt its Final Doom attack.
- When interrupting Final Doom coordinate which Feedback effect you will take.
- Avoid getting hit by Meteor Storm.
 Essence of the Lifebinder
 Surge of Life
In Mythic difficulty, players can only have one charge of Surge of Life at a time.
Dive Down
While gliding, use this ability to dive down to the targeted location.
 Life Energy
 Life Force
In Mythic difficulty, each cast of Life Force reenergizes players with Essence of the Lifebinder.
 Fel Shielding
Fel Shielding can only be removed by the explosion of a Rain of Fel.
The Paraxis
The Paraxis spearheads the Legion's invasion against Eonar, launching several different attacks at players to cover the insertion of Legion forces.
 Paraxis Artillery
 Meteor Storm
 Spear of Doom
 Annihilation
 Rain of Fel
Final Doom
Periodically throughout the encounter, the Paraxis will attempt to annihilate all life in the zone. Players must enter the Paraxis by using special portals that Eonar creates on her platform. While there, players must dispatch a Paraxis Inquisitor and then deactivate four Focusing Crystals in order to disrupt the sequence. Deactivating a crystal gives the player a Feedback application based on the color of the Focusing Crystal.
 Final Doom
 Feedback - Arcane Singularity
 Feedback - Targeted
 Feedback - Burning Embers
 Feedback - Foul Steps
Paraxis Inquisitor
The Paraxis Inquisitor controls access to the various control devices aboard the Paraxis. Defeat him to be able to interact with the devices and interrupt the Paraxis' Final Doom attack.
 Mind Blast
 Pain
Pain
 Wrack
Wrack
 Torment
This ability is only used when the caster is not actively engaged in melee combat.
Forces of the Legion
These creatures warp in at various locations and move directly to Eonar's essence. If they reach her essence they will inflict damage to her until they are defeated.
Felguard
Standard Legion infantry unit. Not exceptionally fast or hearty.
Fel Hound
Exceptionall fast, these hounds of the Legion have less health than Felguards.
Fel Lord
Slow-moving, these elite Legion units have exceptionally high health.
Volant Kerapteron
These fel bats fly in and take an airborne route to Eonar's essence.
Fel-Powered Purifier
Removes any active crowd-control effects from nearby allies and grants all nearby allies immunity to crowd-controlling effects.


Fel-Infused Destructor
Continually fires upon Eonar's essence until dispatched. If not actively engaged in melee combat will greatly increase rate of fire. This creature is sessile.
Fel-Charged Obfuscator
Cloaks nearby allies, making them invisible. This creature ignores combat.

Loot
24 drops · item level 50 · 7 slots (Chest, Feet, Finger, Head, Trinket, Waist +1 more) · all Bind on Pickup
Bearmantle Harness Cord of Blossoming PetalsDreadwake Bonecage
 Droplets of the Cleansing StormFelreaper VestGilded Seraph's RobesGrim Inquisitor's RobesHeaddress of Living BramblesHelmet of the Hidden Sanctuary
 Ironvine ThornJuggernaut Breastplate
 Life-Bearing Footpads
 Light's Vanguard Breastplate
 Loop of the Life-BinderRobes of Venerated Spirits
 Runebound Tunic
 Sash of the Gilded RoseSerpentstalker Tunic
 Spark of Everburning Light
 Tunic of Chi-Ji
 Unwavering Soul Essence
 Vambraces of Life's Assurance
 Vest of the Dashing Scoundrel
 Vitality Resonator
Argus the Unmaker
Bound. Broken. Eons of existence, knowing only pain. A shattered soul, fueling infinite evil. The master beckons. Rise... Rise! Begin the end of all things.
Abilities & Strategy
The Unmaking of Creation
The Speaker has heard the anguished whispers of the Unmaker, an emerald star calling out from the darkness. Little is known of him, only that his once-noble soul has been twisted by ages of endless torment.
Tanks
- Alternate tanks on Argus to minimize Sweeping Scythe damage.
- If you are made the Avatar of Aggramar, you will need to protect players afflicted by Soulbomb so they are not killed by Soulbomb Detonation.
- Constellar Designates equipped with Sword of the Cosmos and Blades of the Eternal should be tanked. Additionally, try to keep the Designate equipped with Sword of the Cosmos away from any other designates to avoid Cosmic Power stacking too high.
Healers
- Players afflicted by Soulbomb and Soulburst will take heavy damage - make sure their health is high enough that they are not subsequently killed by Soulbomb Detonation and Soulburst Detonation.
- If you are afflicted by Soulbomb, move to the Avatar of Aggramar to avoid being killed by Soulbomb Detonation.
- Once Gift of the Lifebinder is afflicted with Withering Roots, heal it to keep it alive so that players can use it to come back to life.
- Collect the Motes of Titanic Power while you are a ghost to empower Khaz'goroth, enabling him to cast Titanforging.
Damage Dealers
- Move into Gift of the Sky or Gift of the Sea to gain the power of Golganneth. However, make sure you always move into the same one, as the effects are mutually exclusive!
- If you are afflicted by Soulbomb, move to the Avatar of Aggramar to avoid being killed by Soulbomb Detonation.
- Collect the Motes of Titanic Power while you are a ghost to empower Khaz'goroth, enabling him to cast Titanforging.
Stage One: Storm and Sky


Stage Two: The Protector Redeemed
When Argus reaches 70% health, Golganneth begins to cast Golganneth's Wrath, clearing away any Death Fog on the platform.


Stage Three: The Arcane Masters
When Argus reaches 40% health, he is sufficiently weakened such that Aman'Thul is able to subdue him with a Temporal Blast. However, the players must then contend with Argus' Constellar Designates. Or, so it seems...
The Constellar Designates
 Cosmic Ray
Cosmic Beacon
 Impending Inevitability
 Starblast
The Stellar Armory
Periodically, two of the Constellar Designates will be granted arms from the Stellar Armory. When equipped with these arms, the Designates will no longer use their other abilities and will instead engage in melee attacks.
Norgannon's Aid

Stage Four: The Gift of Life, The Forge of Loss
His Constellar Designates buying him the time to regain his strength, Argus kills the players with Reap Soul. All hope would be lost, were it not for the titans...
 End of All Things
 Ember of Rage
 Tortured Rage
 Volatile Soul
 Sweeping Scythe
Deadly Scythe
Reorigination Modules
Reorigination Modules will begin an Initialization Sequence when created. When their health is consumed, they will cast Reorigination Pulse.
The Spirit World
Hungering Souls
Hungering Souls stalk the spirit world, released by Argus' wrath. If they come into contact with any ghosts they will burst, applying Soul Detonation to any nearby ghosts.
Motes of Titanic Power
When Reorigination Modules complete a Reorigination Pulse, their Titanic energy is released into the Spirit World as Motes of Titanic Power. Players can walk into these to collect them, granting Khaz'goroth Titanic Essence that he can use to fuel his Titanforging ability.
Eonar's Aid
Gift of the Lifebinder
Eonar causes the Gift of the Lifebinder to spring forth to save the players. While the Gift of the Lifebinder lives, players may freely Release Spirit after dying. If players move to the tree as ghosts, they will be returned to life, at the cost of some of the Gift of the Lifebinder's Life Energy. When the Gift of the Lifebinder's Life Energy is depleted, it becomes the Withered Gift of the Lifebinder.
Khaz'goroth's Aid
When Khaz'goroth has at least 20 Titanic Essence, he will begin to channel Titanforging. Players can collect Motes of Titanic Power within the Spirit World to grant Khaz'goroth Titanic Energy.
Loot
27 drops · item level 10 to 51 · 9 slots (Chest, Finger, Hands, Head, Legs, Neck +3 more) · all Bind on Pickup
 Aman'Thul's Vision
 Aggramar's Conviction
 Chain of the Unmaker
 Conch of the Thunderer
 Condensed Blight OrbCosmos-Culling LegplatesCruor of the Avenger
 Death-Enveloping Cincture
 Eonar's CompassionFlickering Ember of RageGambeson of Sargeras' Corruption
 Golganneth's VitalityHandwraps of Inevitable DoomHelm of the Awakened Soul
 Khaz'goroth's Courage
 Miniaturized Cosmic Beacon
 Mote of the ForgemasterNascent Deathbringer's Clutches
 Norgannon's ProwessPauldrons of Colossal Burden
 Reorigination Spark
 Rime of the Spirit Realm
 Root of the Lifebinder
 Shackled Ur'zul
 Sullied Seal of the PantheonVest of Waning Life
 Volatile Soul Fragment
Quests
9 quests Blizzard’s quest data files under Antorus, the Burning Throne, all for level 45:
- Reward:40 gold44 silver
- Reward:500 reputation with Argussian Reach 500 reputation with Army of the Light
- Reward:40 gold44 silver
- Reward:20 gold22 silver

Achievements
38 achievements tied to Antorus, the Burning Throne, worth 290 achievement points in total.
 Antorus, the Burning Throne Guild RunDefeat the bosses of Antorus, the Burning Throne on Normal difficulty or higher, while in a guild group.10
- Mythic: Argus the Unmaker Guild RunDefeat Argus the Unmaker in Antorus, the Burning Throne on Mythic difficulty, while in a guild group.10
- Realm First! Argus the UnmakerFirst guild on the realm to defeat Argus the Unmaker in Antorus, the Burning Throne on Mythic difficulty, while in a guild group.
- Ahead of the Curve: Argus the UnmakerDefeat Argus the Unmaker in Antorus, the Burning Throne, on Heroic difficulty or higher, before the release of patch 8.0.
- Cutting Edge: Argus the UnmakerDefeat Argus the Unmaker in Antorus, the Burning Throne, on Mythic difficulty, before the release of patch 8.0.
 Light's BreachDefeat the following bosses at the entrance to Antorus, the Burning Throne.10
 Forbidden DescentDefeat the following bosses on the second island of Antorus, the Burning Throne.10
 Hope's EndDefeat the following bosses in the depths of Antorus, the Burning Throne.10
- Seat of the PantheonDefeat the following bosses in the depths of Antorus, the Burning Throne.10
- Seat of the Pantheon (char specific hidden copy)Defeat the following bosses in the depths of Antorus, the Burning Throne.
- Antorus, the Burning ThroneDefeat the bosses of Antorus, the Burning Throne on Normal difficulty or higher.10
 Mythic: Garothi WorldbreakerDefeat the Garothi Worldbreaker in Antorus, the Burning Throne on Mythic difficulty.10
 Mythic: Hounds of SargerasDefeat the Hounds of Sargeras in Antorus, the Burning Throne on Mythic difficulty.10
- Mythic: Antoran High CommandDefeat the Antoran High Command in Antorus, the Burning Throne on Mythic difficulty.10
 Mythic: Portal Keeper HasabelDefeat Portal Keeper Hasabel in Antorus, the Burning Throne on Mythic difficulty.10
- Mythic: EonarSuccessfully defend Eonar in Antorus, the Burning Throne on Mythic difficulty.10
- Mythic: Imonar the SoulhunterDefeat Imonar the Soulhunter in Antorus, the Burning Throne on Mythic difficulty.10
 Mythic: Kin'garothDefeat Kin'garoth in Antorus, the Burning Throne on Mythic difficulty.10
 Mythic: VarimathrasDefeat Varimathras in Antorus, the Burning Throne on Mythic difficulty.10
- Mythic: The Coven of ShivarraDefeat The Coven of Shivarra in Antorus, the Burning Throne on Mythic difficulty.10
 Mythic: AggramarDefeat Aggramar in Antorus, the Burning Throne on Mythic difficulty.10
- Mythic: Argus the UnmakerDefeat Argus the Unmaker in Antorus, the Burning Throne on Mythic difficulty.Title: Titanslayer10
 Worm-mongerDefeat Garothi Worldbreaker in Antorus, the Burning Throne after decimating 16 Blightscale Worms on Normal difficulty or higher.10
- Hounds Good To MeDefeat the Felhounds of Sargeras in Antorus, the Burning Throne on Normal difficulty or higher with both Felhounds afflicted with 5 stacks of Fel Imbuement.10
 This is the War Room!Defeat the Antoran High Command in Antorus, the Burning Throne while placing three or fewer Felshield Emitters.10
- Portal CombatDefeat Portal Keeper Hasabel in Antorus, the Burning Throne after opening a chaotic rift on Normal difficulty or higher.10
 Spheres of InfluenceCollect the 5 Orbs of Life placed around Eonar's sanctuary in Antorus, the Burning Throne on Normal difficulty or higher.10
 Hard to KillDefeat Imonar the Soulhunter in Antorus, the Burning Throne after triggering every trap on the bridge on Normal difficulty or higher.10
- The World Revolves Around MeDefeat Kin'garoth with 9 Diabolic Bombs active in Antorus, the Burning Throne on Normal difficulty or higher.10
 Together We StandDefeat Varimathras in Antorus, the Burning Throne on Normal difficulty or higher without triggering Alone in the Darkness.10
 Remember the TitansDefeat the Coven of Shivarra in Antorus, the Burning Throne on Normal difficulty or higher while at least one of each Torment survives.10
- Don't Sweat the TechniqueDefeat Aggramar after slaying a Manifestation of Taeshalach in Antorus, the Burning Throne on Normal difficulty or higher.10
 Stardust CrusadersCollect 20 Motes of Titanic Power within 5 seconds and then defeat Argus the Unmaker in Antorus, the Burning Throne on Normal difficulty or higher.10
- Antorus, the Burning ThroneDefeat the bosses of Antorus, the Burning Throne on any difficulty.+1 Infinite Knowledge
- Light's BreachDefeat the following bosses at the entrance to Antorus, the Burning Throne.Minor Bronze Cache
- Forbidden DescentDefeat the following bosses on the second island of Antorus, the Burning Throne.Minor Bronze Cache
- Hope's EndDefeat the following bosses in the depths of Antorus, the Burning Throne.Minor Bronze Cache
- Seat of the PantheonDefeat the following bosses in the depths of Antorus, the Burning Throne.Minor Bronze Cache
More Legion Raids
Other raids from the same expansion.