 TheWoWDB
Raid - Legion
The Nighthold
11 encounters, 203 boss abilities and 196 drops, with the Adventure Guide’s own ability and strategy notes for each fight. Every drop links to its item page; tradeable drops carry a live Auction House price.
The largest structure in the Broken Isles, and among the grandest in all of Azeroth, the Nighthold stands as a testament to the achievements of the nightborne civilization. Centered around the Nightwell, the fount of arcane power that has sustained Suramar for centuries, these grounds were built as a haven from the worries of the world. But as a felstorm churns above the former temple of Elune across the bay, and Gul'dan himself now resides within the palace's walls, those worries now begin, not end, here.
Quick Facts
| Type | Raid |
|---|---|
| Expansion | Legion |
| Encounters | 11 |
| Boss abilities | 203 |
| Drops | 196 |
| Item level | 1 to 50 |
| Tradeable drops | 0 |
| Difficulties | Looking For Raid, Normal, Heroic, Mythic |
Difficulties and Lockouts
The Nighthold has 4 difficulties in the game data: Normal, Heroic, Mythic and Looking For Raid save you to a weekly lockout.
| Difficulty | Players | Level range | Lockout |
|---|---|---|---|
| Normal | 30 | 45 | Weekly |
| Heroic | 30 | 45 | Weekly |
| Mythic | 20 | 45 | Weekly |
| Looking For Raid | 30 | 45 | Weekly |
Raid Finder splits The Nighthold into 4 wings:
- Arcing Aqueducts
- Royal Athenaeum
- Nightspire
- Betrayer's Rise
Loot Table Value
Every one of The Nighthold’s 196 drops is Bind on Pickup, so none of this loot can ever reach the Auction House. The table below the bosses is the complete reward list; its value is item level, not gold.
Where It Is
The entrance to The Nighthold is in Suramar at 44.2, 59.5.
 Entrance 44.2, 59.5
Suramar, from the game’s own world map art. The framed marker is the Adventure Guide entrance.
3D Model
First-party render from the game files. Model © Blizzard Entertainment.
Instance Map
The Adventure Guide places 10 bosses of The Nighthold on 7 maps. Numbers follow the encounter order; each links to that fight below.
The Nighthold
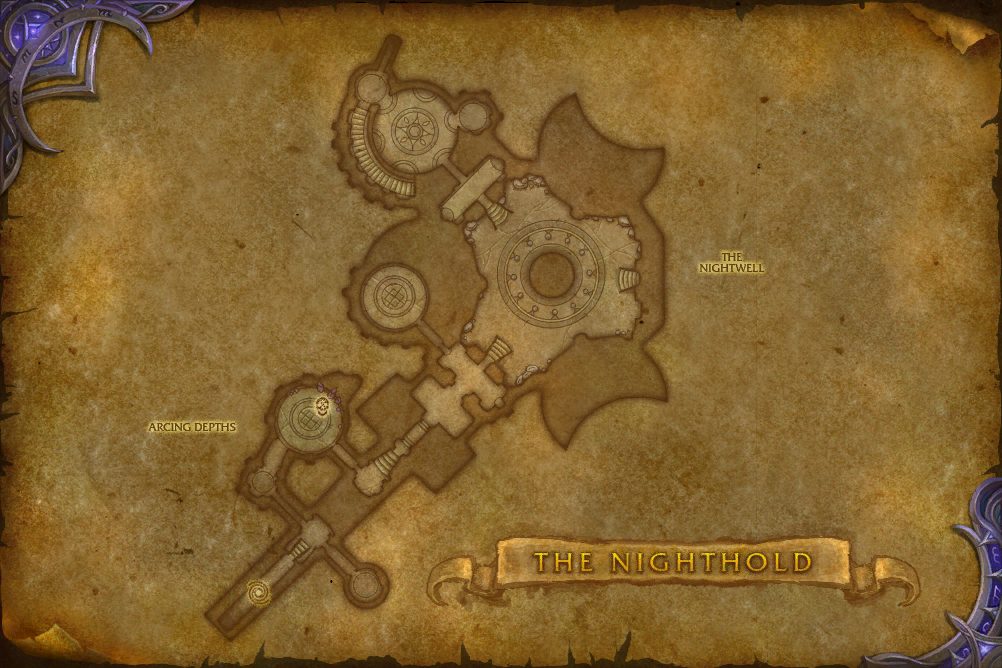 1Skorpyron2Chronomatic Anomaly3Trilliax
- 1 Skorpyron 32.3, 61.0
- 2 Chronomatic Anomaly 52.4, 47.4
- 3 Trilliax 41.5, 19.8
The Nighthold
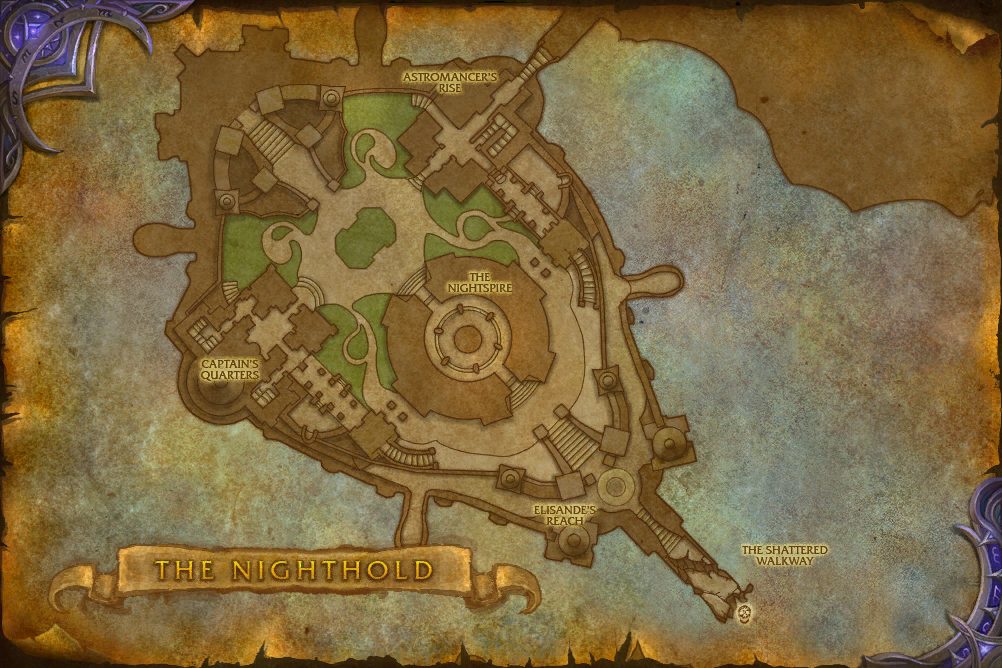 4Spellblade Aluriel6Krosus
- 4 Spellblade Aluriel 39.4, 39.6
- 6 Krosus 74.2, 92.0
The Nighthold
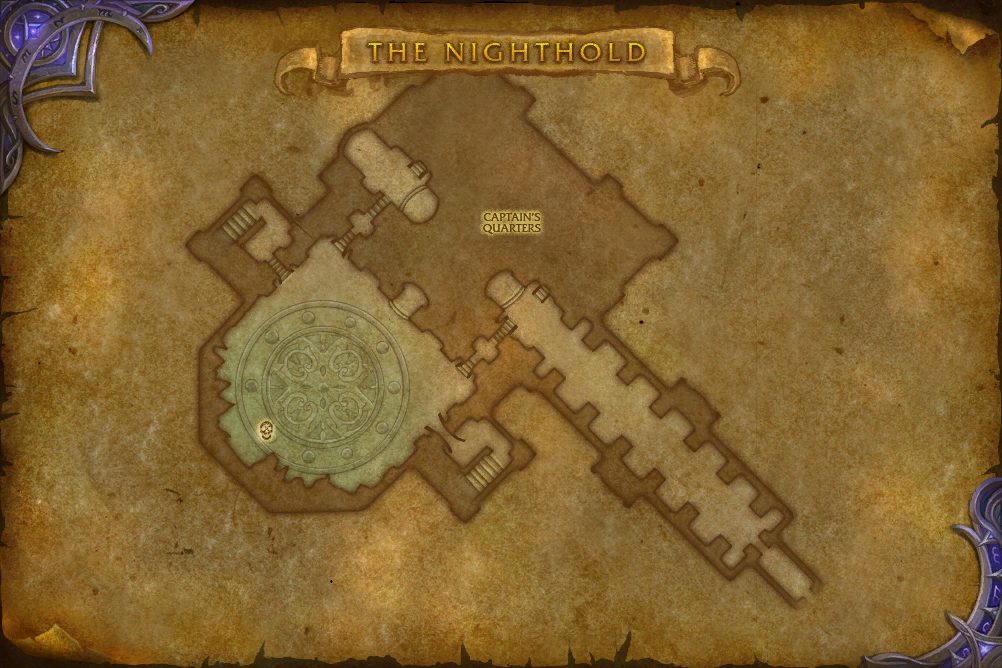 5Tichondrius
- 5 Tichondrius 26.5, 63.9
The Nighthold
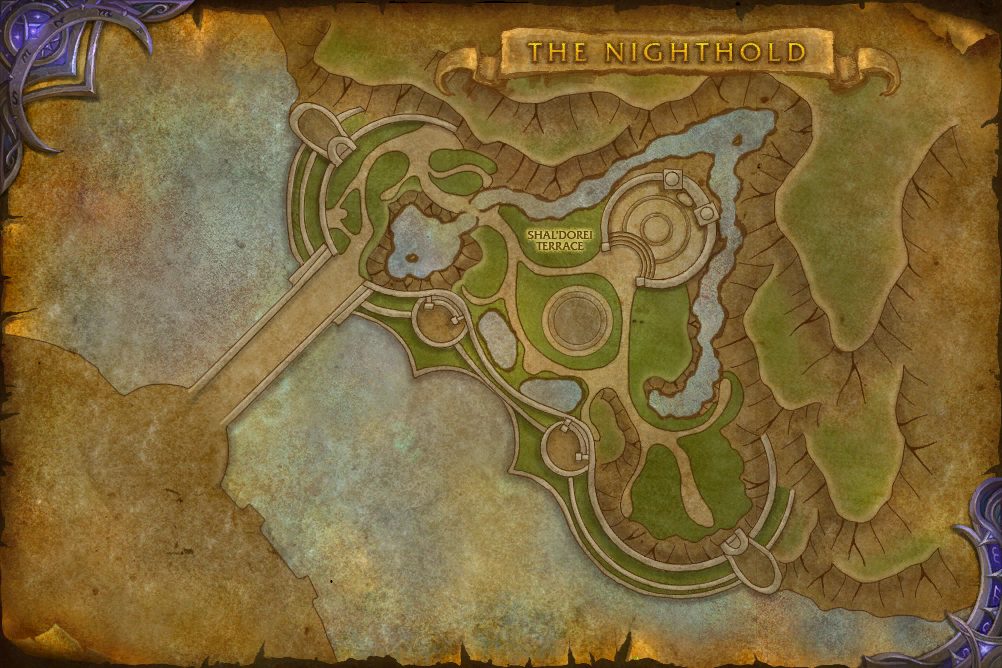 7High Botanist Tel'arn
- 7 High Botanist Tel'arn 65.9, 34.5
The Nighthold
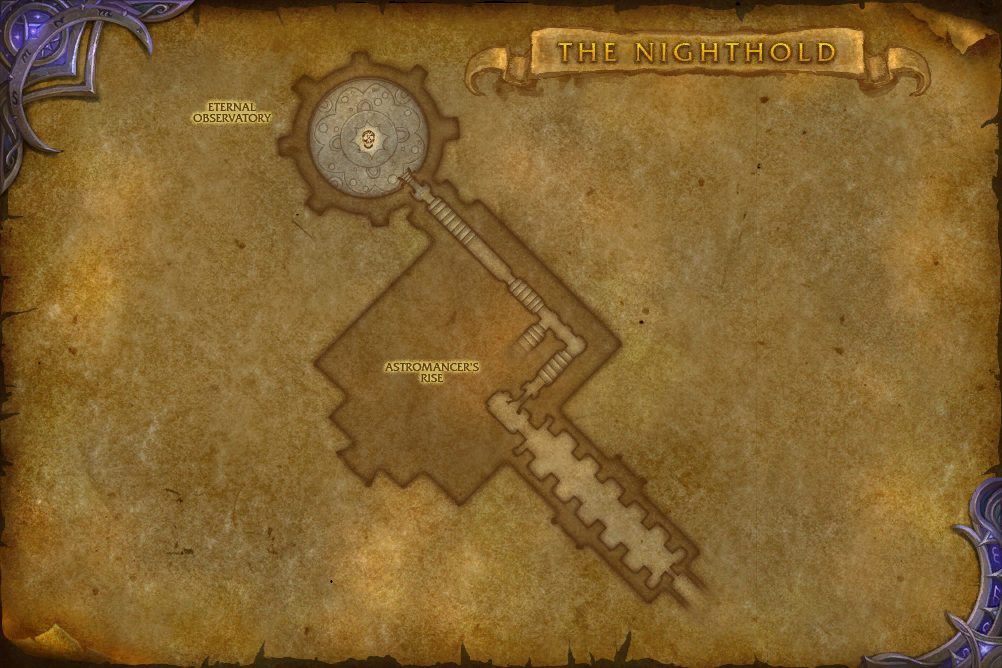 8Star Augur Etraeus
- 8 Star Augur Etraeus 36.9, 20.7
The Nighthold
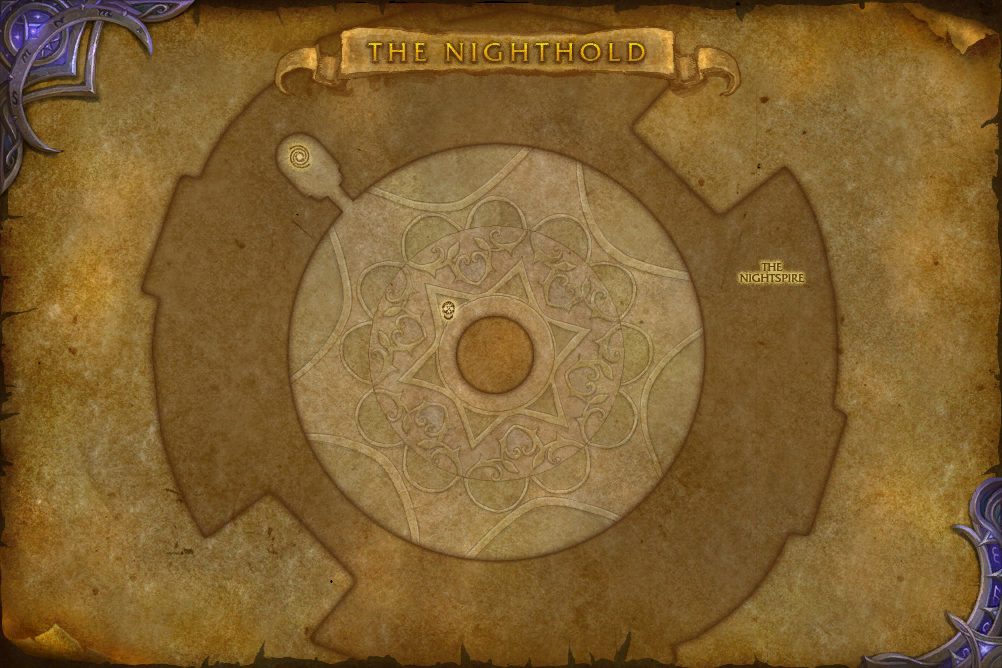 9Grand Magistrix Elisande
- 9 Grand Magistrix Elisande 46.0, 45.7
The Nighthold
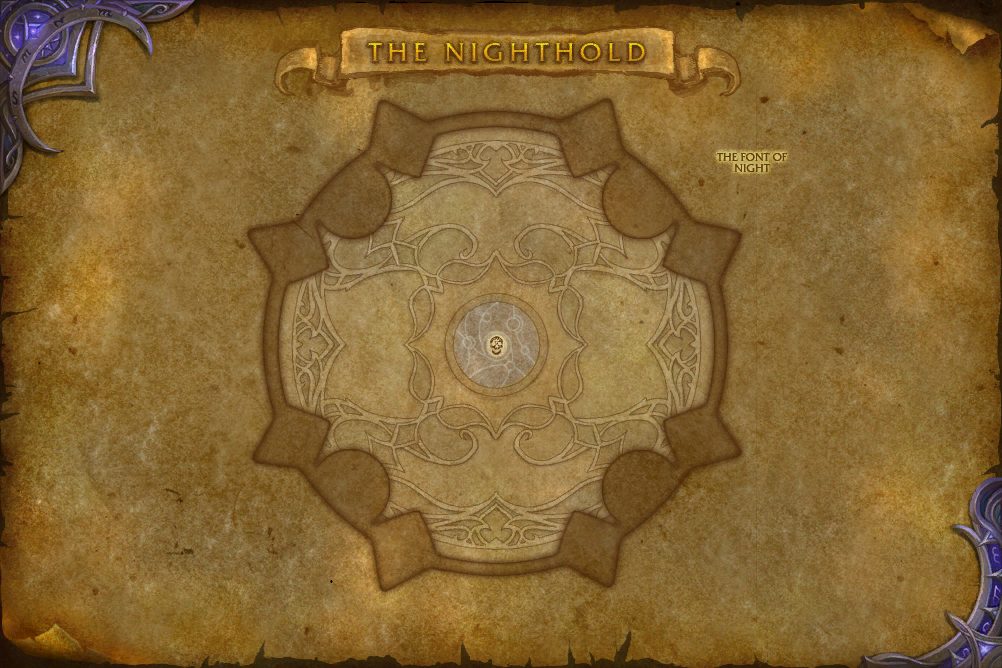 10Gul'dan
- 10 Gul'dan 49.5, 52.0
Encounters
LFRLooking For RaidNNormalHHeroicMMythic
Skorpyron
Deep within the foundations of the Nighthold, beneath the sea, lie long-forgotten vaults that give access to the Nightwell itself. This monstrous armored scorpid has made its home in one of these vaults. Infused with the power of the Nightwell, and surrounded by a teeming brood, Skorpyron presents a serious complication to an otherwise-promising back entry to the Nighthold.
Abilities & Strategy
Overview
Skorpyron's lair is a constantly spawning chamber of scorpids that join the battle following Call of the Scorpid, but which also attack if any player strays too close.
Damage Dealers
- Take shelter behind Crystaline Fragments to protect yourself from Shockwave.
Healers
- Take shelter behind Crystaline Fragments to protect yourself from Shockwave.
Tanks
- Arcane Tethers accrue during Arcanoslash, and need to be broken to reduce damage taken.
- Take shelter behind Crystaline Fragments to protect yourself from Shockwave.
Scorpid Spawning Ground
Skorpyron resides in an active spawning ground, continually creating Scorpids which inhabit the space throughout the encounter.


 Arcanoslash
On Mythic difficulty, Arcane Tethers remain in the encounter area for 15 sec after breaking, reattaching if their target re-enters their range.

Loot
14 drops · item level 50 · 9 slots (Chest, Feet, Hands, Head, Legs, Neck +3 more) · all Bind on Pickup
 Animated Exoskeleton
 Antiquated Highborne Cinch
 Arcanochitin Hauberk
 Chittering Mandible
 Claw of the Crystalline Scorpid
 Gnawed Nightfallen Britches
 Infused Chitin Fragment
 Jagged Carapace Wristclamps
 Leystone-Toe Kickers
 Manatoxin Gland
 Radiant String of Scorpid Eyes
 Scorpid Handler's Gloves
 Stinger Resistant Bracers
 Vintage Suramar Nobility Hat
Krosus
This colossal doom lord, one of the largest and mightiest creatures in the armies of the Legion, was defeated at the Broken Shore through the combined might of the greatest heroes of the Horde and the Alliance. Having recovered from his wounds, Krosus emerges from the bay between the Nighthold and the Tomb of Sargeras to crush any who would oppose the Legion.
Abilities & Strategy
Overview
Players encounter Krosus on a broken section of bridge. Over the course of the encounter, Krosus smashes sections of the bridge, forcing players to retreat into a dwindling space. If Krosus is not defeated in time, players will be left with no foothold, and will plunge into the sea and perish.
Damage Dealers
- If afflicted with Orb of Destruction, move as far away from other players as possible.
- Catch nearby Burning Pitch to prevent Burning Embers from being summoned.
- Do not stand near tanks during Slam.
Healers
- If afflicted with Orb of Destruction, move as far away from other players as possible.
- Catch nearby Burning Pitch to prevent Burning Embers from being summoned.
- Do not stand near tanks during Slam.
Tanks
- Catch nearby Burning Pitch to prevent Burning Embers from being summoned.
- Stand under Krosus' fists during Slam to absorb the force of the blow.


 Burning Pitch
Burning Ember


Loot
22 drops · item level 50 · 7 slots (Chest, Hands, Head, Neck, Trinket, Waist +1 more) · all Bind on Pickup
 Architect's Coif of Despair
 Beleron's Choker of Misery
 Breastplate of the Highlord
 Bridgebreaker Gauntlets
 Chestplate of the Obsidian Aspect
 Doomblade Tunic
 Dreadwyrm Breastplate
 Eagletalon Tunic
 Felfire Pitch
 Finery of Azj'Aqir
 Fingernail of the Fel Brute
 Man'ari Skullbuckled Cinch
 Might of Krosus
 Pharamere's Forbidden Grimoire
 Purifier's CassockRaiment of Shackled Elements
 Robe of Everburning Knowledge
 Robe of the Astral Warden
 Tunic of Enveloped Dissonance
 Tunic of Second Sight
 Unkindled Ember
 Well-Flattened Wristguards
Chronomatic Anomaly
The cavern at the base of the Nightwell is a maelstrom of raw energy, as the power to fuel an entire civilization courses from the earth. Born from this chaotic flux, the Chronomatic Anomaly is an embodiment of the power of the Eye of Aman'thul. As it lashes out with energy attacks, the bursts of energy warp the very flow of time.
Abilities & Strategy
Overview
The rate at which time flows fluctuates over the course of the encounter. These changes affect players' movement and actions, but the Chronomatic Anomaly is exceptionally sensitive to the flow of time and its abilities may be drastically affected.
Tanks
- Monitor your stacks of Chronometric Particles and be aware of any changes in their duration.
- Power Overwhelming can be interrupted by a Temporal Smash from a Temporal Orb.
Healers
- You will have significantly different amounts of time to react to Time Release based on the the current Passage of Time rate.
- Waning Time Particles continually emit raidwide damage via Warp Nightwell.
- Power Overwhelming inflicts increasing damage until it is interrupted by a Temporal Smash.
Damage Dealers
- Waning Time Particles and Fragmented Time Particles continually emit raidwide damage via Warp Nightwell unless interrupted.
- Defeat Waning Time Particles quickly to allow your tanks to interrupt Power Overwhelming.
- Once hit with Temporal Smash the Chronomatic Anomaly will take additional damage.


Depleted Time Particle
Fires Tachyon Pulses at random enemies. When a Depleted Time Particle dies, it explodes in a Tachyon Burst.


Waning Time Particle
Continually Warps the fabric of time within the Nightwell, damaging all players in the zone. Leaves behind a Temporal Rift and divides into Fragmented Time Particles on death.
 Warp Nightwell
When the Waning Time Particle reaches 30% health remaining this ability becomes uninterruptable.
 Temporal Rift
 Temporal Charge
Fragmented Time Particle
Fragmented Time Particles continually Warp the Nightwell until they are defeated.
 Chronomate

 Power Overwhelming
Power Overwhelming continues until the Chronomatic Anomaly is interrupted by a Temporal Smash.
Loot
15 drops · item level 1 to 50 · 8 slots (Chest, Feet, Hands, Head, Legs, Neck +2 more) · all Bind on Pickup
 Chaos-Scarred Mantle
 Chrono-Tempered Legplates
 Erratic Metronome
 Flickering Timespark
 Gauntlets of Fractured Eons
 Hood of Fading Opportunity
 Pauldrons of Warped Memory
 Precipice of EternityRobes of Fluctuating Energy
 Royal Dagger Haft
 Stutterstep Treads
 Suspended Nightwell Droplet
 Temporally Displaced Gloves
 Zealous Timestone Pendant
 Illusion: Chronos
Trilliax
Trilliax, once proud servant to the nightborne aristocracy, has been discarded and left to slowly deteriorate among other surplus constructs. While an unwavering will to carry out its tasks remains, the passage of time has splintered this construct's personality matrix. It now unpredictably switches from one mode to the next, ranging from doting caretaker to homicidal sterilizer, craving recognition and validation from a master that no longer exists.
Abilities & Strategy
Overview
As the fight progresses, the malfunctioning construct swaps between various modes that determine what abilities it uses. During Cleaner mode, eat Toxic Slices. During Maniac mode, avoid Annihilation. While Trilliax is in Caretaker mode, hop onto scrubbers when they malfuction to prevent the raid taking damage from Cleansing Destruction. On Mythic difficulty, Trilliax uses Personality Transference to activate additional constructs. When Trilliax's current mode matches the additional construct's, they activate Dual Personalities.
Damage Dealers
- During Maniac mode, stand close to your partner when connected by Arcing Bonds.
- During Caretaker mode, jump on Scrubbers when they channel Cleansing Destruction.
- During Cleaner mode, stand apart from the raid when affected by Sterilize.
Healers
- During Maniac mode, Mana Rupture pulses damage to the raid.
- During Cleaner mode, heal players affected by Toxic Slice.
Tanks
- Take turns getting hit with Arcane Slash.
- During Maniac mode, stand close to your partner when connected by Arcing Bonds.
- During Caretaker mode, jump on Scrubbers when they channel Cleansing Destruction.
- Steadily move Trilliax around the room to avoid Arcane Seepage.

 Personality Transference


The Cleaner
Trilliax's cleaner personality takes over and wants to scrub the raid into oblivion.


The Maniac
Trilliax's maniac personality takes over, increasing the frequency of Arcane Slash.

The Caretaker
Trilliax's caretaker personality takes over and is no longer hostile.
 Tidy Up
Scrubber
These small arcane scrubbers are nigh indestructible and are used to clear rubbish. They prefer Toxic Slices, which will immediately destroy the scrubber, but if none are around they will clean pools of Arcane Seepage. As it cleans seepage, the scrubber gains energy. If a scrubber reaches max energy, it explodes.
 Succulent Feast
Loot
25 drops · item level 50 · 8 slots (Back, Chest, Feet, Hands, Head, Legs +2 more) · all Bind on Pickup
 Arcanogolem Digit
 Cake Carrier's Girdle
 Cape of Second Sight
 Cloak of Azj'Aqir
 Cloak of Enveloped Dissonance
 Cloak of Everburning Knowledge
 Cloak of Shackled Elements
 Cloak of the Astral Warden
 Construct Personality Sphere
 Doomblade Shadowwrap
 Dreadwyrm Greatcloak
 Eagletalon Cloak
 Foreign Contaminant
 Gilded Nightborne Waistplate
 Greatcloak of the Obsidian Aspect
 Greatmantle of the Highlord
 Immaculately Polished Boots
 Nighthold Custodian's Hood
 Perfectly Preserved Cake
 Perpetually Muddy Sandals
 Pertinacious Legplates
 Purifier's Drape
 Soggy Manascrubber Brush
 Sterilizer's Insulated GauntletsTunic of Unwavering Devotion
Star Augur Etraeus
The nightborne astromancer Etraeus has devoted long years of research to scouring the skies of Azeroth, seeking answers to the great mysteries of the universe. His scrying has shown him worlds beyond our ken, and the power of the Nightwell allows him to draw upon the essence of those worlds to amplify his own powers.
Abilities & Strategy
Overview
Star Augur Etraeus fights within a stellar observatory of his own construction. At 90%, 60%, and 30% health remaining, he will activate his observation deck to project the raid through the nether overlooking different worlds, siphoning the energies of those worlds to empower his abilities in different ways.
Tanks
- Huddle together with clumps of players to remove Absolute Zero, avoiding players with Chilled.
- Use Fel Impact to clear pools of Felflame.
- If a Thing Which Should Not Be is too close to Etraeus, they will both gain Void Shift.
- Turn away from Things Which Should Not Be when they cast Witness the Void.
Healers
- Players affected by Coronal Ejection suffer heavy damage over time.
- Fel Nova and Witness the Void deal heavy raid damage.
- Voidburst deals increasing damage over time.
- Turn away from Things Which Should Not Be when they cast Witness the Void.
Damage Dealers
- Move away from other players when afflicted by Icy Ejection to avoid damaging them with Shatter.
- Avoid placing Felflame on other players when afflicted by Fel Ejection.
- Turn away from Things Which Should Not Be when they cast Witness the Void.

Stage One: The Dome of Observation


Stage Two: Absolute Zero
 Iceburst
 Gravitational Pull
 Icy Ejection
Shatter
On Mythic Difficulty, whenever a player shatters, they create an Ice Crystal which periodically causes a Frigid Pulse.
 Frigid Nova
Stage Three: A Shattered World


Loot
22 drops · item level 50 · 6 slots (Back, Feet, Hands, Neck, Shoulder, Trinket) · all Bind on Pickup
Astromancer's Greatcloak Brooch of the Astral Scryer
 Clutch of Azj'Aqir
 Doomblade GauntletsDreadwyrm GauntletsEagletalon Gauntlets
 Etraeus' Celestial Map
 Gauntlets of Shackled ElementsGauntlets of the Highlord
 Gauntlets of the Obsidian Aspect
 Glistening Meteorite Shard
 Gloves of Enveloped DissonanceGloves of Everburning KnowledgeGloves of Second Sight
 Gloves of the Astral Warden
 Mantle of the Torn Sky
 Purifier's GlovesSabatons of Unchanging Fate
 Star Gate
 Sundered Comet
 Tempest of the Heavens
 Treads of Galactic Odyssey
Gul'dan
The chain of events set in motion when Garrosh escaped to Draenor has continued, unbroken for all its twists and turns, leading to this very moment. Thwarted in Draenor, Gul'dan now stands on the precipice of achieving ultimate victory on behalf of his Legion masters. Standing atop the Nighthold, as the vortex of fel energy swirls in the skies overhead, the outcast orc warlock awaits his destiny.
Abilities & Strategy
Overview
Gul'dan begins a ritual to bring his master into Azeroth, locking himself inside the active Eye of Aman'Thul and summoning his demonic lieutenants. However, proximity to the active Eye of Aman'Thul bestows equally powerful abilities to players, based on their role. After his lieutenants fall, Gul'dan leaps into the fray himself, harnessing the power of the Fel to bolster his frail frame. At 85%, 70%, and 55% health, Gul'dan again taps into the active Eye of Aman'Thul, empowering his abilities. As his health dwindles further, Gul'dan beseeches his Legion masters for additional power, unleashing his ultimate strength while disrupting the aid that players receive from the Eye.
Damage Dealers
- Assist Bonds of Fel-afflicted allies in order to reduce the damage to manageable levels.
- Move away from others when afflicted with Eye of Gul'dan or Empowered Eye of Gul'dan.
- Use Time Dilation to increase damage at opportune moments or cover distances quickly.
- Absorb Soul Corrosion inside the Well of Souls in order to reduce raidwide damage taken from Black Harvest.
- Interrupt Carrion Wave.
Healers
- Fel Lord Kuraz'mal's Shatter Essence inflicts high damage.
- Assist Bonds of Fel-afflicted allies in order to reduce the damage to manageable levels.
- Black Harvest inflicts high raidwide damage.
- Use Scattering Field to absorb nearby allies' Fire damage taken at opportune moments.
- Coordinate use of damage-reduction abilities to help tanks with Fel Lord Kuraz'mal's Shatter Essence.
- Dispel Inquisitor Vethriz's Drain.
Tanks
- While fighting Fel Lord Kuraz'mal, be prepared for Shatter Essence.
- D'zorykx the Trapper will throw Soul Vortex at his current target, increasing their damage taken.
- Use Resonant Barrier to survive moments in the encounter that may otherwise kill you.
- D'zorykx the Trapper will throw Soul Vortex at his current target, drastically increasing their damage taken.
Stage One: The Council of Elders
Gul'dan locks himself inside the active Eye of Aman'Thul, summoning his demonic lieutenants. However, proximity to the active Eye of Aman'thul bestows equally powerful abilities to players, based on their role.
Gul'dan
Essence of Aman'Thul


Stage One: The Ritual of Aman'Thul
Gul'dan, taking no chances, leaps into the fray, harnessing the power of the Fel to bolster his frail frame, periodically summoning his demonic lieutenants and utilizing the active Eye of Aman'Thul, expanding the potency of his abilities.


Stage Two: The Ritual of Aman'Thul
Gul'dan leaps into the fray himself, harnessing the power of the Fel to bolster his frail frame. At 85%, 70%, and 55% health, Gul'dan again taps into the active Eye of Aman'Thul, expanding the potency of his abilities.
Stage Two: The Master's Power
At 50% health Gul'dan harnesses the Eye of Aman'Thul to gain new and empowered abilities, also disrupting the powers that players received from the Eye.


Stage Three: The Master's Power
At 40% health Gul'dan harnesses the Eye of Aman'Thul to gain new and empowered abilities. At 40% health Gul'dan harnesses the Eye of Aman'Thul to gain new and empowered abilities, also disrupting the powers that players received from the Eye.
Loot
26 drops · item level 10 to 50 · 7 slots (Chest, Feet, Finger, Legs, Shoulder, Trinket +1 more) · all Bind on Pickup
Breastplate of the Remembered King Doomblade Pants
 Draught of Souls
 Dreadwyrm LegplatesEagletalon Legchains
 Felstained Jawbone Fragments
 Fiendish Hellfire Core
 High Shadow Councilor's Wrap
 Infernal Contract
 Leggings of Azj'AqirLeggings of Enveloped Dissonance
 Leggings of Everburning Knowledge
 Leggings of Shackled Elements
 Leggings of the Astral WardenLegplates of the Highlord
 Legplates of the Obsidian Aspect
 Legwraps of Second Sight
 Lionshead Lapel Clasp
 Living Infernal Core
 Netherbranded ShoulderpadsOutcast Wanderer's Footrags
 Phial of Fel Blood
 Purifier's Leggings
 Ring of the Scoured Clan
 Warchief's Shattered Tusk
 Whispers in the Dark
Grand Magistrix Elisande
Elisande once distinguished herself by resisting the Legion. She and her highborne followers broke away from Queen Azshara and the dark path she was taking, harnessing the power of the Eye of Aman'thul to create the Nightwell to protect Suramar from the Sundering. But over ten thousand years later, the Legion's arrival offered her no such recourse. She has cast her lot with the demons, hoping to once again use the power of the Nightwell - albeit this time in a very different sense - to save her people.
Abilities & Strategy
Overview
Grand Magistrix Elisande harness the power of the Nightwell to shape time itself. When her health is low and she is nearing defeat, she rewinds time to send players back to the point at which they first engaged her. The fight recommences from this point, but Elisande uses new abilities mixed in with echoes of her past actions. She can perform this feat twice, after which time can no longer save her.
Damage Dealers
- Epocheric Orb damages the entire raid if allowed to strike the ground.
- Expedient Elementals continually damage the raid with Exothermic Release until they are dispatched. This damage increases with each successful cast.
Healers
- Permeliative Torment inflicts increasing damage over time to its victims.
- Epocheric Orb damages the entire raid if allowed to strike the ground.
- Cascadent Star will damage a large portion of the raid.
- Conflexive Burst's duration can be manipulated by using time zones.
Tanks
- In each time layer, Elisande employs a different ability to threaten tanks.
- Ablating Explosion inflicts falloff damage to the entire raid when it expires.
- Interrupt Ablative Pulse.


Time Elementals
Grand Magistrix periodically summons Time Elementals to aid her in combat. When these elementals are dispatched they leave behind a rift that persists until they are consumed.
Recursive Elemental
When this elemental dies it leaves behind a zone of Slow Time.


Expedient Elemental
When this elemental dies it leaves behind a zone of Fast Time.


Time Layer 1
While in this Time Layer Grand Magistrix Elisande will use her Spanning Singularity and Arcanetic Ring abilities.
 Arcanetic Ring
This ability echoes. In Mythic Difficulty, the Arcanetic Ring expands to the outside of the room after collapsing.
 Spanning Singularity
Spanning Singularities appear at the same time and place in successive Time Layers. This ability echoes in Mythic Difficulty.
 Ablation
Time Layer 2
While in this Time Layer Grand Magistrix Elisande will use her Epocheric Orb and Delphuric Beam abilities.
 Delphuric Beam
This ability echoes in Mythic difficulty, and the beam continues through the target rather than stopping at the target.
 Epocheric Orb
This ability echoes. In Mythic difficulty, players catching the Orbs are afflicted with Epocheric Vulnerability.
Ablating Explosion
Time Layer 3
While in this Time Layer Grand Magistrix Elisande will use her Conflexive Burst and Permeliative Torment abilities.
 Permeliative Torment
 Conflexive Burst
In Mythic difficulty, the damage of this ability inflicts falloff damage to all players in the raid.
Ablative Pulse
Loot
23 drops · item level 50 · 6 slots (Back, Head, Shoulder, Trinket, Waist, Wrist) · all Bind on Pickup
 Belt of Celestial Alignment
 Bracers of Impossible ChoicesCloak of Temporal Recalibration
 Collapsing Epoch
 Convergence of Fates
 Doomblade Cowl
 Dreadwyrm CrownEagletalon Cowl
 Ephemeral Paradox
 Eternally Recurring Bracers
 Exothermic Core
 Eyes of Azj'Aqir
 Farsight Spiritjewel
 Helmet of the HighlordHelm of Shackled Elements
 Hood of Enveloped DissonanceHood of Everburning KnowledgeHood of the Astral Warden
 Mantle of Prestidigitation
 Mask of Second Sight
 Purifier's Gorget
 Waistplate of Fractured Realities
 Warhelm of the Obsidian Aspect
Spellblade Aluriel
Aluriel always had an affinity for magic. She rose through the ranks of the Nightguard effortlessly, having a natural talent with the sword. But no matter how strong she became, she wanted more. She studied with the mages at the University of Suramar, spending her days in combat training and her evenings in the artificery. She forged her weapons and armor in the Nightwell, weaving magic spells into the precious metals. She is the first Spellblade, adept in the schools of Fire, Frost and Arcane.
Abilities & Strategy
Overview
Spellblade Aluriel cycles between three enchantments: Frost, Fire, and Arcane. Each enchantment grants her an ability that she can only use while she's under the effect of that enchantment. She will then manipulate that magic with a few commands: replicate, detonate, and animate.
Tanks
- When Aluriel performs Annihilate, gather together to share the damage.
- Transfer Mark of Frost to an ally when its damage becomes excessive, but be mindful that each transfer triggers an explosion.
- Quickly move away from the target of Detonate: Arcane Orb, which deals more damage the closer players are to the impact point.
- Interrupt Fiery Enchantments when they cast Pyroblast, which deals critical damage to a target.
Healers
- Transfer Mark of Frost to an ally when its damage becomes excessive, but be mindful that each transfer triggers an explosion.
- Quickly move away from the target of Detonate: Arcane Orb, which deals more damage the closer players are to the impact point.
Damage Dealers
- Kill Arcane Enchantments quickly to prevent them from triggering Armageddon.
- Transfer Mark of Frost to an ally when its damage becomes excessive, but be mindful that each transfer triggers an explosion.
- Quickly move away from the target of Detonate: Arcane Orb, which deals more damage the closer players are to the impact point.
- Interrupt Fiery Enchantments when they cast Pyroblast, which deals critical damage to a target.
Champion of Blades

Master of Frost
 Mark of Frost

Replicate: Mark of Frost
Additional targets are affected by Mark of Frost.
 Detonate: Mark of Frost
Animate: Mark of Frost
From the Pools of Frost, the remnants of magic stir. Aluriel commands Icy Enchantments to rise. From the Pools of Ice, the remnants of magic stir.
Master of Fire
 Searing Brand
Replicate: Searing Brand
Additional targets are affected by Searing Brand.
 Detonate: Searing Brand
Animate: Searing Brand
From the Burning Ground, the remnants of magic stir. Aluriel commands Fiery Enchantments to rise.


Master of the Arcane
Arcane Orb
Replicate: Arcane Orb
Additional Arcane Orbs manifest.
Detonate: Arcane Orb
Animate: Arcane Orb
From the Arcane Fog, the remnants of magic stir. Aluriel commands Arcane Enchantments to rise.


Loot
15 drops · item level 1 to 50 · 9 slots (Chest, Feet, Finger, Hands, Head, Legs +3 more) · all Bind on Pickup
 Aluriel's Mirror
 Arcana Crux
 Bracers of Harnessed FlameCaptain's Parade Breastplate
 Duskwatch Plate Bracers
 Emblazoned Duskwatch Belt
 Entwined Elemental FociGloves of Synchronous ElementsHeart of FrostMaster Warmage's LeggingsNightborne Battle-Magus Hood
 Sabatons of Burning Steps
 Soul of Flame
 Spellblade's Gemmed Signet
 Magistrix's Garden Fountain
High Botanist Tel'arn
From his youth, the nightborne Tel'arn was fascinated by plant life: the resilience and adaptability of weeds, the ability of simple grass to harness the power of the sun, the way a tree may be divided into two, or two branches grafted into one. Aided by the energies of the Nightwell, he has transformed himself to the point that he is scarely recognizable as a nightborne elf. He now considers himself something far, far greater.
Abilities & Strategy
Overview
High Botanist Tel'arn uses Arcane, Nature, and Solar magic to defend his garden. When he reaches 75% and 50% health remaining he divides his energy, creating empowered forms that focus in a particular school of magic. This division removes High Botanist Tel'arn's access to that school of magic, but the empowered form gains new abilities.
Damage Dealers
- Move away from targets of Parasitic Fetter and quickly kill Parasitic Lashers.
- Damage Plasma Spheres so that they die at least 5 sec apart from one another to avoid lethal damage from Plasma Explosion.
- Avoid Controlled Chaos and Solar Collapse.
Tanks
- Take turns tanking Tel'arn to manage the application of Recursive Strikes.
- Position Naturalist Tel'arn away from his allies and quickly move him out of Grace of Nature.
- High Botanist Tel'arn splits into images that must be tanked at 75% and 50% health remaining.
Healers
- Plasma Explosion inflicts significant damage to all players.
- Dispel Parasitic Fetter when your allies have moved far enough away to avoid Parasitic Lashers.
- Controlled Chaos inflicts moderate damage to all players with each explosion.
Stage One: The High Botanist
 Recursive Strikes
Controlled Chaos
 Parasitic Fetter
Parasitic Lasher
Pursues the closest player and attempts to jump into them and afflict them with Parasitic Fetter. Once Parasitic Fetter is dispelled again, the parasite is recreated at the same health it had when it afflicted the target with Parasitic Fetter.
 Solar Collapse
Stage Two: Nightosis
When High Botanist Tel'arn reaches 75% health remaining, he sacrifices his ability to cast Solar magic to create an empowered Solar image of himself.
Solarist Tel'arn


Stage Three: Pure Forms
When High Botanist Tel'arn reaches 50% health remaining, he divides his remaining power into an empowered Nature and empowered Arcane image.
Naturalist Tel'arn


Arcanist Tel'arn

Stage One: Division of Power
On Mythic difficutly, High Botanist Tel'arn starts the fight in his three pure forms and no longer shares health between the forms. Whenever a form dies, the remaining are healed to full health and gain additional effects on their abilities.
Arcanist Tel'arn
Solarist Tel'arn
Naturalist Tel'arn
Stage Two: Coallesced Energy
When one of Tel'arn's forms dies, the remaining forms become empowered with its energy.
Arcanist Tel'arn's Death
Solarist Tel'arn
Naturalist Tel'arn
Solarist Telarn's Death
Arcanist Tel'arn
Naturalist Tel'arn
Naturalist Telarn's Death
Arcanist Tel'arn
Solarist Tel'arn
Stage Three: The Final Stand
As a second form falls, Tel'arns final body becomes empowered.
Arcanist Tel'arn Final Form
Arcanist Tel'arn
Solarist Tel'arn Final Form
Solarist Tel'arn
Naturalist Tel'arn Final Form
Naturalist Tel'arn
Loot
13 drops · item level 50 · 7 slots (Feet, Finger, Head, Legs, Shoulder, Trinket +1 more) · all Bind on Pickup


Tichondrius
The dreadlord Tichondrius, once leader of the nathrezim, was once slain by the newly-awakened power of none other than Illidan Stormrage. Reconstituted in the Twisting Nether, Tichondrius returns to watch over Gul'dan on behalf of the Legion, ensuring that the orc warlock does not once again fail his masters.
Abilities & Strategy
Overview
Tichondrius wields foul carrion magic, unleashing waves of chaos and pestilence to assault the raid. As the fight progresses, Tichondrius periodically uses Illusionary Night to trap all players in an illusion, within which they may find some respite if they can endure his Carrion Nightmare assault for 30 sec.
Damage Dealers
- Carefully position to avoid spreading Carrion Plague.
- Quickly kill Phantasmal Bloodfangs and obtain Essence of Night while trapped in the Illusionary Night.
- Coordinate Brand of Argus detonations to avoid lethal raidwide damage.
Healers
- Players with Carrion Plague take sustained damage until the debuff can fade during Illusionary Night.
- Position for and quickly dispel Burning Soul.
- Tanks suffer significant damage from Tichondrius' nightborne allies.
Tanks
- Position nightborne and Legion minions outside of Vampiric Aura.
- Avoid taking multiple stacks of Feast of Blood.
Stage One: Lord of the Nathrezim
 Carrion Plague
In Mythic difficulty, this effect increases the damage taken from Seeker Swarm by 1,000%.
 Seeker Swarm
In Mythic difficulty, this effect only hits the player closest to Tichondrius in the path of Seeker Swarm.
 Brand of Argus
In Mythic difficulty, Flames of Argus erupt under each player that triggers Brand of Argus.

 Vampiric Aura
 Feast of Blood
Tainted Blood
Tainted Blood fixates the target of Feast of Blood until it is killed.
 Echoes of the Void
Stage Two: Shadow of Terror
 Illusionary Night
In Mythic difficulty, players without the Essence of Night when Illusionary Night ends are instantly killed.
 Carrion Nightmare
Phantasmal Bloodfang
Phantasmal Bloodfangs continuously form in the illusion at an increasing rate.
The Nightborne
When Tichondrius exits the Illusionary Night for the first time, he begins to call the Nightborne to aid him.


The Legion
When Tichondrius exits the Illusionary Night for the second time, he begins to call the Legion to aid him.


Loot
21 drops · item level 50 · 5 slots (Back, Finger, Shoulder, Trinket, Waist) · all Bind on Pickup
 Archaic Nathrezim Keepsake
 Doomblade SpauldersDreadlord's Tattered Wingcover
 Dreadwyrm ShoulderguardsEagletalon SpauldersFang of Tichondrius
 Girdle of Nefarious Strategy
 Goresmeared Abyssal WaistplateIcon of RotMantle of Everburning Knowledge
 Mantle of the Astral WardenPauldrons of Azj'Aqir
 Pauldrons of Enveloped DissonancePauldrons of Shackled Elements
 Pauldrons of the Highlord
 Purifier's Mantle
 Ring of Exclusive ServitudeShoulderguards of Second Sight
 Shoulderplates of the Obsidian Aspect
 Vampiric Fetish
 Writ of Subjugation
Grand Magistrix Elisande
Elisande once distinguished herself by resisting the Legion. She and her highborne followers broke away from Queen Azshara and the dark path she was taking, harnessing the power of the Eye of Aman'thul to create the Nightwell to protect Suramar from the Sundering. But over ten thousand years later, the Legion's arrival offered her no such recourse. She has cast her lot with the demons, hoping to once again use the power of the Nightwell - albeit this time in a very different sense - to save her people.
Abilities & Strategy
Overview
Grand Magistrix Elisande harness the power of the Nightwell to shape time itself. When her health is low and she is nearing defeat, she rewinds time to send players back to the point at which they first engaged her. The fight recommences from this point, but Elisande uses new abilities mixed in with echoes of her past actions. She can perform this feat twice, after which time can no longer save her.
Damage Dealers
- Epocheric Orb damages the entire raid if allowed to strike the ground.
- Expedient Elementals continually damage the raid with Exothermic Release until they are dispatched. This damage increases with each successful cast.
Healers
- Epocheric Orb damages the entire raid if allowed to strike the ground.
- Cascadent Star will damage a large portion of the raid.
Tanks
- In each time layer, Elisande employs a different ability to threaten tanks.
- Ablating Explosion inflicts falloff damage to the entire raid when it expires.
- Interrupt Ablative Pulse.
Time Elementals
Grand Magistrix periodically summons Time Elementals to aid her in combat. When these elementals are dispatched they leave behind a rift that persists until they are consumed.
Recursive Elemental
When this elemental dies it leaves behind a zone of Slow Time.
Expedient Elemental
When this elemental dies it leaves behind a zone of Fast Time.
Time Layer 1
While in this Time Layer Grand Magistrix Elisande will use her Spanning Singularity and Arcanetic Ring abilities.
Arcanetic Ring
This ability echoes. In Mythic Difficulty, the Arcanetic Ring expands to the outside of the room after collapsing.
Spanning Singularity
Spanning Singularities appear at the same time and place in successive Time Layers.
Ablation
Time Layer 2
While in this Time Layer Grand Magistrix Elisande will use her Epocheric Orb ability.
Epocheric Orb
This ability echoes. In Mythic difficulty, players catching the Orbs are afflicted with Epocheric Vulnerability.
Ablating Explosion
Time Layer 3
While in this Time Layer Grand Magistrix Elisande will use her Delphuric Beam ability.
Ablative Pulse
Delphuric Beam
This ability echoes in Mythic difficulty, and the beam continues through the target rather than stopping at the target.
Loot
23 drops · item level 50 · 6 slots (Back, Head, Shoulder, Trinket, Waist, Wrist) · all Bind on Pickup
Belt of Celestial AlignmentBracers of Impossible ChoicesCloak of Temporal RecalibrationCollapsing EpochConvergence of FatesDoomblade CowlDreadwyrm CrownEagletalon CowlEphemeral ParadoxEternally Recurring BracersExothermic CoreEyes of Azj'AqirFarsight SpiritjewelHelmet of the HighlordHelm of Shackled ElementsHood of Enveloped DissonanceHood of Everburning KnowledgeHood of the Astral WardenMantle of PrestidigitationMask of Second SightPurifier's GorgetWaistplate of Fractured RealitiesWarhelm of the Obsidian AspectQuests
7 quests Blizzard’s quest data files under The Nighthold, all for level 45:
- Reward:20 gold22 silver
- Reward:20 gold22 silver
- Reward:20 gold22 silver
- Reward:40 gold44 silver
- Reward:20 gold22 silver

Achievements
34 achievements tied to The Nighthold, worth 270 achievement points in total.
 The Nighthold Guild RunDefeat the bosses of The Nighthold on Normal difficulty or higher, while in a guild group.10
 Mythic: Gul'dan Guild RunDefeat Gul'dan in The Nighthold on Mythic difficulty, while in a guild group.10
 Arcing AqueductsDefeat the following bosses within the base of The Nighthold.10
 Royal AthenaeumDefeat the following bosses within The Nighthold.10
 NightspireDefeat the following bosses within The Nighthold.10
- Betrayer's RiseDefeat Gul'dan atop The Nighthold.10
- The NightholdDefeat the bosses within The Nighthold on Normal difficulty or higher.10
 Mythic: SkorpyronDefeat Skorpyron in The Nighthold on Mythic difficulty.10
 Mythic: Chronomatic AnomalyDefeat Chronomatic Anomaly in The Nighthold on Mythic difficulty.10
- Mythic: TrilliaxDefeat Trilliax in The Nighthold on Mythic difficulty.10
 Mythic: Spellblade AlurielDefeat Spellblade Aluriel in The Nighthold on Mythic difficulty.10
 Mythic: Star Augur EtraeusDefeat Star Augur Etraeus in The Nighthold on Mythic difficulty.10
- Mythic: High Botanist Tel'arnDefeat High Botanist Tel'arn in The Nighthold on Mythic difficulty.10
 Mythic: TichondriusDefeat Tichondrius in The Nighthold on Mythic difficulty.10
 Mythic: KrosusDefeat Krosus in The Nighthold on Mythic difficulty.10
- Mythic: Grand Magistrix ElisandeDefeat Grand Magistrix Elisande in The Nighthold on Mythic difficulty.10
- Mythic: Gul'danDefeat Gul'dan in The Nighthold on Mythic difficulty.Title: Vengeance Incarnate10
 Cage RematchDefeat Skorpyron in The Nighthold on Normal difficulty or higher without any player leaving the center rings.10
 Grand OpeningActivate all the spotlights around the Nightwell and then defeat the Chronomatic Anomaly in The Nighthold, on Normal difficulty or higher.10
 Gluten FreeDefeat Trilliax in The Nighthold while eating no more than 20 Toxic Slices on Normal Difficulty or higher.10
 A Change In SceneryEngage and defeat Spellblade Aluriel in the following areas of The Nighthold on Normal difficulty or higher. She must reach her destination within 120 seconds of entering combat and remain there until defeated:10
- Elementalry!Defeat Star Augur Etraeus in The Nighthold after having defeated a Well-Traveled Nether Elemental on Normal difficulty or higher.10
 Fruit of All EvilDefeat High Botanist Tel'arn in The Nighthold while all members of the raid are afflicted with Arcane Exposure on Normal Difficulty or higher.10
 Not For YouDefeat Tichondrius in The Nighthold without taking any damage from Echoes of the Void on Normal difficulty or higher.10
 Burning BridgesDefeat Krosus in The Nighthold after quenching 15 Burning Embers on Normal difficulty or higher.10
 InfinitesimalGet betrayed by and then defeat an Infinite Whelpling during the Grand Magistrix Elisande encounter, then defeat Grand Magistrix Elisande in The Nighthold, on Normal difficulty or higher.10
 I've Got My Eyes On YouDefeat Gul'dan in The Nighthold on Normal difficulty or higher, after defeating 16 Eyes of Gul'dan within 3 seconds.10
- Ahead of the Curve: Gul'danDefeat Gul'dan in The Nighthold on Heroic difficulty or higher, before the opening of the Tomb of Sargeras.
- Cutting Edge: Gul'danDefeat Gul'dan in The Nighthold on Mythic difficulty, before the opening of the Tomb of Sargeras.
- The NightholdDefeat the bosses within The Nighthold on any difficulty.+1 Infinite Knowledge
- Arcing AqueductsDefeat the following bosses within the base of The Nighthold.Minor Bronze Cache
- Royal AthenaeumDefeat the following bosses within The Nighthold.Minor Bronze Cache
- NightspireDefeat the following bosses within The Nighthold.Minor Bronze Cache
- Betrayer's RiseDefeat Gul'dan atop The Nighthold.Minor Bronze Cache
More Legion Raids
Other raids from the same expansion.