 TheWoWDB
Raid - Shadowlands
Castle Nathria
10 encounters, 262 boss abilities and 298 drops, with the Adventure Guide’s own ability and strategy notes for each fight. Every drop links to its item page; tradeable drops carry a live Auction House price.
Long has Sire Denathrius ruled the denizens of Revendreth as they harvested anima from prideful souls. But as drought and fear gripped the Shadowlands, Denathrius revealed his true loyalties. In defiance of his former Master, the noble Prince Renathal gathers his few remaining allies for a desperate mission to infiltrate Castle Nathria and remove Denathrius from power.
Quick Facts
| Type | Raid |
|---|---|
| Expansion | Shadowlands |
| Encounters | 10 |
| Boss abilities | 262 |
| Drops | 298 |
| Item level | 1 to 207 |
| Tradeable drops | 0 |
Difficulties and Lockouts
Castle Nathria has 4 difficulties in the game data: Normal, Heroic, Mythic and Looking For Raid save you to a weekly lockout.
| Difficulty | Players | Level range | Lockout |
|---|---|---|---|
| Normal | 30 | 60 | Weekly |
| Heroic | 30 | 60 | Weekly |
| Mythic | 20 | 60 | Weekly |
| Looking For Raid | 30 | 60 | Weekly |
Raid Finder splits Castle Nathria into 4 wings:
- The Leeching Vaults
- Reliquary of Opulence
- Blood from Stone
- An Audience with Arrogance
Loot Table Value
Every one of Castle Nathria’s 298 drops is Bind on Pickup, so none of this loot can ever reach the Auction House. The table below the bosses is the complete reward list; its value is item level, not gold.
Where It Is
The entrance to Castle Nathria is in Revendreth at 46.6, 41.5.
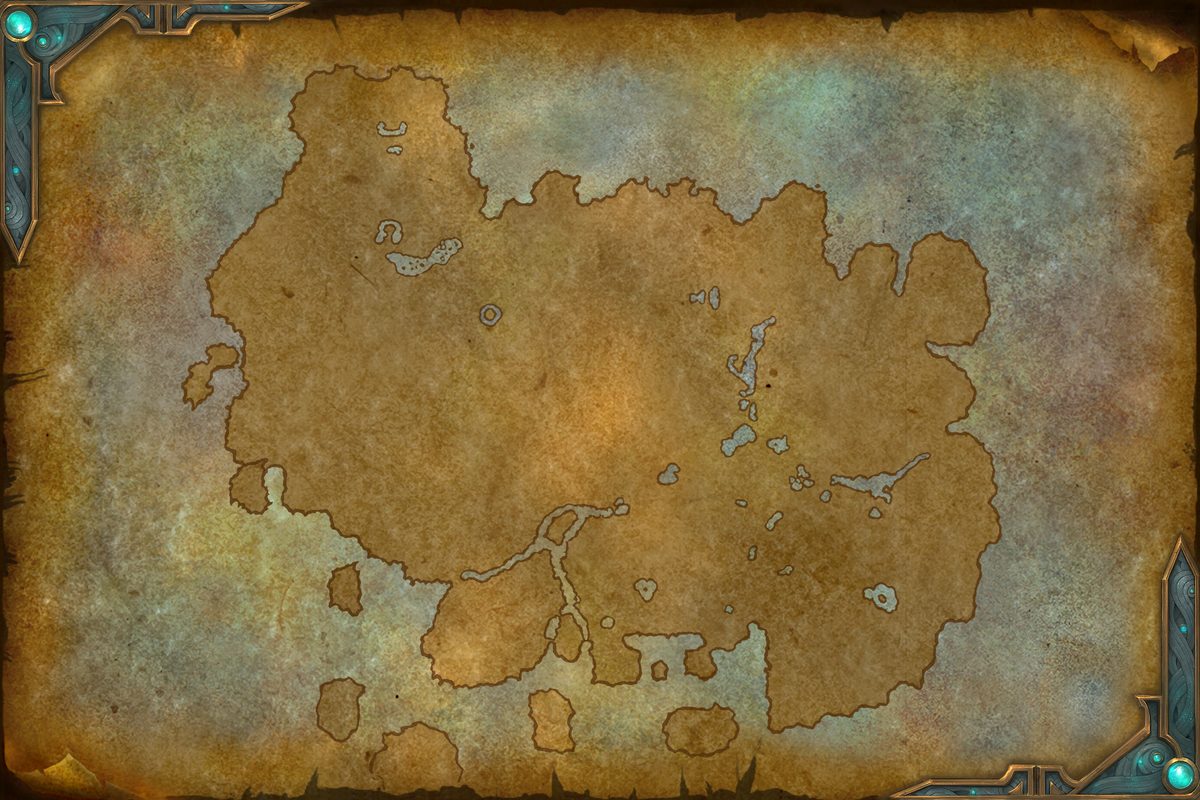 Halls of AtonementEntrance 46.6, 41.5
Revendreth, from the game’s own world map art. The framed marker is the Adventure Guide entrance; gold diamonds are the zone’s landmarks.
3D Model
First-party render from the game files. Model © Blizzard Entertainment.
Instance Map
The Adventure Guide places 10 bosses of Castle Nathria on 6 maps. Numbers follow the encounter order; each links to that fight below.
Castle Nathria
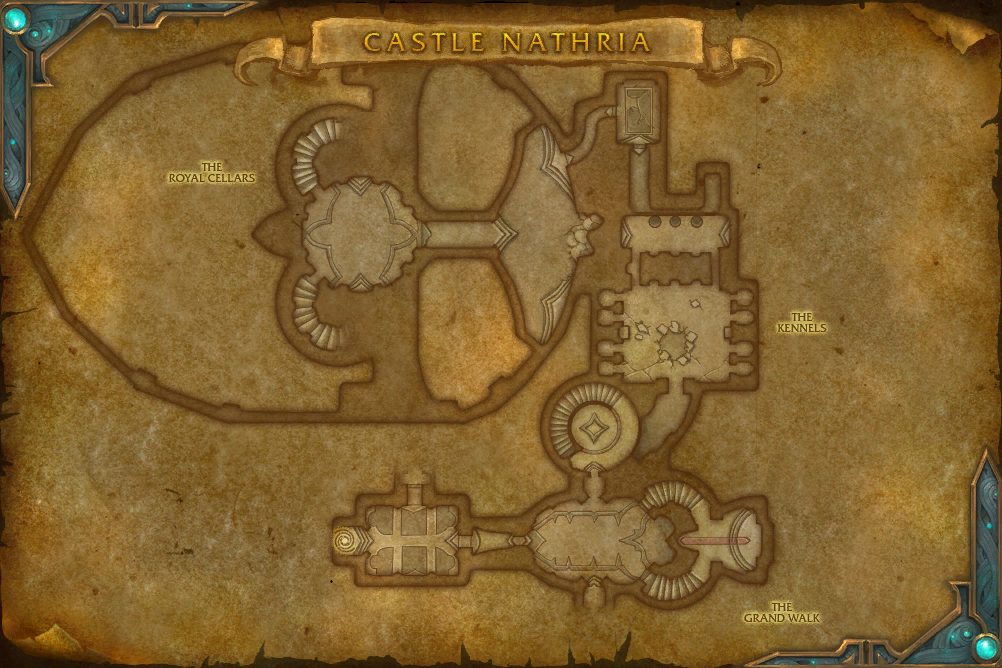 1Shriekwing2Huntsman Altimor5Hungering Destroyer8Sludgefist
- 1 Shriekwing 59.3, 81.1
- 2 Huntsman Altimor 67.6, 49.5
- 5 Hungering Destroyer 35.8, 34.7
- 8 Sludgefist 70.2, 81.5
Castle Nathria
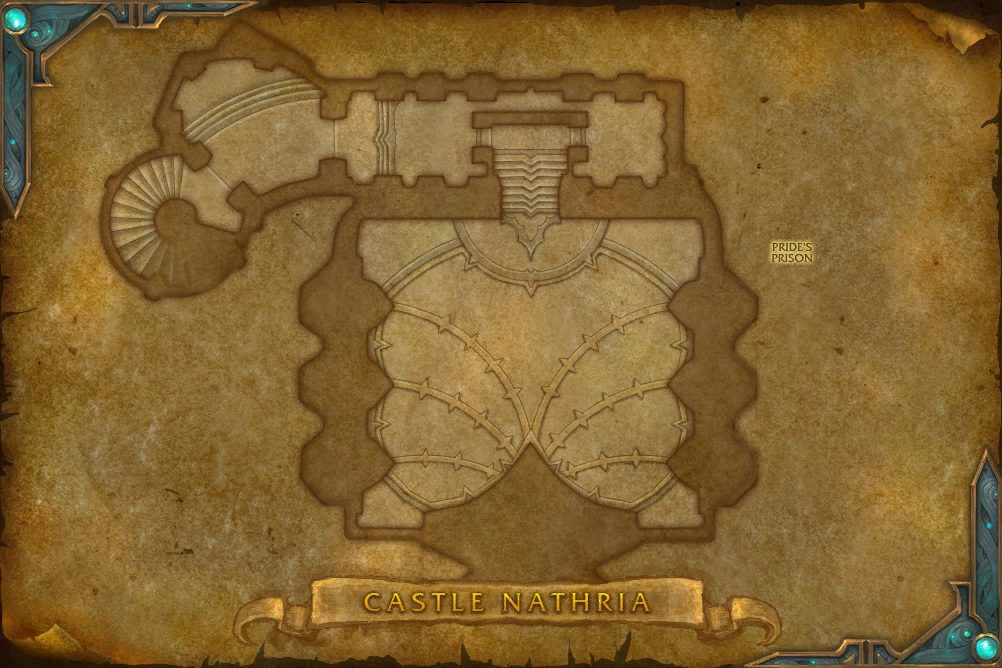 3Sun King's Salvation
- 3 Sun King's Salvation 52.9, 74.6
Castle Nathria
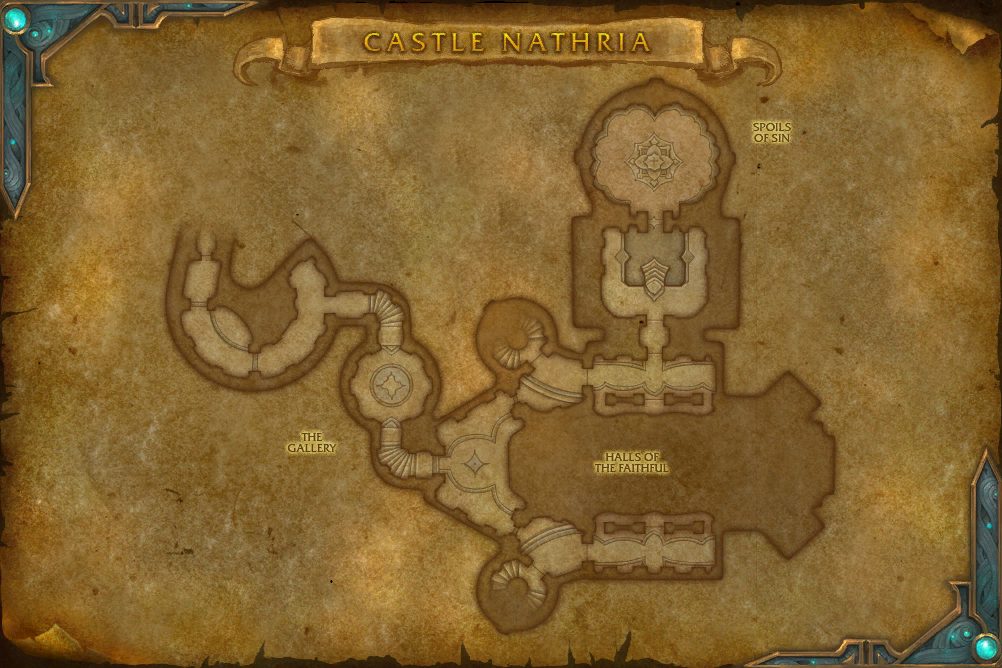 4Artificer Xy'mox
- 4 Artificer Xy'mox 65.4, 23.6
Castle Nathria
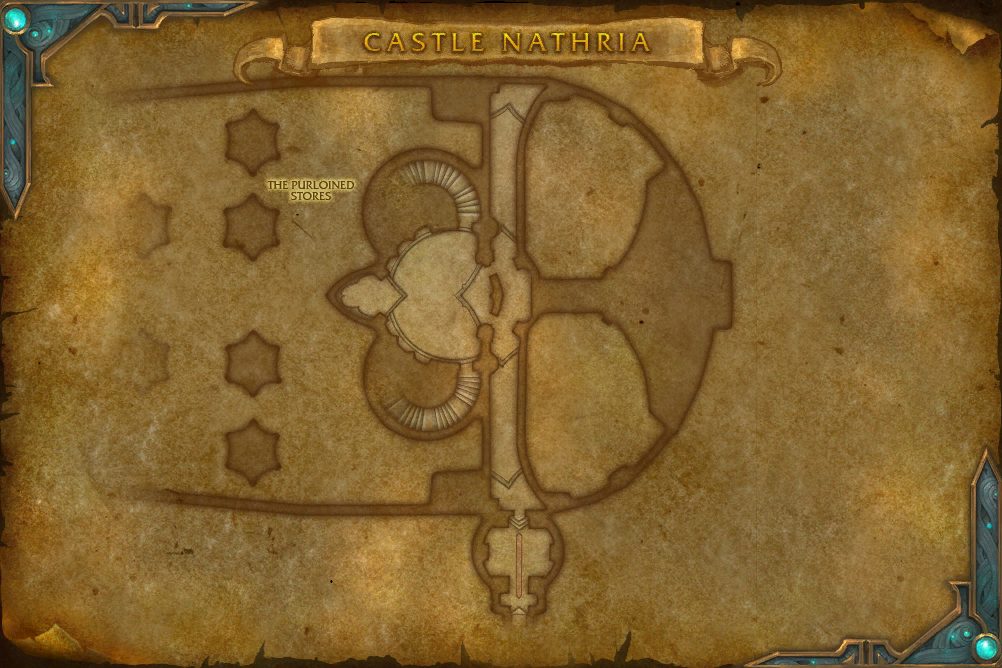 6Lady Inerva Darkvein
- 6 Lady Inerva Darkvein 36.4, 44.3
Castle Nathria
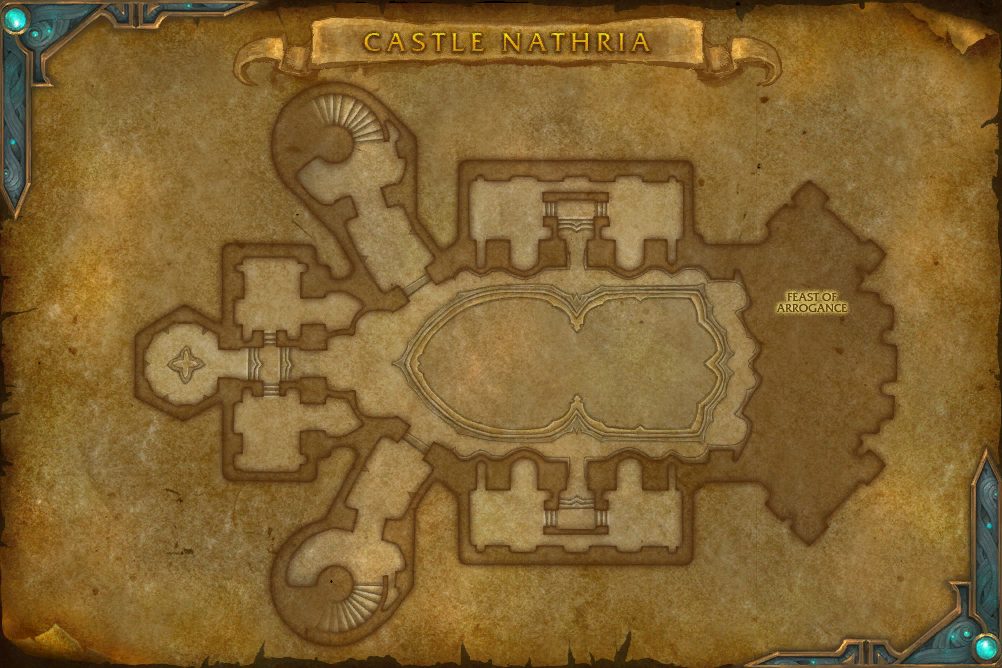 7The Council of Blood
- 7 The Council of Blood 70.2, 54.7
Castle Nathria
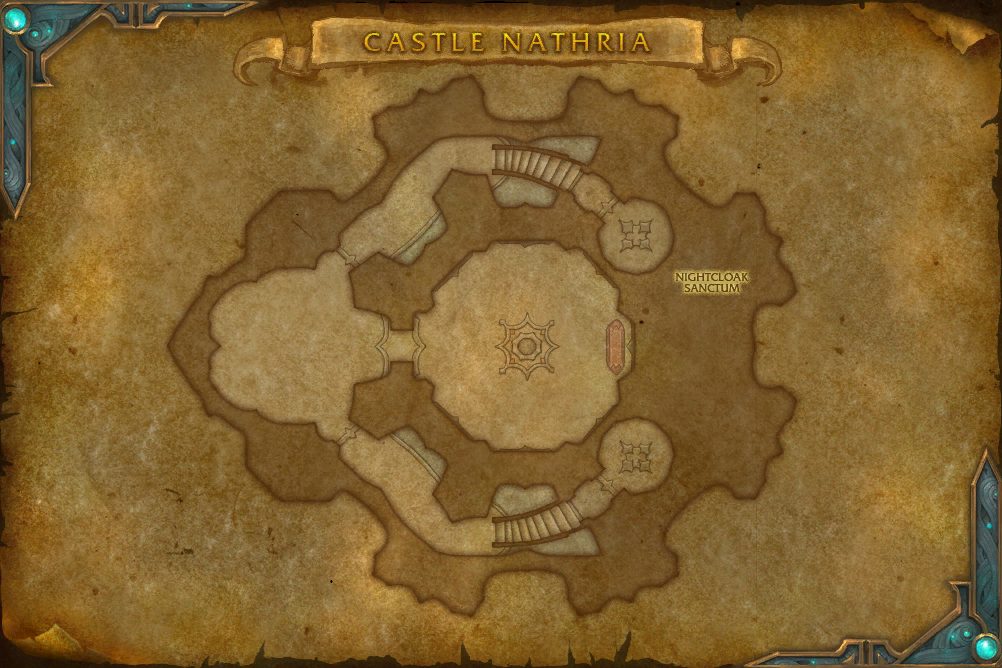 9Stone Legion Generals10Sire Denathrius
- 9 Stone Legion Generals 26.3, 51.8
- 10 Sire Denathrius 52.6, 52.3
Encounters
Shriekwing
Tasked with guarding Castle Nathria's entry hall, the blind monster Shriekwing locates her victims with horrifying cries that reverberate off the chamber's walls. The last sound heard by trespassers in the Grand Walk is the monster's cry as she descends upon her prey.
Abilities & Strategy
Overview
Shriekwing will unleash Earsplitting Shrieks as she gains blood over time. Upon reaching 100 blood Shriekwing becomes protected by Blood Shroud and fills the antechamber with Echoing Sonar.
Tank
- Coordinate with another player to manage the effects of Exsanguinating Bite.
- Players within Shriekwing's line of sight will take heavy damage from Earsplitting Shriek.
- Avoid being detected by Echoing Sonar while Shriekwing is under the effects of Blood Shroud.
Healer
- Players within Shriekwing's line of sight will take heavy damage from Earsplitting Shriek.
- Players with high applications of Exsanguinated receive reduced healing.
- Avoid being detected by Echoing Sonar while Shriekwing is under the effects of Blood Shroud.
Damage
- Players within Shriekwing's line of sight will take heavy damage from Earsplitting Shriek.
- Position carefully while affected by Echolocation.
- Avoid being detected by Echoing Sonar while Shriekwing is under the effects of Blood Shroud.


Stage One - Thirst for Blood
Shriekwing feasts on her victims and becomes engorged with blood as the battle rages.
 Earsplitting Shriek

 Echolocation

 Echoing Screech
On Mythic difficulty, the effects of Echoing Screech are only visible while affected by Bloodlight.
 Wave of Blood
 Blind Swipe
 Exsanguinating Bite
Stage Two - Terror of Castle Nathria
Shrouded in darkness, Shriekwing stalks her prey throughout The Grand Walk.
Earsplitting Shriek
 Blood Shroud

Echoing Sonar
On Mythic difficulty, the effects of Echoing Sonar are only visible while affected by Bloodlight.
Loot
16 drops · item level 145 to 200 · 5 slots (Back, Feet, Legs, Trinket, Waist) · all Bind on Pickup


Sludgefist
Sludgefist was born in the muddy foundation beneath Castle Nathria and now wanders the halls as he awaits orders from Sire Denathrius. His massive footsteps reverberate throughout the castle, announcing his arrival from several rooms away.
Abilities & Strategy
Overview
Sludgefist gains rage as the battle ensues. At 100 rage Sludgefist starts a Heedless Charge toward the player affected by Hateful Gaze. Sludgefist triggers Collapsing Foundation if he impacts a wall while charging.
Tank
- Sludgefist hits two targets at once with Giant Fists.
- Sludgefist triggers Collapsing Foundation if he impacts a wall during Heedless Charge.
- Moving too far from an ally while affected with Chain Link will trigger Shattering Chain.
Healer
- Collapsing Foundation inflicts increasing damage to all players as the battle continues.
- Moving too far from an ally while affected with Chain Link will trigger Shattering Chain.
Damage
- Sludgefist inflicts massive damage to any player caught in the path of Heedless Charge.
- Moving too far from an ally while affected with Chain Link will trigger Shattering Chain.


 Chain Slam
On Mythic difficulty, Sludgefist immediately gains 100 rage if Chain Slam fails to hit at least four players.


Loot
28 drops · item level 1 to 200 · 6 slots (Chest, Feet, Hands, Legs, Trinket, Waist) · all Bind on Pickup
 Memory of a Clear Mind
 Memory of a Siphoning Storm
 Memory of Azj'Aqir's Cinders
 Memory of Greenskin
 Memory of Koltira
 Memory of the Ardent Protector
 Memory of the Berserker's WillMemory of the Frenzyband
 Memory of the Morning's Tear
 Memory of the Primal Lava Actuators
 Memory of the Rylakstalker's Strikes
 Colossal Plate Gauntlets
 Hateful Chain
 Heedless Pugilist's Harness
 Impossibly Oversized Mitts
 Leggings of Lethal Reverberations
 Load-Bearing Belt
 Rampaging Giant's Chestplate
 Stoneclas Stompers
 Diverted Energy
 Fel Celerity
 Harm Denial
 Icy Propulsion
 Maim, Mangle
 Quick Decisions
 Tireless Pursuit
 Tyrant's Soul
 Unchecked Aggression
Artificer Xy'mox
Not everyone in Castle Nathria is loyal to Sire Denathrius. Some simply saw an opportunity and exploited it to their own ends. Artificer Xy'mox has worked with Denathrius but is mostly concerned with getting the better end of the deal, which may require the end of Nathria's invaders.
Abilities & Strategy
Overview
Xy'mox creates wormholes players can travel between and removes Sire Denathrius' Relics from their display cases, unleashing their powers on players. At 70% and 40% remaining health, Xy'mox will return active Relics to their display case and bring out another. In Mythic difficulty, Denathrius' Relics remain available for the remainder of the encounter once they are removed from their display.
Tank
- Utilize wormholes created by Dimensional Tear to quickly reposition.
- Glyph of Destruction inflicts substantial Arcane damage to nearby players.
Healer
- Coordinate with allies to place wormholes created by Dimensional Tear.
- Utilize wormholes created by Dimensional Tear to quickly reposition.
- Hyperlight Spark and Glyph of Destruction inflict damage to all players.
Damage
- Coordinate with allies to place wormholes created by Dimensional Tear.
- Utilize wormholes created by Dimensional Tear to quickly reposition.
- Seeds of Extinction created by Root of Extinction can be picked up and moved.


Sire Denathrius' Private Collection
In Mythic difficulty, Denathrius' Relics remain available for the remainder of the encounter once they are removed from their display.


Loot
19 drops · item level 1 to 200 · 7 slots (Bag, Chest, Finger, Legs, Trinket, Waist +1 more) · all Bind on Pickup
 Memory of the Core of the Balespider
 Memory of the Last Emperor
 Apogee Anima BeadBreastplate of Cautious Calculation
 Glyph of Assimilation
 Greaves of Enigmatic Energies
 Hyperlight Band
 Portable Pocket Dimension
 Precisely Calibrated Chronometer
 Shadewarped Sash
 Accrued Vitality
 Born Anew
 Clear Mind
 High Voltage
 Magi's Brand
 Marksman's Advantage
 Shining Radiance
 Tempest Barrier
 Umbral Intensity
Lady Inerva Darkvein
Anima fuels the Shadowlands, and Lady Inerva Darkvein seeks to unlock its mysteries. Under Denathrius's tutelage, she has learned insidious secrets to turn against his enemies. She will strip anima from Nathria's invaders and use it to shape a dark new future.
Abilities & Strategy
Overview
Lady Inerva Darkvein's abilities are directly linked to the anima levels of the containers. As they rise, the efficacy of her abilities increases. Players can lower the levels of the containers by using the anima release valves located around the playspace. Allowing any container to reach capacity will trigger a Container Breach.
Tanks
- Lady Inerva Darkveins' Expose Desires will alter your responsibilities as it gains power.
- Make sure to trigger Change of Heart away from your allies.
- Allies with Shared Cognition will take damage based off the damage you take from Expose Desires.
Healers
- Allies with Shared Cognition will take damage based off the damage the tank takes from Expose Desires.
- Sins of the Past summoned by Sins and Suffering constantly damage the nearest player until they are connected with the beams of Shared Suffering.
- The raid continually suffers damage from Loose Anima in the chamber. This damage increases with each open container.
- If any container reaches capacity, a Container Breach occurs.
Damage Dealers
- Sins of the Past summoned by Sins and Suffering constantly damage the nearest player until they are connected with the beams of Shared Suffering.
- If any container reaches capacity, a Container Breach occurs.
- Bottled Anima will trigger a burst of Unleashed Volatility if not caught.
- When you have Shared Cognition, you take damage based off the damage the tank takes from Expose Desires.
Primal Anima Containers
Anima containers are placed around Lady Inerva Darkvein's balcony that gradually gather anima energy to empower each of her abilities. Players can interact with the containers to open them, and close them by interacting with them again. Open containers vent their Loose Anima into the playspace. When any container reaches full capacity, a Container Breach occurs. The breach continues to damage players until the anima level is reduced below capacity.
 Anima Release
 Loose Anima
The damage of Loose Anima increases with each open Primal Anima Container.
 Container Breach
Zero-Sum Game
In Mythic Raid difficulty, the anima drained by opening a Primal Anima Container is transferred to all closed Primal Anima Containers.
 Focus Anima
While focused, a Primal Anima Container cannot be opened by players.
Container of Desire
The Container of Desire governs the power of Lady Inerva Darkvein's Expose Desires ability. As the container increases in level, the power of Expose Desires increases. Lady Inerva Darkvein uses these abilities when she reaches 100 energy.
 Expose Desires
On Mythic Raid difficulty, the target is attacked by two images of their Hidden Desires.

Expose Cognition
Lady Inerva Darkvein uses this ability when the Container of Desire surpasses 33% capacity. On Mythic Raid difficulty, the target is attacked by two images of their Hidden Desires.

Expose Heart
Lady Inerva Darkvein uses this ability when the Container of Desire surpasses 66% capacity. On Mythic Raid difficulty, the target is attacked by two images of their Hidden Desires.
Container of Bottled Anima
The Container of Bottled Anima governs the power of Lady Inerva Darkvein's Bottled Anima ability. As the container increases in level, the power of Bottled Anima increases.
 Bottled Anima

Lingering Anima
Lady Inerva Darkvein uses this ability when the Container of Bottled Anima surpasses 33% capacity.

Replicating Anima
Lady Inerva Darkvein uses this ability when the Container of Bottled Anima surpasses 66% capacity.
Container of Sin
The Container of Sin governs the power of Lady Inerva Darkvein's Sins and Suffering ability. As the container increases in level, the power of Sins and Suffering increases.
Simple Geometry
In Mythic Raid difficulty, Sins and Suffering summons an additional Sins of the Past. Players must link all four orbs with the three beams of Shared Suffering.
 Lesser Sins and Suffering
If players fail to connect Sins of the Past before they expire, Indemnification occurs.
 Shared Suffering
In Raid Finder difficulty, victims are Silenced until they sever the connection of Shared Suffering by linking the Sins of the Past.
 Indemnification
Sins and Suffering
Lady Inerva Darkvein uses this ability when the Container of Sin surpasses 33% capacity. If players fail to connect Sins of the Past before they expire, Indemnification occurs.
Shared Suffering
In Raid Finder difficulty, victims are Silenced until they sever the connection of Shared Suffering by linking the Sins of the Past.
Indemnification
 Anima Web
Greater Sins and Suffering
Lady Inerva Darkvein uses this ability when the Container of Sin surpasses 66% capacity. If players fail to connect Sins of the Past before they expire, Indemnification occurs.
Shared Suffering
In Raid Finder difficulty, victims are Silenced until they sever the connection of Shared Suffering by linking the Sins of the Past.
Indemnification
Anima Web
Container of Concentrated Anima
The Container of Concentrated Anima governs the power of Lady Inerva Darkvein's Concentrated Anima ability. As the container increases in level, the power of Concentrated Anima increases. Each cast of Concentrated Anima results in one Harnessed Specter. Any additional players chosen for this ability cause a Conjured Manifestation to appear.
 Lightly Concentrated Anima

Concentrated Anima
Lady Inerva Darkvein uses this ability when the Container of Concentrated Anima surpasses 33% capacity.

Highly Concentrated Anima
Lady Inerva Darkvein uses this ability when the Container of Concentrated Anima surpasses 66% capacity.
Conjured Manifestation
Continually Condemns the raid.

Harnessed Specter
Harnessed Specters are sessile and will Condemn the raid if not engaged in melee combat.

Loot
25 drops · item level 1 to 200 · 6 slots (Finger, Hands, Head, Legs, Trinket, Waist) · all Bind on Pickup
 Memory of a Fortified Fel Flame
 Memory of the Mother Tree
 Binding of Warped Desires
 Confidant's Favored Cap
 Gloves of Phantom ShadowsMemento-Laden Cuisses
 Memory of Past Sins
 Ritualist's Treasured RingThaumaturgic Anima Bead
 Count the Odds
 Golden Path
 Grounding Breath
 Grounding Surge
 Jade Bond
 Prepared for All
 Reinforced Shell
 Rejuvenating Wind
 Resolute Barrier
 Safeguard
 Shattered Restoration
 Spiritual Resonance
 Sudden Ambush
 Swirling Currents
 Tough as Bark
 Translucent Image
Sun King's Salvation
In the sinister confines of Castle Nathria, souls are being tortured not to redeem their sins, but to amplify them. The prideful Prince Kael'thas has been burdened with the sins of others, and his pain and hatred are channeled to make him a powerful weapon. This has imperiled his soul like no other, and it must be saved--if only to keep it from being unleashed upon the Shadowlands.
Abilities & Strategy
Overview
Kael'thas starts in a weakened state and needs assistance to bring him back to full strength. However, Sire Denathrius's forces continue to pour in, determined to stop your attempts at redeeming Kael'thas's soul. Upon Kael'thas reaching 45% and 90% health, a Shade of Kael'thas manifests, suspending everyone's ability to heal Kael'thas. This Shade of Kael'thas enters the arena and engages the raid until it is defeated. Inflicting damage to the Shade of Kael'thas also heals Kael'thas himself.
Tanks
- Vile Occultist's Door of Shadows impair threat management on them, and Soul Infusers ignore player threat entirely.
- Shade of Kael'thas's Fiery Strike inflicts applications of Burning Remnants.
Damage Dealers
- Assist allies to mitigate damage taken from Ember Blast.
- Soul Infusers are susceptible to crowd control.
- Move away from allies when targeted for Crimson Flurry.
Healers
- Interact with the Infuser's Orbs to gain Infuser's Boon.
- Heal Essence Fonts cast Essence Overflow at full health, greatly healing Kael'thas.
- Move away from allies when targeted for Crimson Flurry.
Shade of Kael'thas
A Shade of Kael'thas manifests upon Kael'thas reaching 45% and 90% health.
 Reflection of Guilt
 Cloak of Flames

 Smoldering Remnants
Ember Blast, Blazing Surge and the Reborn Phoenixes's Smoldering Plumage leave this pool.
 Fiery Strike
 Ember Blast
On Normal difficulty and higher, this also applies 6 applications Lingering Embers, divided among all players hit.

 Blazing Surge
On Heroic difficulty and higher, Blazing Surge targets a random player's position rather than the primary target's position.
Reborn Phoenix
On Mythic difficulty, the Reborn Phoenixes do not disappear when the Shade of Kael'thas is defeated.


Ministers of Vice
As the fight progresses, Sire Denathrius's Ministers of Vice work to thwart the raid's attempts to save Kael'thas.
Rockbound Vanquisher


Bleakwing Assassin


Vile Occultist


Soul Infuser
Pestering Fiend


Infusing Essences
Soul Infusers and Pride's Prison's Soul Pedestals offer adventurers advantages in restoring Kael'thas to full health. Soul Infusers, Vile Occultists, and Pride's Prison's Soul Pedestals offer adventurers advantages in restoring Kael'thas to full health.
Infuser's Orb
Soul Infuser leave behind an Infuser's Orb upon death. Interacting with the Infuser's Orb grants Infuser's Boon.
Soul Pedestal
Players can interact with the Soul Pedestals to cast Soul Infusion on Kael'thas. Soul Pedestals don't activate when the Shade of Kael'thas is alive. Soul Pedestals don't activate when the Shade of Kael'thas is present.
Essence Font
Vile Occultists drop an Essence Font upon death. Dropped Essence Fonts cast Essence Overflow at full health.

Kael'thas
When the Shade of Kael'thas is not present, Kael'thas periodically casts Cloak of Flames.
High Torturer Darithos
Loot
21 drops · item level 1 to 200 · 6 slots (Back, Chest, Hands, Trinket, Waist, Wrist) · all Bind on Pickup
 Memory of the Shadowbreaker
 Memory of the Sun King
 Abominable Anima Spherule
 Bangles of Errant PrideBleakwing Assassin's Grips
 High Torturer's Smock
 Mantle of Manifest Sins
 Soul Igniter
 Splintered Heart of Al'arStoic Guardsman's Belt
 Tuft of Smoldering Plumage
 Brutal Vitality
 Cheetah's Vigor
 Fel Defender
 Hardened Bones
 Infernal Cascade
 Punish the Guilty
 Rolling Agony
 Shielding Words
 Soul Furnace
 Vital Accretion
Sire Denathrius
For countless ages, Sire Denathrius stood among the Eternal Ones who rule the realms of Death. But in the Shadowlands' darkest hour, he has betrayed his sacred duty. With his bloodthirsty living blade Remornia at his side and defended by his most sychophantic loyalists, Denathrius will cut a swath through any who stand against him and cast their remains into the inescapable terror of the Maw.
Abilities & Strategy
Overview
Denathrius begins the fight by tormenting players for their past transgressions. Player must be hit by Cleansing Pain to remove Burden of Sin before they run out of space to avoid Ravage. At 70% health, Denathrius casts March of the Penitent and drags players into his grand Observatorium, where they must face a chorus of his most powerful admirers while avoiding Remornia's attempts to Massacre them. At 40% health, Denathrius casts Indignation and begins to wield Remornia directly, assaulting players with a combination of his most powerful abilities.
Tanks
- Use Cleansing Pain to remove Burden of Sin from yourself and allies.
- Wracking Pain greatly increases damage taken, and can also hit Crimson Cabalists.
- Position carefully for Blood Price and Shattering Pain, both of which knock players away from Denathrius.
Damage Dealers
- Echoes of Sin and Crimson Cabalists are dangerous and can overwhelm your raid if not dealt with quickly.
- Remornia shares health with Denathrius through Bloodbound.
- Position carefully for Blood Price and Shattering Pain, both of which knock players away from Denathrius.
Healers
- Targeted abilities like Impale and Fatal Finesse inflict heavy damage.
- Blood Price and Hand of Destruction can inflict heavy damage to the entire raid.
- Position carefully for Blood Price and Shattering Pain, both of which knock players away from Denathrius.
Stage One: Sinners Be Cleansed
Players face Denathrius in the Nightcloak Sanctum, where he kindly offers enough pain to cleanse them of their sins.


Intermission: March of the Penitent


Stage Two: The Crimson Chorus
Once fully cleansed, players find themselves in the grand Observatorium, where countless mirrors are used to watch and manipulate events throughout the Shadowlands and beyond. Players can enter these mirrors to travel great distances, but there is no escape from Denathrius.
The Nightcloak
At the beginning of Stage Two, Denathrius calls upon some of his most trusted lieutenants.
Lady Sinsear
Lord Evershade
Baron Duskhollow
Countess Gloomveil
Crimson Cabalist
Members of the Crimson Cabal periodically enter the room. These loyal servants of Denathrius assault players with deadly anima magic.

Remornia
Remornia aids Denathrius in battle. When not using an ability, she's free to move and attack players at will.


 Inevitable
Wracking Pain
 Hand of Destruction
 Command: Massacre

Stage Three: Indignation
Having completely run out of patience, Denathrius opts to wield Remornia directly and crush players with his most powerful abilities.


Loot
85 drops · item level 1 to 207 · 4 slots (Finger, Head, Shoulder, Trinket) · all Bind on Pickup
 Memory of a Celestial InfusionMemory of a Harmonious Apparatus
 Memory of a Malefic Wrath
 Memory of Finality
 Memory of Oneth
 Memory of the Chaos Theory
 Memory of the Deadliest Coil
 Memory of the Demise of Skybreaker
 Memory of the Eredun War Order
 Memory of the Exploiter
 Memory of the Freezing Winds
 Memory of the Vanguard's MomentumAbominable Anima Spherule
 Cabalist's Hymnal
 Diadem of Imperious Desire
 Dreadfire Vessel
 Manabound Mirror
 Most Regal Signet of Sire DenathriusMystic Anima Spherule
 Pauldrons of Fatal Finality
 Sadist's Sinister Mask
 Sanguine Vintage
 Shawl of the PenitentVenerated Anima SpheruleZenith Anima Spherule
 Ambuscade
 Astral Protection
 Bone Marrow Hops
 Brooding Pool
 Brutal GraspCatastrophic Origin
 Conflux of Elements
 Courageous Ascension
 Deep Allegiance
 Destructive Reverberations
 Discipline of the Grove
 Elysian Dirge
 Empowered Release
 Endless Thirst
 Enfeebled Mark
 Essential Extraction
 Evolved Swarm
 Fade to Nothing
 Fae Fermata
 Fatal Decimation
 Festering Transfusion
 Fleeting Wind
 Gift of the Lich
 Hallowed Discernment
 Harrowing Punishment
 Imbued Reflections
 Impenetrable GloomIncantation of SwiftnessIncreased Scrutiny
 Indelible Victory
 Ire of the Ascended
 Kilrogg's Cunning
 Lashing Scars
 Lavish Harvest
 Light's Barding
 Light's Inspiration
 Necrotic Barrage
 Piercing Verdict
 Proliferation
 Repeat Decree
 ReverberationRighteous Might
 Ringing ClaritySeptic ShockShattered Perceptions
 Siphoned Malice
 Soul Eater
 Soul Tithe
 Spirit Attunement
 Strike with ClaritySudden Fractures
 Swift TransferenceThe Long Summer
 Tumbling Waves
 Unnatural Malice
Stone Legion Generals
The ancient stoneborn generals, Kaal and Grashaal, have hounded the Prince Renathal's rebellion at every turn. Once they were General Draven's apprentice and mentor; now their strength, strategy, and soldiers have been unleashed against him and any who would defy the Sire's will.
Abilities & Strategy
Overview
The Generals defend the entrance to the Nightcloak sanctum. Grashaal takes to the air as Kaal engages the party. At 50% health, Kaal enters Hardened Stone Form. Grashaal orders airborne reinforcements, while Draven ascends to confront them. Prince Renathal casts Shattering Blast upon reaching full mana from retrieved Anima Orbs, obliterating Kaal's protective form. Grashaal then descends to the ground as Kaal takes take flight. At 50% health, Grashaal will enter Hardened Stone Form, and Anima Orbs are gathered to shatter his defenses. Kaal will land, and both generals will assault the party. Upon the death of one of the Generals, the other General will gainSoldier's Oath.
Damage Dealers
- Stone Breaker's Combo removes all applications of Wicked Laceration and Serrated Tear.
- During Hardened Stone Form, deliver Anima Orbs to Prince Renathal, triggering Shattering Blast.
- Position Wicked Blade as to mitigate raid damage.
Healers
- Stone Breaker's Combo removes all applications of Wicked Laceration and Serrated Tear.
- During Hardened Stone Form, deliver Anima Orbs to Prince Renathal, triggering Shattering Blast.
- Coordinate Heart Rend dispels to stagger Heart Hemorrhage damage.
- Pulverizing Meteor is cast at Crystalized players, dividing damage among those hit.
Tanks
- Stone Breaker's Combo removes all applications of Wicked Laceration and Serrated Tear.
- During Hardened Stone Form, deliver Anima Orbs to Prince Renathal, triggering Shattering Blast.
- Coordinate with your co-tank to manage the effects of Stone Fist and Serrated Swipe.
Stage One: Kaal's Assault
Players face Kaal, as Grashaal flies above the battlefield. At 50% health, Kaal enters Hardened Stone Form and Stone Legion Commandos launch an aerial assault. Prince Renathal casts Shattering Blast upon reaching full mana from retrieved Anima Orbs, obliterating Kaal's protective form.
General Kaal


General Grashaal

Stone Legion Forces
Stone Legion Skirmisher
Stone Legion Goliath
Stone Legion Commando
Prince Renathal
Stage Two: Grashaal's Blitz
Players face Grashaal, as Kaal flies above the the battlefield. At 50% health,Grashaal enters Hardened Stone Form and Stone Legion Commandos launch an aerial assault. Prince Renathal casts Shattering Blast upon reaching full mana from retrieved Anima Orbs, obliterating Grashaal's protective form.
General Grashaal
 Hardened Stone Form
 Stone Breaker's Combo
 Crystalize
Stone Fist
 Reverberating Leap
Reverberating Eruption
 Seismic Upheaval
General Kaal

Stone Legion Forces
Stone Legion Skirmisher
Stone Legion Goliath
Stone Legion Commando
Prince Renathal
Stage Three: Unified Offensive
Kaal and Grashaal attack the party together. Upon the death of one of the Generals, the other General will gain Soldier's Oath.
General Kaal
General Grashaal
Hardened Stone Form
Stone Breaker's Combo
Crystalize
Stone Fist
Reverberating Leap
Reverberating Eruption
Seismic Upheaval
 Soldier's Oath
Stone Legion Forces
Stone Legion Skirmisher
Loot
36 drops · item level 1 to 207 · 6 slots (Back, Chest, Hands, Legs, Shoulder, Trinket) · all Bind on Pickup
 Memory of an Ancestral Reminder
 Memory of an Expanded PotentialMemory of Bloodfang's Essence
 Memory of Demonic Synergy
 Memory of Superstrain
 Memory of the Anguish of the Collective
 Memory of the Circle of Life and Death
 Memory of the Invoker
 Memory of the Sun's Cycles
 Memory of the Tormented Kings
 Memory of the Twins of the Sun Priestess
 Memory of the Wild CallApogee Anima Bead
 Ceremonial Parade Legguards
 Crest of the Legionnaire General
 Oathsworn Soldier's GauntletsRobes of the Cursed Commando
 Stone Legion HeraldryThaumaturgic Anima Bead
 Wicked Flanker's Gorget
 Charitable Soul
 Diabolic Bloodstone
 Divine Call
 Felfire Haste
 Flow of Time
 Fortifying Ingredients
 Front of the Pack
 Harmony of the Tortollan
 Insatiable Appetite
 Recuperator
 Stalwart Guardian
 Strength of the Pack
 Thunderous Paws
 Unruly Winds
 Unstoppable Growth
 Virtuous Command
The Council of Blood
The Council of Blood presides over courtly functions in Revendreth. Castellan Niklaus is a strict military commander with an indomitable will and impenetrable armor. Lord Stavros, a foppish dandy, leads the court in dance but is also deadly with his blades. Baroness Frieda wields powerful anima magics and commands the dredger wait staff--along with the respect of the entire court.
Abilities & Strategy
Overview
The Council of Blood, three deadly Venthyr nobles, attack simultaneously. They do not share health, but are restored to full health and gain additional abilities when one of their allies falls. Players suffer in the Oppressive Atmosphere of the Venthyr's festivities, but when any council member is reduced to 50% health, the living bosses temporarily flee the arena, and a round of the Danse Macabre begins. Players must find their assigned spaces on the dance floor and perform the courtly dance moves in sequence. When the dance concludes the bosses will rejoin the fray.
Tanks
- Lord Stavros teleports behind his current target before inflicting damage from Evasive Lunge to players in a frontal line.
- Coordinate with your co-tank to manage Evasive Lunge and Duelist's Riposte.
- Attendees are granted limited time to locate their position for the Danse Macabre.
Healers
- Drain Essence inflicts heavy damage damage over time to the target.
- Quickly find your partner if paired off for the Dark Recital.
- Attendees are granted limited time to locate their position for the Danse Macabre.
Damage Dealers
- Dutiful Attendants maintain Unyielding Shield until they are slain.
- Quickly find your partner if paired off for the Dark Recital.
- Attendees are granted limited time to locate their position for the Danse Macabre.
The Council of Blood
 Dancing Fever
 Oppressive Atmosphere
Castellan Niklaus
 Duelist's Riposte
Summon Dutiful Attendant
Infused with Anima
When one council member is defeated, the remaining council members each gain an ability.
Empowered with Anima
When both other council members are defeated, the remaining council member gains a final ability.
Afterimage of Castellan Niklaus
Baroness Frieda
 Drain Essence
 Dreadbolt Volley
Infused with Anima
When one council member is defeated, the remaining council members each gain an ability.
Empowered with Anima
When both other council members are defeated, the remaining council member gains a final ability.
Afterimage of Baroness Frieda
Lord Stavros
 Evasive Lunge
 Dark Recital
Infused with Anima
When one council member is defeated, the remaining council members each gain an ability.
Empowered with Anima
When both other council members are defeated, the remaining council member gains a final ability.
Afterimage of Lord Stavros
Intermission: The Danse Macabre
When a council member is reduced to 50% health, each living council member retreats to the balcony for the Danse Macabre.


Loot
27 drops · item level 1 to 200 · 6 slots (Chest, Feet, Hands, Legs, Neck, Trinket) · all Bind on Pickup
 Memory of the Dashing Scoundrel
 Memory of the Void's Eternal CallCastellan's Chainlink Grips
 Corset of the Deft DuelistCourtier's Costume Trousers
 Enchanted Toe-Tappers
 Macabre Sheet Music
 Noble's Birthstone Pendant
 Sparkling Glass Slippers
 Stoneguard Attendant's BootsZenith Anima Spherule
 Bloodletting
 Chilled Resilience
 Dancing with Fate
 Demonic Momentum
 Dizzying Tumble
 Echoing Blessings
 Haunting Apparitions
 Innate Resolve
 Inspiring Presence
 Nimble Fingers
 Power Unto Others
 Ravenous Consumption
 Refreshing Waters
 Reversal of Fortune
 Vicious Contempt
 Winter's Protection
Hungering Destroyer
The devourers consume anima wherever they can find it. With drought afflicting the Shadowlands, it is no surprise that the hungriest and most dangerous of the devourers is drawn to the abundant store of anima here in the depths of Castle Nathria.
Abilities & Strategy
Overview
Over the course of the encounter the Hungering Destroyer gains energy. Upon reaching 100 energy, the Hungering Destroyer casts Consumes attempting to devour all nearby life energy.
Tanks
- Coordinate with your co-tank to manage Growing Hunger.
- Move away from the Hungering Destroyer when it casts Consume.
Healers
- Gluttonous Miasma prevents all healing received by afflicted targets but siphons health from afflicted targets' nearby allies.
- Position yourself to avold hitting other players when targeted by Volatile Ejection.
- Move away from the Hungering Destroyer when it casts Consume.
Damage Dealers
- Gluttonous Miasma prevents all healing received by afflicted targets but siphons health from afflicted targets' nearby allies.
- Position yourself to avold hitting other players when targeted by Volatile Ejection.
- Move away from the Hungering Destroyer when it casts Consume.
 Gluttonous Miasma
In Mythic difficulties, players who share their health with the target of Gluttonous Miasma gain an application of Essence Sap.

 Expunge
16 In Heroic and Mythic difficulties, when Expunge detonates an Obliterating Rift is left at the target's location.


Loot
21 drops · item level 1 to 200 · 6 slots (Chest, Head, Legs, Shoulder, Trinket, Waist) · all Bind on Pickup
 Memory of Gorefiend's Domination
 Memory of the WallCinch of Infinite Tightness
 Consumptive Chainmail Carapace
 Consumptive InfusionEndlessly Gluttonous Greaves
 Epaulets of Overwhelming Force
 Gluttonous Spike
 Helm of Insatiable AppetiteMiasma-Lacquered JerkinVenerated Anima Spherule
 Volatile Shadestitch Legguards
 Ashen Remains
 Calculated Strikes
 Cloaked in Shadows
 Cryo-FreezeEternal Hunger
 Move with Grace
 Resplendent Light
 Spirit Drain
 Tumbling Technique
Huntsman Altimor
Sire Denathrius seldom engages in the hunts himself, but Altimor makes certain the master has the finest beasts should he ever choose to indulge. Margore, Bargast, and Hecutis has been trained longer than most beasts have existed, and each is ready to deliver the Huntsman's wrath to any in his domain.
Abilities & Strategy
Overview
Alitmor commands the hunting gargon of Castle Nathira. Each hound possesses unique abilities and shares health with Altimor. When a gargon is defeated Altimor will release another.
Tanks
- Margore's Jagged Claws inflicts significant Physical damage and applies a potent stacking bleed effect.
- Minimize damage taken by Rip Soul and position Bargast to avoid granting Altimor Devour Soul.
- Coordinate with your healers to manage Hecutis' Crushing Stone.
Healers
- Spreadshot inflicts consistent raid damage.
- Bargast's Rip Soul creates souls that can be healed before they reach Altimor.
- Crushing Stone inflicts substantial raid damage when Hecutis' moves.
Damage Dealers
- Position yourself when marked for Sinseeker.
- Utilize crowd control on Shades of Bargast to apply stacks of Destabilize.
- Position yourself when affected by Hecutis' Petrifying Howl.
Huntsman Altimor
 Sinseeker
In Mythic difficulty, Sinseeker is permanently empowered when a gargon is released.


 Spreadshot
 Huntsman's Bond
Hunting Gargon
Margore
 Vicious Lunge
In Heroic difficulty, all players struck by Vicious Lunge are afflicted with Vicious Wound. In Mythic difficulty, all players struck by Vicious Lunge are afflicted with Vicious Wound.
 Jagged Claws
Bargast


Hecutis
Loot
20 drops · item level 1 to 200 · 5 slots (Chest, Neck, Trinket, Waist, Wrist) · all Bind on Pickup
 Memory of Eagletalon's True Focus
 Memory of the Natural Order
 Memory of the Spiritwalker's Tidal Totem
 Bargast's Leash
 Charm of Eternal Winter
 Grim Pursuant's Maille
 Hellhound CuffsMaster Huntsman's BandolierMystic Anima SpheruleSpell-Woven Tourniquet
 Ashen Juggernaut
 Born of the Wilds
 Cacophonous Roar
 Crippling Hex
 Everfrost
 Focused Mending
 Lingering Numbness
 Rushed SetupSharpshooter's Focus
 Tactical Retreat
Quests
1 quest Blizzard’s quest data files under Castle Nathria:
- Reward:51 gold48 silver
Achievements
24 achievements tied to Castle Nathria, worth 200 achievement points in total.
 Castle Nathria Guild RunDefeat the following bosses in Castle Nathria on Normal difficulty or higher while in a guild group.10
- Heroic: Castle Nathria Guild RunDefeat the following bosses in Castle Nathria on Heroic difficulty while in a guild group.10
 Mythic: Sire Denathrius Guild RunDefeat Sire Denathrius in Castle Nathria on Mythic Difficutly while in a guild group.10
 Mythic: ShriekwingDefeat Shriekwing in Castle Nathria on Mythic difficulty.10
 Mythic: Huntsman AltimorDefeat Huntsman Altimor in Castle Nathria on Mythic difficulty.10
 Mythic: Sun King's SalvationDefeat Sun King's Salvation in Castle Nathria on Mythic difficulty.10
 Mythic: Artificer Xy'moxDefeat Artificer Xy'mox in Castle Nathria on Mythic difficulty.10
 Mythic: Hungering DestroyerDefeat the Hungering Destroyer in Castle Nathria on Mythic difficulty.10
 Mythic: Lady Inerva DarkveinDefeat Lady Inerva Darkvein in Castle Nathria on Mythic difficulty.10
 Mythic: The Council of BloodDefeat The Council of Blood in Castle Nathria on Mythic difficulty.10
 Mythic: SludgefistDefeat Sludgefist in Castle Nathria on Mythic difficulty.10
 Mythic: Stone Legion GeneralsDefeat the Stone Legion Generals in Castle Nathria on Mythic difficulty.10
- Mythic: Sire DenathriusDefeat Sire Denathrius in Castle Nathria on Mythic difficulty.Title: Sinbreaker10
 Blind as a BatDefeat Shriekwing after she kills six Sneaky Servitors in Castle Nathria on Normal difficulty or higher.10
- Taking Care of BusinessDefeat Huntsman Altimor after walking Margore, Bargast, and Hecutis to the corners of The Kennels in Castle Nathria on Normal difficulty or higher.10
 Burning BrightRedeem Kael'thas after lighting all four of the room's braziers in Castle Nathria on Normal difficulty or higher.10
 Private StockDefeat Artificer Xy'mox after returning loose Maldraxxus, Ardenweald, and Maw Anima to their display cases in Castle Nathria on Normal difficulty or higher.10
- Feed the BeastDefeat the Hungering Destroyer after draining all of the large anima canisters with Volatile Ejection in Castle Nathria on Normal difficulty or higher.10
 Dirtflap's RevengeDefeat Sludgefist after he collides with pillars in Dirtflap's preferred order in Castle Nathria on Normal difficulty or higher.10
 Clear ConscienceDefeat Sire Denathrius after removing Burden of Sin from all players before March of the Penitent is cast in Castle Nathria on Normal difficulty or higher.10
- Hall of Fame: Sire Denathrius (Alliance)Among the first one hundred Alliance guilds worldwide to defeat Sire Denathrius on Mythic difficulty.Title: Famed Slayer of Denathrius
- Hall of Fame: Sire Denathrius (Horde)Among the first one hundred Horde guilds worldwide to defeat Sire Denathrius on Mythic difficulty.Title: Famed Slayer of Denathrius
- Ahead of the Curve: Sire DenathriusDefeat Sire Denathrius in Castle Nathria on Heroic difficulty or higher, before the release of the next raid tier.
- Cutting Edge: Sire DenathriusDefeat Sire Denathrius in Castle Nathria on Mythic difficulty, before the release of the next raid tier.
More Shadowlands Raids
Other raids from the same expansion.