TheWoWDB
Raid - Warlords of Draenor
Hellfire Citadel
13 encounters, 276 boss abilities and 438 drops, with the Adventure Guide’s own ability and strategy notes for each fight. Every drop links to its item page; tradeable drops carry an Auction House price.
When Garrosh encouraged Grommash to begin construction of this massive stronghold at the heart of Tanaan Jungle, to serve as a staging ground for the assault of Azeroth, he even suggested the name Hellfire, pulled from a different time and a different land. He dreamed of seeing mighty orcish iron towering over an unblighted landscape, so very different from the wasteland he had known in Outland. But even as times change, so too do they stay the same.
Quick Facts
| Type | Raid |
|---|---|
| Expansion | Warlords of Draenor |
| Encounters | 13 |
| Boss abilities | 276 |
| Drops | 438 |
| Item level | 1 to 45 |
| Tradeable drops | 1 |
| Difficulties | Looking For Raid, Normal, Heroic, Mythic |
Difficulties and Lockouts
Hellfire Citadel has 4 difficulties in the game data: Normal, Heroic, Mythic and Looking For Raid save you to a weekly lockout.
| Difficulty | Players | Level range | Lockout |
|---|---|---|---|
| Normal | 30 | 40 | Weekly |
| Heroic | 30 | 40 | Weekly |
| Mythic | 20 | 40 | Weekly |
| Looking For Raid | 30 | 40 | Weekly |
Raid Finder splits Hellfire Citadel into 5 wings:
- Hellbreach
- Halls of Blood
- Bastion of Shadows
- Destructor's Rise
- The Black Gate
Loot Table Value
1 of Hellfire Citadel’s 438 drops can be traded, but none of them are listed on any Auction House we scanned in the last pass, so there is no market price to compute yet.
3D Model
First-party render from the game files. Model © Blizzard Entertainment.
Instance Map
The Adventure Guide places 13 bosses of Hellfire Citadel on 9 maps. Numbers follow the encounter order; each links to that fight below.
Hellfire Citadel
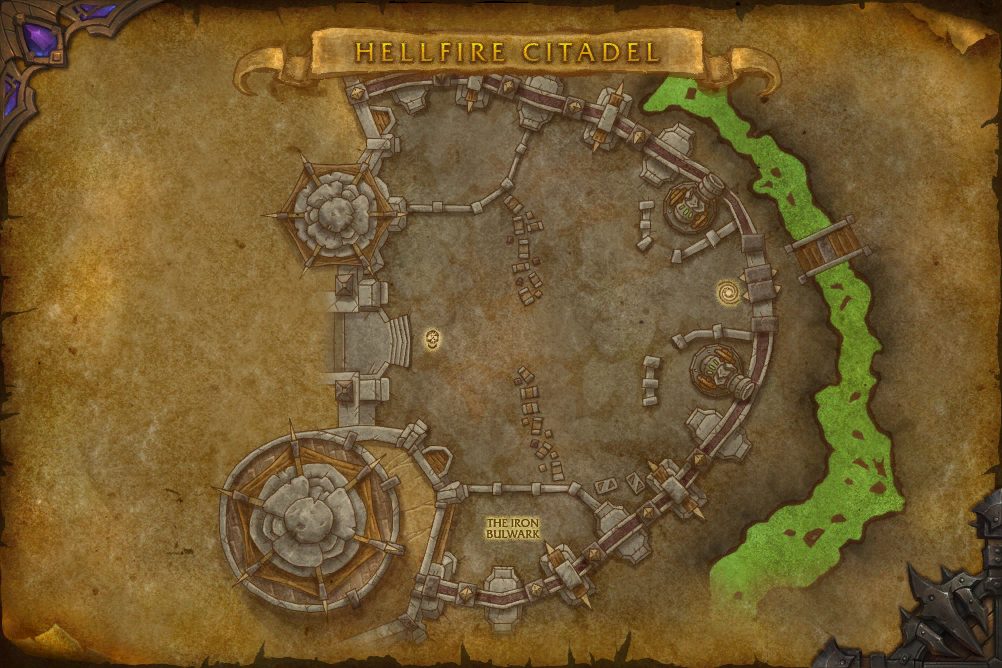 1Hellfire Assault2Iron Reaver
- 1 Hellfire Assault 61.0, 45.0
- 2 Iron Reaver 43.4, 50.6
Hellfire Citadel
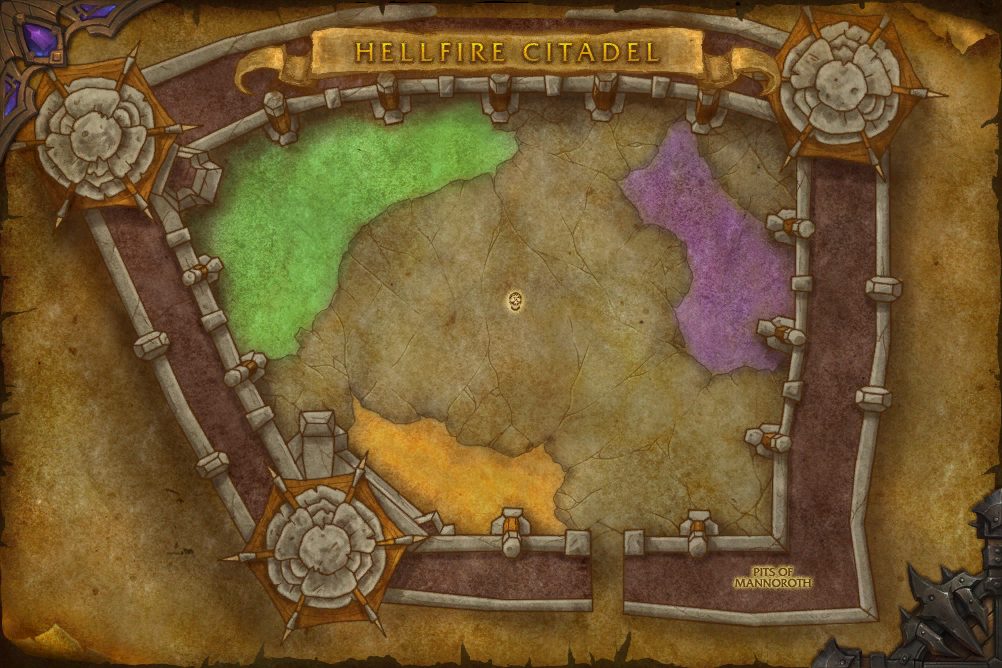 3Kormrok
- 3 Kormrok 52.2, 45.2
Hellfire Citadel
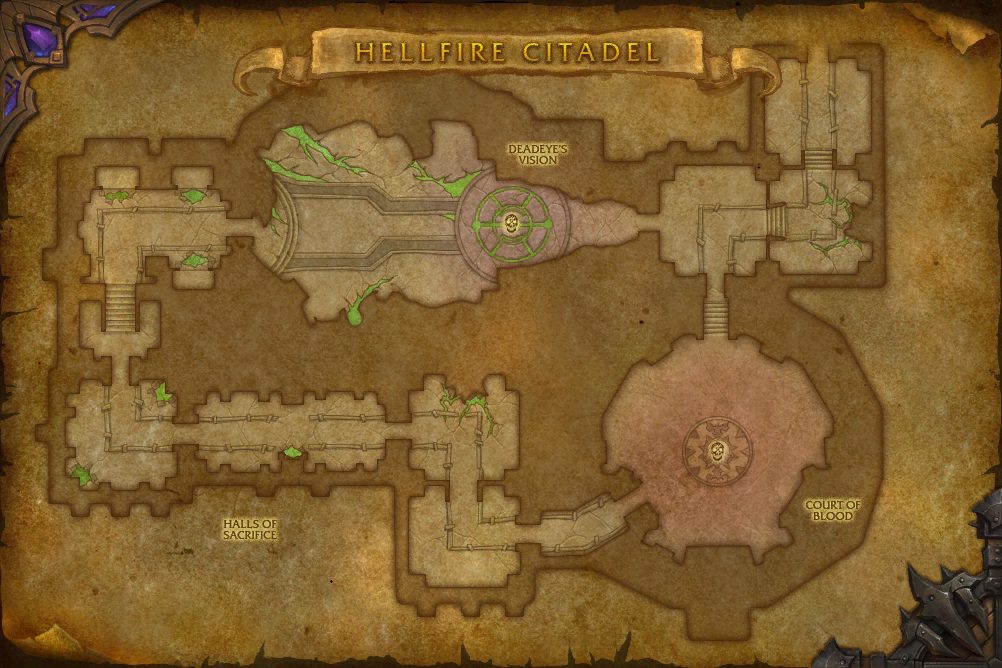 4Hellfire High Council5Kilrogg Deadeye
- 4 Hellfire High Council 71.8, 67.6
- 5 Kilrogg Deadeye 51.2, 33.5
Hellfire Citadel
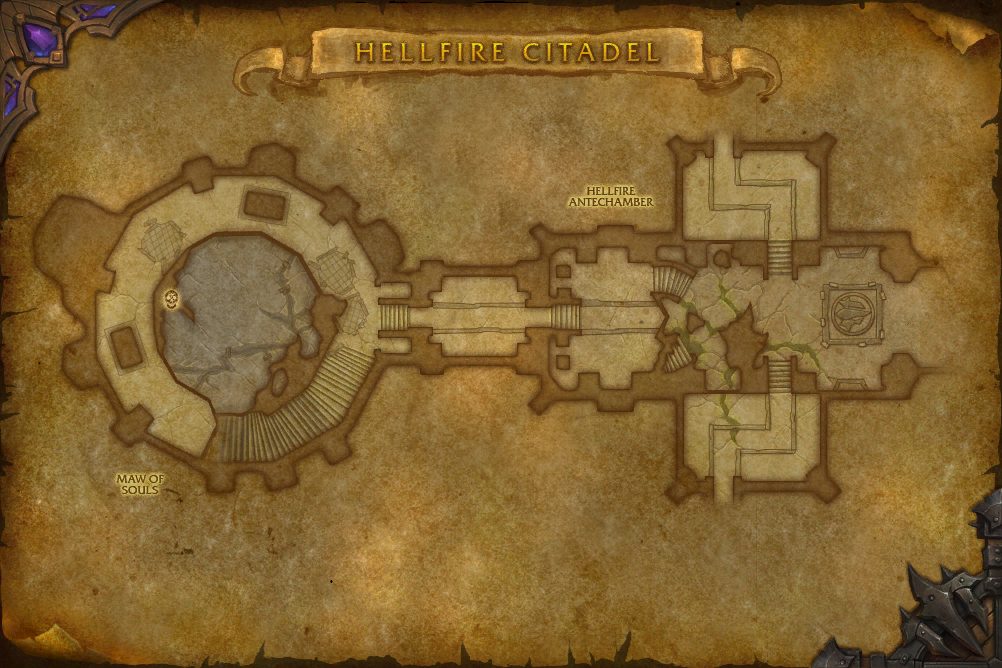 6Gorefiend
- 6 Gorefiend 17.6, 45.2
Hellfire Citadel
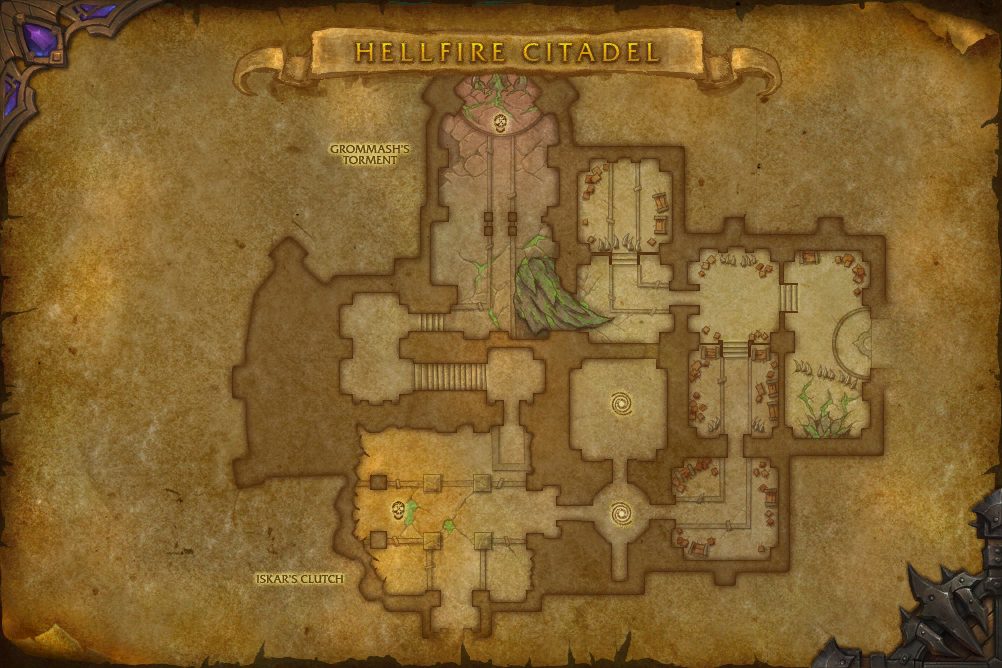 7Shadow-Lord Iskar9Fel Lord Zakuun
- 7 Shadow-Lord Iskar 40.1, 76.1
- 9 Fel Lord Zakuun 49.9, 18.3
Hellfire Citadel
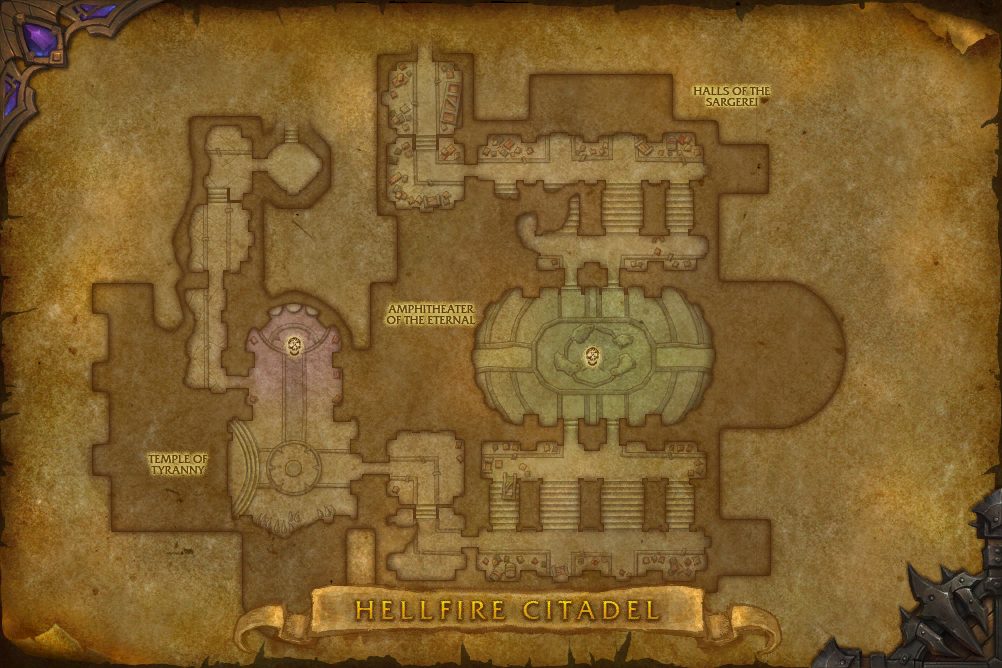 8Socrethar the Eternal11Tyrant Velhari
- 8 Socrethar the Eternal 59.5, 53.0
- 11 Tyrant Velhari 29.4, 51.5
Hellfire Citadel
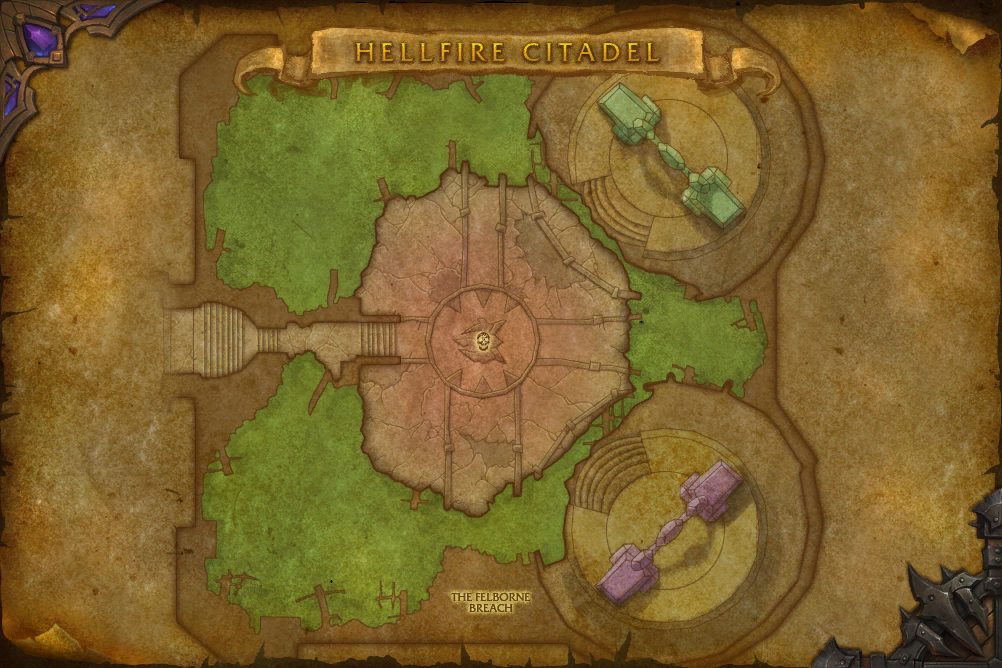 10Xhul'horac
- 10 Xhul'horac 48.4, 50.7
Hellfire Citadel
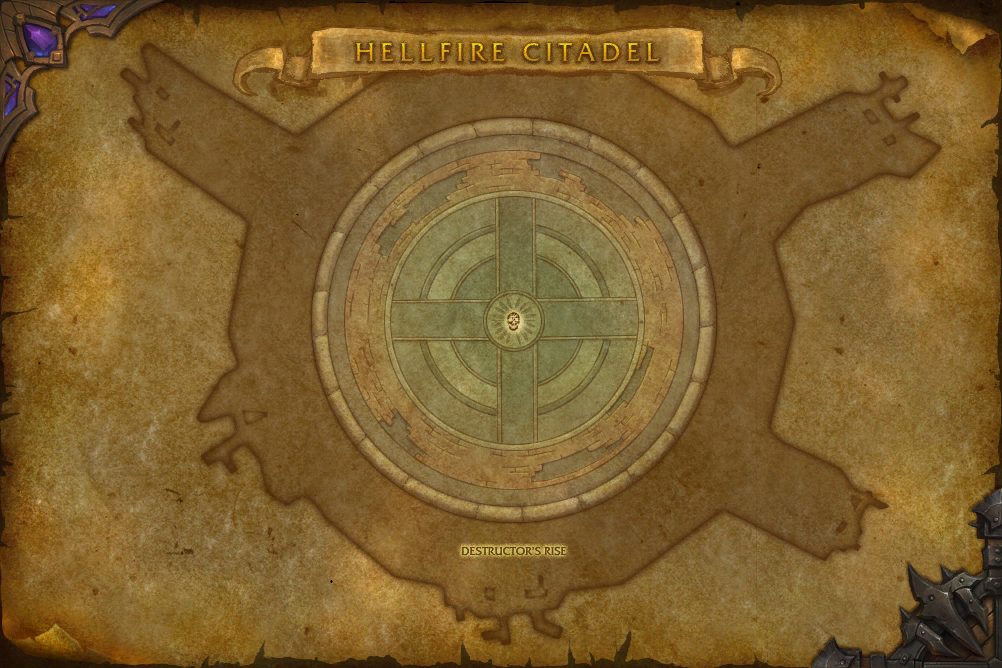 12Mannoroth
- 12 Mannoroth 51.1, 48.0
Hellfire Citadel
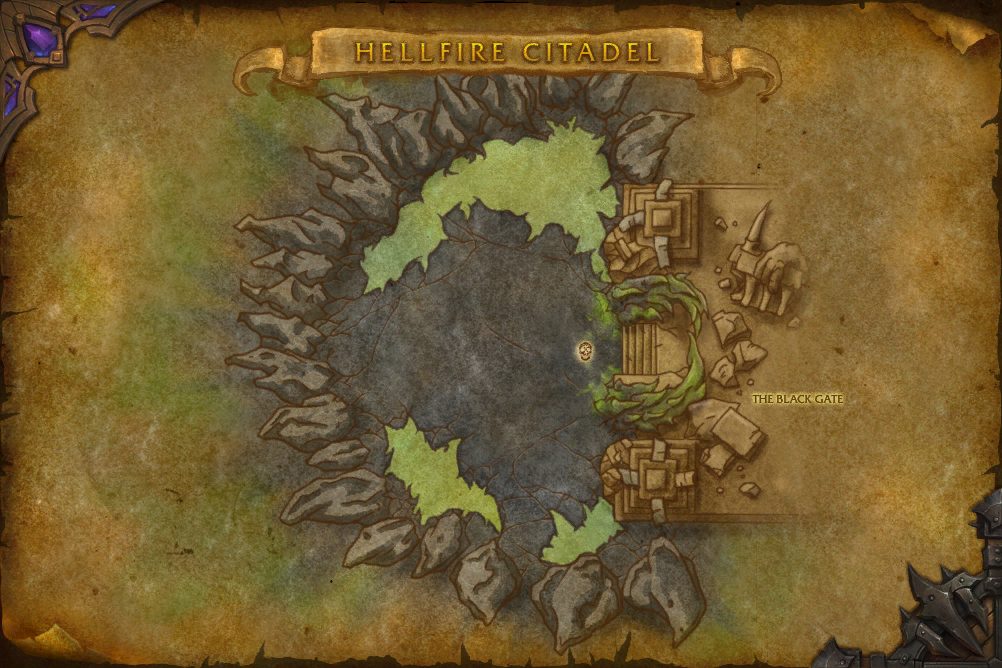 13Archimonde
- 13 Archimonde 58.4, 53.3
Encounters
LFRLooking For RaidNNormalHHeroicMMythic
Gorefiend
Falling into the heart of the mausoleum Auchindoun, the Shadow Council lieutenant Teron'gor gorged upon hundreds of draenei souls, becoming a bloated abomination in the process. More than just an orc now, Teron'gor gave up his old name and has taken a new one: Gorefiend.
Abilities & Strategy
Overview
Gorefiend devours the spirits of players who otherwise would have suffered fatal damage. When consumed, players enter Gorefiend's stomach, which is full of hostile Trapped Souls that attempt to escape into the outside world to attack the raid. While inside Gorefiend's stomach, players can damage these Souls to weaken or defeat them before they escape. Each Soul that is released or slain reduces Gorefiend's energy. When Gorefiend reaches zero energy he begins a Feast of Souls, which recharges him to begin his assault anew.
Damage Dealers
- Shadow of Death targets random players. When slain, use the opportunity to damage Trapped Souls within Gorefiend's stomach.
- If afflicted with Touch of Doom, move as far away from other players as possible.
- Move quickly towards the immobilized target if afflicted with Shared Fate
- Run into an Unstable Soul when Gorefiend performs Feast of Souls.
Healers
- Shadow of Death targets random players. When slain, fully heal Tortured Essences to free them from Gorefiend's power.
- If afflicted with Touch of Doom, move as far away from other players as possible.
- Move quickly towards the immobilized target if afflicted with Shared Fate
Tanks
- Shadow of Death targets random players. When slain, tank the Enraged Spirit within Gorefiend's stomach.
- Avoid the Enraged Spirit's Fel Fury.
- At 70% life, the Enraged Spirit escapes from the stomach and becomes a powerful Gorebound Spirit that must be tanked.
- When Gorefiend reaches 0 energy he begins a Feast of Souls.
Gorefiend
Devourer of Souls
Players who are killed are not slain outright. Instead, Gorefiend devours their souls, placing them in his stomach where they will be Digested. Players who have recently been consumed are afflicted with Gorefiend's Corruption and if they die again their soul is lost.
Corrupted Soul
When a player is slain a fragment of their soul is left behind and deeply corrupted by Gorefiend. The result is a being of pure malice, bent on consuming the living. Only when this fragment is destroyed will the player who was consumed be freed from Gorefiend's stomach.
 Digest
Spell details Gorefiend's Corruption
Spell detailsIn Mythic difficulty Gorefiend's Corruption is only removed when a player collapses an Unstable Soul.
 Gathering Darkness
Spell details Shadow of Death
Spell details Touch of Doom
Spell details Doom Well
Spell details Shared Fate
Spell details Surging Shadows
Spell details Crushing Darkness
Spell details Feast of Souls
Spell details Unstable Soul
Spell detailsIn Mythic difficulty Gorefiend's Corruption is only removed when a player collapses an Unstable Soul.
Trapped Souls
Shadowy Construct
The twisted remains of a soul walk towards the center of Gorefiend's stomach before being released and empowered.
 Gorefiend's Command
Spell detailsTortured Essence
A draenei spirit bound to Gorefiend's will. The spirit moves towards the center of the stomach where it will be fully corrupted and released. Healing the spirit to full releases it from Gorefiend's grasp.
Gorefiend's Command
Spell detailsEnraged Spirit
 Slam
 Gorebound Fortitude
Unleashed Souls
Gorebound Construct
 Hunger for Life
Spell detailsGorebound Essence
 Spirit Volley
Spell detailsGorebound Spirit
 Raging Charge
Loot
37 drops · item level 44 to 45 · 13 slots (Back, Chest, Finger, Hands, Head, Held In Off-hand +7 more) · all Bind on Pickup
 Boisterous Bellower's Hood
 Bulging Chain Vest
 Chestguard of Gnawing Desire
 Choker of Forbidden Indulgence
 Cloak of Insatiable Greed
 Cowl of a Thousand Hungers
 Deathrattle Leggings
 Demonbreaker Legplates
 Demongaze Legplates
 Deserter's Honor
 Drape of Gluttony
 Felblade Leggings
 Felfume Pantaloons
 Ferroleather Leggings
 Fetid Salivation
 Gibbering Madness
 Gloves of Great Engorgement
 Greatcloak of the Terrible Feast
 Greaves of the Ceaseless VigilIronpelt Leggings
 Leggings of the Living Mountain
 Leggings of the Savage Hunt
 Legplates of Iron Wrath
 Legwraps of the Hurricane's Eye
 Limbcarver Hatchet
 Mitts of Eternal Famishment
 Oathclaw Leggings
 Pantaloons of the Arcanic Conclave
 Pious Leggings
 Rancorbite Leggings
 Ravenous Girdle
 Serrated Demontooth Ring
 Soulcult Ritual Staff
 Soulgorged Pauldrons
 Spur of the Great Devourer
 Unending Hunger
 Voracious Souleater
Fel Lord Zakuun
Speculated by some scholars of the Legion to be an evolved version of the common felguard, Fel Lords serve as enforcers in the direct service of Archimonde. Their cruelty is matched only by their brute force. Zakuun was set to a task that called upon both of these traits in equal measure: breaking the iron will of a stubborn and defiant orc chieftain of the Warsong Clan....
Abilities & Strategy
Overview
Zakuun alternates between attacking with his axe, and flinging it to the ground to strike with his fists, modifying his abilities in the process. Throughout the encounter, Zakuun attempts to form Fel Crystals, though players may prevent this process by absorbing the energy themselves. In either case, some of Zakuun's abilities will trigger a massive explosion if they strike either a Crystal or a player with absorbed Latent Energy.
Tanks
- Stand within Rumbling Fissures to seal them when not actively tanking.
- When the Fel Lord is Disarmed or Heavily Armed, both tanks must stand together.
- Soul Cleave banishes you to the Shadow Realm, allowing you to shed your Latent Energy.
Damage Dealers
- Stand within Rumbling Fissures to seal them.
- When targeted with Seed of Destruction, aim Wake of Destruction away from any Fel Crystals.
- When Befouled, move away from your allies.
Healers
- Stand within Rumbling Fissures to seal them.
- When targeted with Seed of Destruction, aim Wake of Destruction away from any Fel Crystals.
- When Befouled, move away from your allies.
Encounter-Wide Mechanics
These mechanics are seen throughout the encounter:
 Latent Energy
Spell details Unleashed Energy
Spell detailsDestructive Forces
Some of the Fel Lord's abilities will trigger an explosion if they strike a player who has Latent Energy.
 Wake of Destruction
Spell details Ring of Destruction
Spell detailsFissures and Crystals
Zakuun creates Rumbling Fissures on the ground nearby. If a Rumbling Fissure is not absorbed by standing within it, it forms a Fel Crystal.
 Rumbling Fissure
Spell detailsThe last Rumbling Fissure present after any others have been absorbed will immediately transform into a Fel Crystal.
 Fel Crystal
Spell detailsArmed
At the beginning of the fight Zakuun is armed with his axe. While Armed, Zakuun swings slowly and hits a single target with his melee attacks.
 Soul Cleave
Spell detailsOnly the primary target is afflicted with Cloven Soul; but all targets hit by Soul Cleave are Disembodied.
 Disembodied
Spell detailsOn Heroic and Mythic Difficulties, when the victim re-enters the Mortal Realm, Wakes of Destruction are unleashed. On Mythic Difficulty, players who had Latent Energy while Disembodied gain Exhausted Soul after Disembodied ends.
 Cloven Soul
Spell detailsResidual Energy
Residual Energy is left behind whenever a player leaves the Shadow Realm and will continually fire either Wakes of Destruction or Rings of Destruction.
 Cavitation
Spell details Befouled
Spell detailsFoul Explosion
Spell detailsDisarmed
Zakuun hurls his axe at the target location, where it lodges in the floor and damages the raid with Fel Explosions. While Disarmed, Zakuun attacks with both fists, is Heavy Handed, and gains 30% haste.
 Heavy Handed
 Seed of Destruction
 Enrage
Spell details Heavily Armed
Spell detailsLoot
27 drops · item level 44 to 45 · 13 slots (Back, Chest, Feet, Finger, Hands, Head +7 more) · all Bind on Pickup
 Befouled Demonhide Belt
 Bindings of Imminent Fury
 Bloodcrystal Chaincloak
 Bloody Dagger-Heeled Pumps
 Brittleskin Wraps
 Chain of Agonizing Woe
 Chain of Lidless Eyes
 Choker of Whispered Promises
 Cloak of Hideous Unity
 Demonblade Eviscerator
 Discordant Chorus
 Gaze of Superiority
 Girdle of the Legion General
 HellrenderImp-Infested Legplates
 Ironblade KnucklesLeggings of Eternal TerrorLegguards of Grievous Consonances
 Manacles of the Demon General
 Manacles of the MultitudesMindscythe of the Legion
 Ringmail of Madness Accordant
 Sash of Unending Anguish
 Voidswirling Throat-Globe
 Withering Waistwrap
 Zakuun's Signet of Command
 Zakuun's Smoldering Seal
Kormrok
As ancient as Draenor itself, Kormrok once ruled Gorgrond, the creatures of the land slinking away from the giant magnaron's destructive fury. But then the Iron Horde came, trapping the behemoth and attempting to break his will. They were entirely unsuccessful... that is, until the rise of Gul'dan, and the fel power that Kormrok could not resist.
Abilities & Strategy
Overview
Kormrok periodically jumps to the nearest fel pool of energy, empowering one of his abilities for a short duration depending on which pool he entered.
Tanks
Healers
- Pound inflicts heavy damage to the entire raid, compounded if players do not spread out.
- Move away from any tanks affected by Fiery Burst.
- Trigger Fiery Runes before they explode.
Damage Dealers
- Kill Crushing Hands as quickly as possible.
- Run away from any tanks affected by Fiery Burst.
- Trigger Fiery Runes before they explode.
- Spread out during Pound.
 Leap
Spell detailsOn Mythic Difficulty, residue is sent out from the pool that Kormrok jumped into.
 Shadow Energy
 Explosive Energy
 Foul Energy
 Splash
 Pound
Spell details Fel Outpouring
Spell detailsWhen empowered, this abiliity causes all three pools to send out globules.
 Explosive Runes
Spell detailsWhen empowered, triggering the rune causes it to try and reform nearby. Explosive Runes will not reform on top of an existing Explosive Rune, nor will they reform if they are the last Explosive Rune active.
 Grasping Hands
Spell detailsWhen empowered, Dragging Hands that pull players toward the closest pool are summoned instead.
Mutating Hatred
Kormrok will use different abilities against his current tank target based on the last pool he leapt into. Getting hit with any of these abilities afflicts the victim with Fel Touch.
 Swat
 Explosive Burst
 Enrage
Spell detailsLoot
39 drops · item level 44 to 45 · 12 slots (Back, Chest, Finger, Hands, Head, Legs +6 more) · all Bind on Pickup
 Chestplate of Potential Energy
 Cowl of the Arcanic Conclave
 Craggy Gloves of Grasping
 Crown of the Living MountainDeathrattle MaskDemonbreaker Helm
 Demongaze Helm
 Faceguard of Iron Wrath
 Felblade Hood
 Felfume Hood
 Fel-Inscribed ShoulderplatesFerroleather Hood
 Fragmented Runestone Etching
 Glowing Firestone
 Glowing String of PebblesGoop-Proof Gloves
 Helm of the Ceaseless Vigil
 Hood of the Savage Hunt
 Imbued Stone SigilIndustrial Lifting BeltIronpelt Helm
 Mask of the Hurricane's Eye
 Oathclaw Helm
 Pious Cowl
 Pit-Extracted Stone SignetPolymorphic Cloak of Absorption
 Rancorbite Hood
 Rugged Stoneshaped Pauldrons
 Rumbling Pebble
 Runeaxe of the Breaker
 Rune-Infused Spear
 Runic Magnaron Tooth
 Shadowgorged Iron Choker
 Sigil-Stitched DrapeSludge-Resistant Waders
 Sludge-Soaked WaistbandSplashcover Cloak
 Stone Runeband
 Tunic of Reformative Runes
Tyrant Velhari
When Gul'dan brought his gift to the Sargerei, Velhari had already made her ambitions clear and risen through the ranks with brutal ferocity. Known to her enemies as the Tyrant, Velhari was one of the first to accept the fel touch, further enhancing her combat prowess. Velhari now bears a mockery of the holy symbol of the Naaru, signifying her conviction to the new order.
Abilities & Strategy
Overview
Tyrant Velhari begins the fight with Aura of Oppression. When she loses 10% of her health, Velhari calls forth an Ancient Enforcer to assist her in combat. At 70% health, Velhari switches her active aura to Aura of Contempt. When she loses 10% of her health, Velhari calls forth an Ancient Harbinger to restore her health. At 40% health, Velhari once more switches her active aura to Aura of Malice. When she loses 10% of her health, Velhari calls forth an Ancient Sovereign to bolster her defenses. In Mythic difficulty, each aura persists but decreases in strength when the corresponding phase ends.
Damage Dealers
- Quickly defeat the Ancients called in to assist Velhari.
- Stand near players afflicted with Edict of Condemnation to reduce the damage each individual suffers.
Healers
- Touch of Harm places a large heal absorb on a player. Heal the player to remove it, dispelling if that player's health gets low.
- Stand near players afflicted with Edict of Condemnation to reduce the damage each individual suffers.
Tanks
- Seal of Decay can quickly stack in effect. Avoid allowing it to accumulate too much.
- Stand near players afflicted with Edict of Condemnation to reduce the damage each individual suffers.
 Edict of Condemnation
Spell detailsIn Mythic difficulty, Edict of Condemnation reduces the movement speed of the target by 70%.
Touch of Harm
Spell detailsIn Mythic difficulty, Touch of Harm inflicts 15% of the target's current health as Shadow damage every 2 sec.
 Seal of Decay
Spell detailsStage One: Oppression
 Aura of Oppression
Spell detailsIn Mythic difficulty, this aura persists but decreases in strength when the phase ends.
 Annihilating Strike
Spell details Searing Blaze
Spell details Infernal Tempest
Spell detailsSearing Blaze
Spell detailsAncient Enforcer
At 90% health, Tyrant Velhari calls forth an Ancient Enforcer to assist her in combat.
 Thunderous Crash
Spell details Enforcer's Onslaught
Spell detailsStage Two: Contempt
 Aura of Contempt
Spell detailsIn Mythic difficulty, this aura persists but decreases in strength when the phase ends.
 Tainted Shadows
Spell detailsCorrupted Blast
Spell details Font of Corruption
Spell detailsAncient Harbinger
At 60% health, Tyrant Velhari calls forth an Ancient Harbinger to assist her in combat.
 Harbinger's Mending
Stage Three: Malice
 Aura of Malice
Spell details Bulwark of the Tyrant
Spell details Despoiled Ground
Spell details Gavel of the Tyrant
Spell detailsAncient Sovereign
At 30% health, Tyrant Velhari calls forth an Ancient Sovereign to assist her in combat.
Thunderous Crash
Spell details Sovereign's Ward
Spell detailsLoot
26 drops · item level 44 to 45 · 12 slots (Back, Chest, Feet, Finger, Hands, Legs +6 more) · all Bind on Pickup
 Accusation of Inferiority
 Choker of Sneering Superiority
 Contemptuous Wristguards
 Demonbreaker Gauntlets
 Fallen Defender of ArgusFelfume Gloves
 Gauntlets of DerisionHarbinger's Desecrated Chain ShirtHaughty Chain Legguards
 Impertinent Student's CloakIronpelt Mitts
 Loathful Encrusted Band
 Malicious Censer
 Mantle of Unrestrained Contempt
 Maul of Tyranny
 Oppressor's Merciless Treads
 Pauldrons of Contempt
 Pompous Ceremonial Ring
 Rancorbite Grips
 Satin Gloves of Injustice
 Spiked Gnarlroot Greatclub
 Spiked Throatcrusher Boots
 Thorny Choker of Suffering
 Tyrant's DecreeWarhammer of Arrogance
 Willbreaker Brooch
Mannoroth
Bloodthirsty and brutal, Mannoroth was Archimonde's most feared enforcer, until he was felled by a mighty blow from Grommash's blade. Even in death, his blood was used by Gul'dan to fuel a dark bargain with the Iron Horde and their allies. Gul'dan and his minions now seek to reanimate the shattered remains of Mannoroth, that he may continue to serve the Legion.
Abilities & Strategy
Overview
Players initially face a set of Fel Iron Summoners that call servants of the Legion into Draenor. After their defeat, Gul'dan resurrects Mannoroth. When Mannoroth reaches 65% and 30% health, Gul'dan overcharges the Fel Spires to further empower the pit lord. In Mythic difficulty, Gul'dan reclaims the Fel power from the Fel Iron Summoners to resurrect Mannoroth, keeping the Doom Lord's Fel Spire intact.
Damage Dealers
- Avoid triggering Mark of Doom while standing near your allies.
- Once Mannoroth is resurrected, group up for Mannoroth's Gaze.
- When Mannoroth is at full strength, avoid being pushed off by Shadowforce.
- After Gul'dan fully empowers Mannoroth, avoid damage from the Empowered Fel Hellstorm.
Healers
- Avoid triggering Mark of Doom while standing near your allies.
- Once Mannoroth is resurrected, group up for Mannoroth's Gaze and prepare to dispel it when appropriate.
- When Mannoroth is at full strength, heal allies being pushed off by Shadowforce.
- After Gul'dan fully empowers Mannoroth, avoid damage from the Empowered Fel Hellstorm.
Tanks
- During the initial phase, only Doom Lords need to be tanked.
- Once Mannoroth is resurrected be prepared forGlaive Combo.
- When Mannoroth is at full strength, avoid the Fel Hellstorm.
- After Gul'dan fully empowers Mannoroth, avoid damage from the Empowered Fel Hellstorm.
Stage One: The Legion's Might
Fel Iron Summoners leverage the power of the Fel Spires and unleash the Legion into this world. In Mythic difficulty, Gul'dan reclaims the Fel power from the Fel Iron Summoners to resurrect Mannoroth, keeping the Doom Lord's Fel Spire intact.
 Curse of the Legion
Spell detailsDoom Lord
Doom Lords are created when the Curse of the Legion expires or is dispelled.
 Fel Imp-losion
Spell detailsFel Imp
Fel Imps are created at the location of the Fel Imp-losion's impact.
 Inferno
Spell detailsDread Infernal
Dread Infernals are created at the location of the Inferno's impact.
Stage Two: The Resurrection
Gul'dan harnesses the power of a Fel Spire to resurrect Mannoroth, destroying the Fel Spire and closing the portal to the Doom Lords.
Curse of the Legion
Spell detailsDoom Lord
Doom Lords are created when the Curse of the Legion expires or is dispelled.
Fel Imp-losion
Spell detailsFel Imp
Fel Imps are created at the location of the Fel Imp-losion's impact.
Inferno
Spell detailsDread Infernal
Dread Infernals are created at the location of the Inferno's impact.
Mannoroth
A weakened Mannoroth, resurrected by Gul'dan.
 Glaive Combo
Spell details Fel Hellstorm
Spell details Mannoroth's Gaze
Spell detailsFelseeker
Spell detailsStage Three: True Power
Gul'dan harnesses the power of a Fel Spire to return Mannoroth to his true form, destroying the Fel Spire and closing the portal to the Fel Imps.
Inferno
Spell detailsDread Infernal
Dread Infernals are created at the location of the Inferno's impact.
Fel Imp-losion
Spell detailsFel Imp
Fel Imps are created at the location of the Fel Imp-losion's impact.
Curse of the Legion
Spell detailsDoom Lord
Doom Lords are created when the Curse of the Legion expires or is dispelled.
Mannoroth
Mannoroth returned to his true form.
 Shadowforce
Spell detailsGlaive Combo
Spell detailsFel Hellstorm
Spell detailsMannoroth's Gaze
Spell detailsFelseeker
Spell details Wrath of Gul'dan
Spell details Gripping Shadows
Spell detailsStage Four: EMPOWERMENT!
Gul'dan harnesses the power of a Fel Spire to Empower Mannoroth, destroying the Fel Spire and closing the portal to the Dread Infernals.
Fel Imp-losion
Spell detailsFel Imp
Fel Imps are created at the location of the Fel Imp-losion's impact.
Mannoroth
Mannoroth has been Empowered beyond comprehension!
Empowered Shadowforce
Spell detailsEmpowered Glaive Combo
Spell detailsEmpowered Fel Hellstorm
Spell details Empowered Mannoroth's Gaze
Spell detailsEmpowered Felseeker
Spell detailsWrath of Gul'dan
Spell detailsGripping Shadows
Spell detailsLoot
38 drops · item level 44 to 45 · 15 slots (Back, Chest, Feet, Finger, Head, Held In Off-hand +9 more) · all Bind on Pickup
 Annihilan's Waistplate
 Bracers of Fel Empowerment
 Breastplate of Iron Wrath
 Cloak of Tangible Dread
 Cuirass of the Ceaseless Vigil
 Cursed Demonbone Longbow
 Deathrattle Robe
 Demonbreaker Pauldrons
 Demonforged Iron Bracers
 Demongaze Chestplate
 Empowered Demonskin Kilt
 Empty Drinking Horn
 Fang of the PitFelblade ChestguardFelfume MantleFel-Light Lantern
 Ferroleather Chestguard
 Hauberk of the Savage Hunt
 Hellstorm Sabatons
 Ironpelt Pauldrons
 Irontalon StaffLeggings of the Iron SummonerLeggings of Wasted Flesh
 Locket of Unholy Reconstitution
 Mannoroth's Calcified Eye
 Mark of the DestructorOathclaw Vestment
 Pious RaimentPit Lord's Cowl
 Prophecy of Fear
 Rancorbite Spaulders
 Robe of the Arcanic Conclave
 Robe of the Hurricane's Eye
 Robe of the Living Mountain
 Serrated Bloodritual Dagger
 Snarlwood Recurve Bow
 Thumping Demonheart Fetish
 Xu'tenash, Glaive of Ruin
Kilrogg Deadeye
Kilrogg Deadeye, Warlord of the Bleeding Hollow, seized control of his clan after performing a ritual to learn of his death. With this knowledge, he led his clan fearlessly on countless campaigns, marching toward the glorious end he desires. Now, with demon blood coursing through his veins, Kilrogg awaits you in Hellfire Citadel, awaiting the moment of his death, or yours.
Abilities & Strategy
Overview
Kilrogg's Visions of Death transports players to the moment of their doom. The more demons a player kills during this phase, the greater stacks of Undying Resolve they receive. Failure to send anyone to this phase results in heavy raid damage. As the fight progresses, Kilrogg calls for his clansmen to drink the fel blood within the chamber. If these Salivating Bloodthirsters reach the blood, they transform into Hulking Terrors.
Damage Dealers
- Blood Globules that reach Kilrogg Deadeye damage the raid.
- Fel Blood Globules that reach Kilrogg damage the raid and heal Kilrogg.
- Enter Visions of Death and kill demons to gain stacks of Undying Resolve.
- Kill Salivating Bloodthirsters before they reach the blood pool.
- Interrupt the Hulking Terror's Rending Howl.
Healers
- Heal players affected by Heart Seeker to keep them alive.
- Death Throes pulses damage to the raid.
- Enter Visions of Death and heal allies. Each demon killed grants stacks of Undying Salvation.
Tanks
- Prevent Hulking Terrors from dying next to allies.
- Take turns tanking Hulking Terrors to control your level of Fel Corruption and avoid losing control to Demonic Possession.
- Use Active Mitigation defensive abilities to counter Shred or else suffer from Shredded Armor.
Kilrogg Deadeye
Fel Corruption
Throughout the fight, Fel Corruption is inflicted onto the raid. As Fel Corruption increases on a target, it inflicts increasing damage over time. At 100 Fel Corruption, the target is dominated by the Burning Legion.
 Demonic Possession
Spell details Shred Armor
Spell details Heart Seeker
Spell detailsIn Mythic difficulty, as the fight progresses Kilrogg picks multiple targets for Heart Seeker. Also, the Heart Seeker debuff will last the duration of the encounter.
 Blood Splatter
Spell detailsBlood Globule
Summoned next to a player affected by Heart Seeker. Immediately begins making its way towards Kilrogg.
Fel Blood Globule
Summoned next to a player affected by Heart Seeker who is covered in Fel Blood. Immediately begins making its way towards Kilrogg.
Death Throes
Spell detailsIn Mythic difficulty, Death Throes inflicts Fel Corruption onto the raid.
Death's Door
Spell details Vision of Death
Spell details Undying Resolve
 Cleansing Aura
Salivating Bloodthirster
Immediately starts running for the blood pool when summoned.
Hulking Terror
Salivating Bloodthirsters transform into these terrors if they reach the blood pool.
 Savage Strikes
Spell details Fel Claws
Spell details Rending Howl
Spell details Fel Rupture
Spell detailsIn Mythic difficulty, Fel Rupture leaves behind a Fel Puddle. Fel Puddles that have not been removed summon Fel Blood Globules during Death Throes.
 Fel Puddle
Spell detailsHellblaze Imp
The footsoldier of the Burning Legion, encountered during Visions of Death.
 Fel Blaze
Spell detailsHellblaze Fiend
The brute of the Burning Legion, encountered during Visions of Death.
Fel Flames
Spell detailsHellblaze Mistress
The elite of the Burning Legion, encountered during Visions of Death.
 Cinder Breath
Spell detailsLoot
33 drops · item level 1 to 45 · 13 slots (Back, Chest, Feet, Finger, Hands, Head +7 more) · all Bind on Pickup
Ancient Gorestained Wrap Balanced MacheteBand of Impending Doom
 Bite of the Bleeding Hollow
 Bloodcult Bracers
 Bloodsurge Bracers
 Boots of Final Salvation
 Cinch of the Bleeding Hollow
 Congealed Globule Loop
 Crimson Throatgrabbers
 Demonhorn Spike
 Fallen Warlord's Mindcarver
 Goresoaked Ritual Robes
 Heartseeking Skull PendantHelm of PrecognitionHollowheart Helm
 Intuition's GiftJungle Flayer's ChestguardPauldrons of Perceived DepthsPauldrons of Rapid Coagulation
 Pendant of PrecognitionRibwrencher Gauntlets
 Ring of Fortuitous ForesightRuinous Gutripper
 Sandals of Sanguine SupplicationShawl of Sanguinary Ritual
 Stompers of Brazen Terror
 Teardrop of Blood
 Toxicologist's Treated Boots
 Velvet Bloodweaver Gloves
 Vial of Vile Viscera
 Warlord's Unseeing Eye
 Illusion: Mark of the Bleeding Hollow
Iron Reaver
The schematics for the Iron Reaver were found in the workshop of Blackfuse himself after the fall of Orgrimmar, drawing inspiration from the mighty constructs of the Legion and designed to be the nefarious goblin's masterwork. The project was completed after his death, and represents the pinnacle of the Iron Horde's military might.
Abilities & Strategy
Overview
Before reaching full power, the Iron Reaver fights enemies on the ground, leveraging her size and technological superiority against opponents. Upon reaching full power, the Iron Reaver takes to the skies. While flying, the Reaver takes 95% reduced damage and has access to an arsenal of new devastating abilities.
Tanks
- When the Iron Reaver marks you for Artillery, move away from other raid members before the Reaver finishes locking on.
Healers
- Pounding inflicts high raid-wide damage.
- Spread out to reduce the chance that Unstable Orb damages multiple allies.
Damage Dealers
- Spread out to reduce the chance that Unstable Orb damages multiple allies.
- When the Iron Reaver marks you for Artillery, move away from other raid members before the Reaver finishes locking on.
Ground Operation
Before reaching full power, the Iron Reaver fights enemies on the ground, leveraging her size and technological superiority against opponents.
Immolation
Spell details Artillery
Spell details Unstable Orb
Spell detailsBarrage
Spell detailsPounding
Spell details Blitz
Spell details Firebomb
Spell details Volatile Firebomb
Spell detailsAir Operation
Upon reaching full power, the Iron Reaver takes to the skies. While flying, the Reaver takes 95% reduced damage and has access to an arsenal of new devastating abilities.
Immolation
Spell detailsArtillery
Spell detailsFirebomb
Spell detailsVolatile Firebomb
Spell details Quick-Fuse Firebomb
Spell detailsBurning Firebomb
Spell details Reactive Firebomb
Spell detailsReinforced Firebomb
Spell details Fuel Streak
Spell details Flash Fire
Spell detailsFalling Slam
Spell details Energized Fist
Spell detailsLoot
29 drops · item level 44 to 45 · 13 slots (Back, Chest, Feet, Finger, Hands, Legs +7 more) · all Bind on Pickup
Assembly Worker's Legguards Commander's Seat Cushion Cover
 Crackling Fel-Spark Plug
 Demonhorn Buckler
 Die-Cast Ringmail SabatonsDouble-Padded SlippersDouble-Polished Chain Pauldrons
 Felforged Aegis
 Fel-Spring CoilFel-Steamed Leather Tunic
 Flanged Gasket
 Hot-Rolled Iron Bracers
 Insulated Wirer's Gloves
 Iron Reaver Piston
 Iron SkullcrusherIronthread GreatcloakLiquid-Cooled Mantle
 Pedal-Pushing Sandals
 Pilot's PauldronsPulley Chain WristwrapsRivet-Studded LeggingsRoughly Soldered WristclampsShrapnel-Studded Boots
 Spiked Irontoe Slippers
 Spiked Torque WrenchStamped Felsteel Chestplate
 Torch-Brazed Waistguard
 Unfired Ejection Parachute
 Voltage Regulation Diode
Hellfire Assault
With the aid of the mercenary Blackfuse company, the Iron Horde constructed devastating siege machinery in the shadow of Hellfire Citadel, to be used in the eventual assault upon Azeroth's capitals. With the tanks now retrofitted to use fel energy, Siegemaster Mar'tak awaits Gul'dan's command to begin the assault.
Abilities & Strategy
Overview
Players attempt to turn the massive Hellfire Cannons in the Citadel's courtyard against the mighty gate of the Citadel, while fending off Siegemaster Mar'tak and her militarized force. Throughout the encounter, waves of enemies rush at the players, periodically accompanied by huge siege weapons that seek to destroy the Cannons and the players defending them. Destroying these siege weapons allows players to salvage Felfire Munitions, which may be brought to the Hellfire Cannon, allowing it to continuously fire Hellfire Rounds at the Reinforced Hellfire Door. Once players successfully breach the Reinforced Hellfire Door, Siegemaster Mar'tak's forces retreat into the Citadel.
Damage Dealers
- Quickly defeat Gorebound Felcasters after they use Metamorphosis to become a Gorebound Terror.
- Defeat Fel-Infused Siege Weapons to keep the Hellfire Cannons alive.
Healers
- Felfire Volley inflicts high raid-wide damage after Metamorphosis.
Tanks
- Be ready to grab the attention of any Hellfire Reinforcements.
- Slam stacks increase Physical damage taken, so be wary when tanking multiple enemies and a Hulking Berserker.
Hellfire Cannon
Upon starting the encounter, players commandeer both Hellfire Cannons. Siegemaster Mar'tak's forces continually pour forth from Hellfire Citadel to prevent players from capitalizing on possession of these cannons. Based on available Felfire Munition reserves, the Hellfire Cannon will continuously fire at the Reinforced Hellfire Door.
Felfire Munitions
Felfire-Imbued Siege Vehicles carry Felfire Munitions into battle. Upon death, the Felfire Munitions drop to the ground, allowing a player to pick it up. The Felfire Munitions despawn if not picked up within 10 min. Upon being picked up, a player gains Haste, increasing movement speed for 9 sec.
Siegemaster Mar'tak
 Shockwave
 Inspiring Presence
Hellfire Reinforcements
Iron Dragoon
This hardened melee enemy wields a sharpened polearm and is at the beck and call of Siegemaster Mar'tak.
Hulking Berserker
 Slam
Spell detailsCower!
Spell detailsGorebound Felcaster
 Metamorphosis
Contracted Engineer
 Repair
 Conducted Shock Pulse
 Boom
Grand Corruptor U'rogg
 Corruption Nova
 Corruption Bolt
 Corruption Siphon
Grute
Felfire-Imbued Siege Vehicles
Felfire Crusher
 Bore
Spell details Burn
Spell detailsFelfire Flamebelcher
 Belch Flame
Spell detailsFelfire Artillery
 Artillery Blast
Spell detailsFelfire Demolisher
 Siege Nova
Spell detailsFelfire Transporter
 Call to Arms!
Spell detailsLoot
32 drops · item level 44 to 45 · 15 slots (Back, Chest, Feet, Finger, Hands, Head +9 more) · all Bind on Pickup
Blackfuse Company Tool Belt Blackfuse Company Utility KnifeBlastproof Legguards
 Bolt-Latched Felsteel Gorget
 Engine-Kicking Boots
 Faulty Detonator Cord
 Felfire Munitions LauncherFelgrease-Smudged Robes
 Fel Iron Roller ChainFel Mechanic's Sparkguard Bracers
 Flamebelcher's Insulated MittsFlickering FelsparkForward Observer's Camouflage Cloak
 Gorebound Wristguards
 Hand Loader Gauntlets
 Hand-Welded GorgetIron Dragoon's CoifIron Dragoon's PantaloonsIronspike Knuckled GauntletsManacles of Enforced LaborMar'tak's Rugged Seal
 Pledge of Iron Loyalty
 Powder-Singed Bracers
 Rangefinder's Spaulders
 Shell-Resistant StompersSiegesmith's Chain LeggingsSmoldercore Bulwark
 Snub-Nosed Iron Rifle
 Sootstained Felsworn SignetSooty Felcult RobesSparkburnt Welder's CloakWicked Bonecarver's Knife
Socrethar the Eternal
The greatest warriors of the draenei have their souls imbued into gleaming constructs, serving as eternal Vigilants in defense of their people. Originally a member of the Council of Exarchs before his descent into darkness, Socrethar has perverted this holiest of rituals, and used a warped fel construct to preserve his soul after his defeat in Talador.
Abilities & Strategy
Overview
Socrethar begins the encounter occupying the Soulbound Construct. When players deplete the Soulbound Construct's health, Socrethar's spirit will be ejected from the construct, and a player can take control of it. The Sargerei then stream into the chamber, and together with Socrethar attempt to regain control of the Construct. When the Construct's health is depleted when controlled by a player, they are ejected and Socrethar regains control, beginning the cycle again. Players must destroy Socrethar's soul to complete the encounter.
Damage Dealers
- Raid members must take turns absorbing Shattered Defenses to keep the tanks from suffering fatal damage.
- Interrupt Exert Dominance to prolong the period of time that your tank is able to control the Construct.
- Do not let Haunting Souls reach their targets.
Healers
- Raid members must take turns absorbing Shattered Defenses to keep the tanks from suffering fatal damage.
- Apocalypse deals heavy damage to the raid.
- Run away from Haunting Souls who are fixated on you.
Tanks
- Alternate who is tanking the Soulbound Construct to prevent Shattered Defenses from stacking too high.
- One tank should take control of the Construct when Socrethar is ejected.
- When controlling the construct, avoid Soul Dispersion by staying away from Haunting Souls.
Soulbound Construct
Reverberating Blow
Spell detailsOn Mythic Difficulty, inflicts 6 stacks of Shattered Defenses.
 Shattered Defenses
Spell details Fel Prison
Spell details Volatile Fel Orb
Spell details Felblaze Charge
Spell details Apocalyptic Felburst
Spell details Overwhelming Power
Spell details Incomplete Binding
Spell detailsVoracious Soulstalker
The results of Sagerei's demon-twisted experiments on souls, Voracious Soulstalkers periodically join the battle.
Eternal Hunger
Spell detailsDevour
Spell details Blooded Tracker
Spell details Soul Regeneration
Spell details Socrethar's Contingency
Spell detailsSocrethar and the Sargerei
Once Socrethar is ejected from the construct, players can take control of it. The Sargerei join the battle in attempt to wrest control of the Construct back from the raid.
Socrethar
Exert Dominance
Spell details Apocalypse
Spell detailsSargerei Dominator
 Fel Barrier
Spell details Gift of the Man'ari
Spell detailsSargerei Shadowcaller
 Shadow Word: Agony
Spell details Shadow Bolt Volley
Spell detailsHaunting Soul
 Virulent Haunt
 Ghastly Fixation
Loot
39 drops · item level 44 to 45 · 13 slots (Back, Chest, Finger, Hands, Head, Neck +7 more) · all Bind on Pickup
Automated ShoulderplatesCasque of Foul Concentration Chain Wristguards of the StrickenConstructbreaker's Chestguard
 Contained Fel Orb LocketCrystal-Buckle BeltDeathrattle Gloves
 Decaying Draenic ShieldDemongaze Gauntlets
 Demonic PhylacteryDrape of Beckoned Souls
 Felblade Gloves
 Felcrystal Impaler
 Felgore Double Blade
 Felstricken Sha'tari CrystalswordFerroleather Gloves
 Fistwraps of the Hurricane's EyeGauntlets of Iron WrathGauntlets of the Ceaseless VigilGauntlets of the Living MountainGirdle of Bound AgonyGloves of the Arcanic ConclaveGloves of the Savage Hunt
 Haunting Nightmare CloakHood of Unhealthy Fixation
 Howling Soul GemOathclaw GauntletsPious HandwrapsPristine Man'ari CuffsSaber of Twisted Virtue
 Seal of the Traitorous CouncilorShoulderpads of Wrought DestructionSocrethar's Ceremonial CuffsSoulbinder's Greatcloak
 Soul Capacitor
 Soulwarped Tower Shield
 Tenacious Dominator's Gorget
 Toxin-Tipped Bolt Launcher
 Tunic of the Soulbinder
Hellfire High Council
Thousands of Iron Horde orcs accepted the blood of Mannoroth, but few grew as powerful as these three champions. Dia Darkwhisper, master of Void magic and an outcast of the Shadowmoon, rose quickly to power as the left hand of Gul'dan. Gurtogg, with his insatiable hunger for blood, emerged the victor in hundreds of trials by combat. He has met his match only once, fighting Blademaster Jubei'thos to a draw. Tainted with fel sickness, they serve Gul'dan as both Highguard and Council of War.
Abilities & Strategy
Overview
Each member of the council has a special attack that they will only use below 30% health. These effects will persist until the end of the encounter.
Tanks
- When Dia Darkwhisper uses Nightmare Visage, use defensive abilities to reduce the damage you take.
- Keep Dia Darkwhisper away from her allies, else they will gain the effects of Void Haze.
- Move away from the impact point of Gurtogg Bloodboil's Demolishing Leap to minimize damage taken.
Healers
- Dispel Dia Darkwhisper's Mark of the Necromancer before its damage becomes lethal, but do not dispel prematurely as doing so causes the effect transfers to 2 additional targets when dispelled.
- Use defensive abilities to maximize your chance of survival if Gurtogg Bloodboil targets you with his Fel Rage.
- Move away from the impact point of Gurtogg Bloodboil's Demolishing Leap to minimize damage taken.
Damage Dealers
- If you are afflicted with Mark of the Necromancer when Dia Darkwhisper casts Reap, the ground beneath your position will burn for the remainder of the encounter, so position yourself carefully.
- Use defensive abilities to maximize your chance of survival if Gurtogg Bloodboil targets you with his Fel Rage.
- Move away from the impact point of Gurtogg Bloodboil's Demolishing Leap to minimize damage taken.
Blademaster Jubei'thos
 Fel Blade
Spell detailsFelstorm
Spell details Windwalk
Spell details Mirror Images
Spell detailsHis Final Hour
Upon reaching 30% health remaining, Jubei'thos will begin to cast Wicked Strike. After his death the images of Jubei'thos will continue to haunt players, striking them from the shadows.
 Wicked Strike
Spell detailsDia Darkwhisper
 Void Bolt
Spell details Void Haze
Spell details Nightmare Visage
Spell details Mark of the Necromancer
Spell detailsIn Mythic difficulty, Mark of the Necromancer bounces to 3 targets, instead of 2.
 Reap
Spell details Burden of the Necromancer
Spell detailsWailing Horror
Spell detailsHer Final Hour
Upon reaching 30% health remaining, Dia Darkwhisper is overcome by darkness, applying Mark of the Necromancer to half of all remaining foes. In her madness, she will no longer use Reap.
Gurtogg Bloodboil
 Bloodboil
Spell details Acidic Wound
Spell details Fel Rage
Spell details Fury
Spell details Demolishing Leap
Spell detailsHis Final Hour
Upon reaching 30% health remaining, Gurtogg begins to cast Tainted Blood until he is defeated.
 Tainted Blood
Spell detailsLoot
32 drops · item level 44 to 45 · 13 slots (Back, Feet, Finger, Hands, Head, Legs +7 more) · all Bind on Pickup
Acid-Etched LegplatesBlade-Chipped WaistguardBladewalk Boots Blazing Demonhilt Sword
 Blood-Tanned PauldronsBloody Berserker's Bracers
 Cursed Blood Bracers
 Desecrated Shadowmoon InsigniaDia's Nightmarish Leggings
 Fel-Burning BladeFel-Crazed PauldronsGauntlets of Reckless Assault
 Girdle of Savage Resolve
 Gorget of Induced MadnessGurtogg's Discarded Hood
 Hazy Voidstone Band
 Hellfire MindbladeKilt of Self-ReflectionMindbender's FlamebladeMirror of the Blademaster
 Rivetspike CleaverRugged Bloodcaked Drape
 Sash of Guttural Intonation
 Shadowmoon Ancestry Ring
 Shimmering Voidstone Band
 Smoldering Felblade Remnant
 Spiked Bloodstone Pendant
 Spring-Loaded JawstaffViscera-Stained LongswordVoid-Pact LeggingsWailing Woe PauldronsWindswept Wanderer's Drape
Shadow-Lord Iskar
After Iskar's efforts to resurrect Terokk and return to power ended in frustration, he was approached by Gul'dan with an offer and a promise to break the ancient curse of Sethe. No longer flightless, elevated from the shadows yet still a master of illusion and deception, Iskar's hour of vengeance is at hand.
Abilities & Strategy
Overview
Shadow-Lord Iskar weaves illusions that deceive the raid, but the nearby Eye of Anzu provides the key to seeing through the twisted arakkoa's deception. Players may pass the Eye around among raid members to counter specific attacks of Iskar and his minions. Periodically, Iskar takes to the skies and channels powerful beams of fel energy, as his minions swoop down to attack on the ground.
Damage Dealers
- Pass the Eye of Anzu to players affected by Phantasmal Winds or Phantasmal Wounds.
- Move away from other players if targeted by Fel Chakram.
- Hold the Eye of Anzu to be able to interrupt Shadowfel Warden's Fel Conduit.
Healers
- Pass the Eye of Anzu to players affected by Phantasmal Winds.
- Focus healing on allies affected by Phantasmal Wounds or pass the Eye of Anzu to them.
- Move away from other players if targeted by Fel Chakram.
- Hold the Eye of Anzu to be able to dispel the Fel Bomb during Phantasmal Obliteration.
Tanks
- Pass the Eye of Anzu to players affected by Phantasmal Winds or Phantasmal Wounds.
- Move away from other players if targeted by Fel Chakram.
- Use a defensive cooldown or be in possession of the Eye of Anzu to survive Phantasmal Corruption.
 Eye of Anzu
Spell details Uncontrolled Radiance
Spell details Radiance of Anzu
Spell detailsShadow-Lord Iskar
 Focused Blast
Spell details Phantasmal Winds
Spell details Fel Chakram
Spell details Phantasmal Wounds
Spell detailsFel Incineration
Spell detailsShadow Riposte
Spell detailsPhantasmal Radiance
 Chains of Despair
Spell detailsDark Bindings
Spell detailsFel Raven
Phantasmal Corruption
Spell detailsShadowfel Warden
Fel Conduit
Spell detailsFel Chain Lightning
Spell detailsCorrupted Priest of Terokk
 Phantasmal Obliteration
Spell detailsPhantasmal Fel Bomb
Spell details Fel Bomb
Spell detailsIllusionary Outcast
Loot
31 drops · item level 1 to 45 · 13 slots (Back, Chest, Feet, Finger, Hands, Head +7 more) · 1 tradeable
 Amice of Phantasmal Power
 Anzu's Cursed Plume
 Band of Enthralling DelusionBeaked Hood of Betrayal
 Belt of Misconceived LoyaltyBracers of Supreme DespairChakram-Gripping GlovesChestguard of Ill FateCloak of Desperate TemerityCoif of Untrue SightCorrupted Talonguard ChestplateCorrupted Talonguard Pendant
 Cursefeather Cloak
 Deceiver's Felbeak Wand
 Demonspine Wand
 Ensnared Orb of the SkyFeather-Embellished Wristclamps
 Filigreed Loop of Zealotry
 Flickering Nightstone BandHelm of Imagined HorrorsPhantasmal CummerbundRaiment of Divine Clarity
 Ring of Foul Temptation
 Shadowrend TalonbladeSoul Prison SolitaireSurefooted Chain Treads
 Talon-Link Loop
 Unblinking Gaze of SetheVestment of Illusory Might
 Wristplate of the WretchedCorrupted Nest Guardian
Archimonde
One of the original eredar who betrayed the draenei of Argus to take his place as the sinister hand of the dark titan Sargeras, Archimonde the Defiler commands the military might of the Burning Legion. He arrives in Draenor, reaching across space and time, to ensure that the invasion of Azeroth proceeds as planned, and that Gul'dan does not fail his Legion masters.
Abilities & Strategy
Overview
Archimonde assaults players with the might of the Burning Legion, gaining new abilities each time his health is reduced by 15%, eventually summoning Rain of Chaos to destroy Draenor. When a player is launched into the air by Shadowfel Burst, their allies must catch them to avoid fatal damage. As Archimonde Desecrates the land, players must protect themselves with the Light of the Naaru. When Archimonde reaches 40% health remaining, he begins to cast Nether Banish, sending players to the Twisting Nether.
Damage Dealers
- Destroy Doomfire Spirits quickly before they create too much Doomfire.
- Wrought Chaos inflicts heavy damage if aimed towards other players.
- Shackled Torment inflicts lethal raidwide damage if mutliple shackles are broken at once.
- Infernal Doombringers will begin to cast Hellfire if not killed quickly.
Healers
- Desecrate inflicts increasing raidwide damage to players without Light of the Naaru.
- Shadow Blast significantly increases Shadow damage taken by Death Brand.
- Shackled Torment inflicts heavy raidwide damage each time it is broken.
Tanks
- Death Brand inflicts massive initial damage and periodic damage until Hellfire Deathcallers are killed.
- Nether Banish sends tanks to the Twisting Nether along with any other players within 10 yards.
Stage One: The Defiler
Doomfire
Spell detailsIn Mythic difficulty, Doomfire is consumed when a player comes into contact with it. This effect stacks up to 15 times. When the Doomfire debuff expires, a new patch of Doomfire is created at that player's location.
Allure of Flames
Spell detailsIn Mythic difficulty, Allure of Flames inflicts Fire damage to all players for each Doomfire that is moved.
 Shadowfel Burst
Spell detailsIn Mythic difficulty, Shadowfel Burst targets 3 players.
 Death Brand
Spell detailsHellfire Deathcaller
Demonic Art: Desecration
When Archimonde reaches 85% health remaining, he summons corruption that erupts from the ground.
Desecrate
Spell detailsYrel
Stage Two: Hand of the Legion
When Archimonde reaches 70% health remaining, he calls on new powers to destroy his enemies.
Shackled Torment
Spell detailsIn Mythic difficulty, the range of Unleashed Torment is limited to.
Unleashed Torment
Spell detailsIn Mythic difficulty, the range of Unleashed Torment is limited to.
Wrought Chaos
Spell detailsIn Mythic difficulty, all players become the target of either Wrought Chaos or Focused Chaos when Archimonde casts Wrought Chaos.
Allure of Flames
Spell detailsIn Mythic difficulty, Allure of Flames inflicts Fire damage to all players for each Doomfire that is moved.
Death Brand
Spell detailsHellfire Deathcaller
Demonic Art: Vanguard of the Legion
When Archimonde reaches 55% health remaining, he summons the vanguard of the Burning Legion.
Felborne Overfiend
Dreadstalker
Stage Three: The Twisting Nether
When Archimonde reaches 40% health remaining, he calls on the Twisting Nether to destroy his enemies. When Archimonde reaches 40% health remaining, he transcends. All of his enemies are drawn helplessly into the Twisting Nether, an endless, chaotic space from which few have ever returned...
Demonic Feedback
Spell detailsShackled Torment
Spell detailsIn Mythic difficulty, the range of Unleashed Torment is limited to.
Unleashed Torment
Spell detailsIn Mythic difficulty, the range of Unleashed Torment is limited to.
Wrought Chaos
Spell detailsIn Mythic difficulty, all players become the target of either Wrought Chaos or Focused Chaos when Archimonde casts Wrought Chaos.
 Nether Banish
Spell detailsLiving Shadow
Living Shadow periodically spawn from the Nether Portal and attack players. Each time a Living Shadow spawns from a portal, the rate at which they spawn is increased.
The Nether
Demonic Art: Rain of Chaos
When Archimonde reaches 25% health remaining, he summons a massive meteor to destroy Draenor.
 Rain of Chaos
Spell detailsLoot
42 drops · item level 30 to 45 · 12 slots (Back, Chest, Feet, Hands, Head, Legs +6 more) · all Bind on Pickup
 Bleeding Hollow Toxin Vessel
 Calamity's Edge
 Choker of the Great BetrayerCloak of Incendiary Wrath
 Core of the Primal Elements
 Decree of Demonic SovereigntyDemonbreaker Chestplate
 Demonbuckle Sash of Argus
 Demon Prince's Ascendant Crown
 Doomcrier's Shoulderplates
 Edict of ArgusEredar Fel-Chain GlovesEtching of SargerasFelfinger RuneglovesFelfume Robes
 Felsteel Annihilator
 Fractured Soulgem Staff
 Fragment of the Dark Star
 Gavel of the Eredar
 Grasp of the Defiler
 Greatsword of ChaosIronpelt Jerkin
 Libram of Vindication
 Mantle of the Eredar Lord
 Portent of Disaster
 Pressure-Compressed LoopRancorbite Chain Shirt
 Reaper's Harvest
 Repudiation of War
 Sacred Draenic Incense
 Seed of CreationShadeflesh LegguardsStompers of Echoing Doom
 Talisman of the Master Tracker
 Tome of Shifting Words
 Treads of the Defiler
 Unquenchable Doomfire CenserVintage Draenic HandguardsVoidsight Hood
 Waistwrap of Banishment
 Worldbreaker's Resolve
 World Ender's Gorget
Xhul'horac
Summoned by Gul'dan from the depths of the Twisting Nether, Xhul'horac is one of most powerful of the Void Revenants - a race of parasitic void-beings that tear holes through the planes of reality, consuming and absorbing the energies and beings within. Gul'dan has twisted Xhul'horac, feeding him overwhelming Fel energy, and using his powers to tear open the portals through which he plans to rally the forces of the Burning Legion.
Abilities & Strategy
Overview
Two portals dominate Xhul'horac's room: one powered by void, and one by the Legion's fel magic. Xhul'horac activates the Fel portal first, granting him fel abilities and summoning first Imps and then Vanguard Akkelion. When Akkelion dies, Xhul'horac activates the void portal, granting him void abilities and summoning Unstable Voidfiends and then Omnus. Once Omnus is defeated, Xhul'horac gains the energy of both fel and void, rapidly switching between elements. Once he reaches 20% health, he completely absorbs the power of both portals and must be quickly defeated.
Damage Dealers
- Interrupt or intercept Fel Orb when you are not Voidtouched to avoid spreading Chaotic Felblaze.
- When affected by Chains of Fel, move away from other chained players.
- Close Black Hole by moving into its center, alongside other players to split the damage from Singularity.
Healers
- When affected by Chains of Fel, move away from other chained players.
- Close Black Hole by moving into its center, alongside other players to split the damage from Singularity.
- Overwhelming Chaos will inflict heavy damage to the raid.
Tanks
- When Xhul'horac gains Shadowfel Phasing, alternate which tank is hit by Void Strike and Fel Strike to avoid Shadowfel Annihilation.
- Withering Gaze and Felblaze Flurry deal increasing damage each time they hit, and will drastically increase the damage of Void Strike and Fel Strike.
- Falling off of Xhul'horac's platform is deadly! Beware the knockback from Void Strike and Fel Strike.
Unleashed Energies
Throughout the encounter, Xhul'horac focuses the wild energy of fel and void in his summoning chamber, letting them smolder out of control - and mixing them with deadly results.
Feltouched
Spell details Voidtouched
Spell detailsChaotic Felblaze
Spell detailsFelsinged
Spell details Creeping Void
Spell details Wasting Void
Spell details Shadowfel Annihilation
Spell detailsStage One: The Legion's Flame
Xhul'horac, tainted with Fel energy, summons forth servants of the Legion and attacks with Fel magic.
 Fel Strike
Spell details Fel Surge
Spell detailsVanguard Akkelion
 Felblaze Flurry
Spell detailsChains of Fel
Spell detailsWild Pyromaniac
 Fel Orb
Spell detailsStage Two: Grasp of the Void
Xhul'horac opens the Void portal, summoning forth fellow Void creatures and drawing strength from the power of the Void.
 Void Strike
Spell detailsVoid Surge
Spell detailsOmnus
Withering Gaze
Spell detailsBlack Hole
Spell detailsUnstable Voidfiend
Volatile Voidstep
Spell detailsOn Mythic Difficulty, each cast of Volatile Voidstep will reduce the cast time of subsequent casts.
Stage Three: The Shadowfel Amalgamation
Overwhelmed by channeling a combination of Void and Fel energies, Xhul'horac's form begins rapidly shifting between one dominated by Fel and Void magic.
 Shadowfel Phasing
Spell detailsEmpowered Chains of Fel
Spell detailsFel Snapback
Spell detailsEmpowered Black Hole
Spell details Empowered Singularity
Spell detailsFel Strike
Spell detailsFel Surge
Spell detailsVoid Strike
Spell detailsVoid Surge
Spell detailsStage Four: Tearing Apart
Xhul'horac completely absorbs the energy of both the Void and Fel portals, preventing any new creatures from coming through them, and rapidly destabilizing.
 Overwhelming Chaos
Spell detailsLoot
33 drops · item level 44 to 45 · 12 slots (Back, Feet, Finger, Head, Legs, Neck +6 more) · all Bind on Pickup
Bracers of Tainted Magic Breach-Scarred WristplatesCountenance of the Revenant
 Deathrattle ShoulderpadsDemonbreaker CrushersDemongaze PauldronsFelblade SpauldersFelfume SlippersFerroleather Spaulders
 Fiendsbreath WarmaceGirdle of Volatile DualityHammer of Wicked InfusionHood of Unknowable SecretsIronpelt Boots
 Loop of Beckoned ShadowsMantle of the Arcanic ConclaveMantle of the Hurricane's Eye
 Oathclaw MantlePauldrons of Iron WrathPauldrons of the Living MountainPauldrons of the Savage HuntPious MantlePortal Key SignetRancorbite SabatonsShadowfel CordShoulderplates of the Ceaseless VigilSinister Felborne HelmetStoic Netherfel Legplates
 Unstable Felshadow Emulsion
 Vial of Immiscible Liquid
 Voidcore GreatstaffVoid Lord's Wizened Cloak
 Voidthread Spineguard
Collectibles from Hellfire Citadel
2 collectibles whose in-game collection entry names Hellfire Citadel as a source.
Mounts (1)
Battle pets (1)
Quests
9 quests Blizzard’s quest data files under Hellfire Citadel, all for level 40:
- Reward:67 gold92 silver
- Reward:67 gold92 silver
- Reward:67 gold92 silver
- Reward:500 reputation with Cenarion Circle
- Reward:67 gold92 silver
- Reward:67 gold92 silver
- Reward:33 gold96 silver
- Reward:33 gold96 silver

Achievements
20 achievements tied to Hellfire Citadel, worth 170 achievement points in total.
 HellbreachDefeat the following bosses at the entrance to Hellfire Citadel:10
 Halls of BloodDefeat the following bosses in the depths of Hellfire Citadel:10
 Bastion of ShadowsDefeat the following bosses in the upper reaches of Hellfire Citadel:10
 Destructor's RiseDefeat the following bosses in the upper reaches of Hellfire Citadel:10
 The Black GateDefeat Archimonde in Hellfire Citadel.10
 Time is a Flat CircleDefeat Archimonde on Normal difficulty or higher, before the release of patch 7.0.
"Everything we have ever done or will do, we are going to do over and over and over again."Garrison Monument Reward: The King in Green
- Ahead of the Curve: The Black GateDefeat Archimonde on Heroic difficulty or higher, before the release of patch 7.0.
- Cutting Edge: The Black GateDefeat Archimonde on Mythic difficulty, before the release of patch 7.0.
 Nearly IndestructibleComplete the Hellfire Assault encounter in Hellfire Citadel while keeping the Hellfire Cannons above 90% health on Normal difficulty or higher.10
- Turning the TideKill 10 Hellfire Guardians, then defeat the Iron Reaver in Hellfire Citadel on Normal difficulty or higher.10
 Waves Came Crashing Down All AroundDefeat Kormrok in Hellfire Citadel without taking damage from any of the waves on Normal difficulty or higher.10
- A Race Against SlimeDefeat Kilrogg Deadeye in Hellfire Citadel with Ariok surviving the encounter on Normal difficulty or higher.Follower: Ariok10
 Get In My Belly!Defeat Gorefiend after killing the Soul of the Crone in Hellfire Citadel on Normal difficulty or higher.10
- Pro TossDefeat Shadow-Lord Iskar in Hellfire Citadel without anyone holding the Eye of Anzu for more than 5 seconds in a row, on Normal difficulty or higher.10
 I'm a Soul ManDefeat Socrethar the Eternal in Hellfire Citadel after killing 20 Haunting Souls within 10 seconds on Normal difficulty or higher.10
 This Land Was Green and Good Until...Defeat Fel Lord Zakuun in Hellfire Citadel without absorbing any Rumbling Fissures on Normal difficulty or higher.10
 You Gotta Keep 'em SeparatedDefeat Xhul'horac in Hellfire Citadel without triggering any Shadowfel Annihilations on Normal difficulty or higher.10
- Non-Lethal EnforcerDefeat Tyrant Velhari in Hellfire Citadel without killing the Ancient Enforcer on Normal difficulty or higher.10
 Bad Manner(oth)Kill a Doom Lord using Empowered Felseeker, then defeat Mannoroth in Hellfire Citadel on Normal difficulty or higher.10
- Echoes of DoomfireDefeat Archimonde in Hellfire Citadel with Doomfire still active on Normal difficulty or higher.10
More Warlords of Draenor Raids
Other raids from the same expansion.